
A Photo Guide to Easter Island
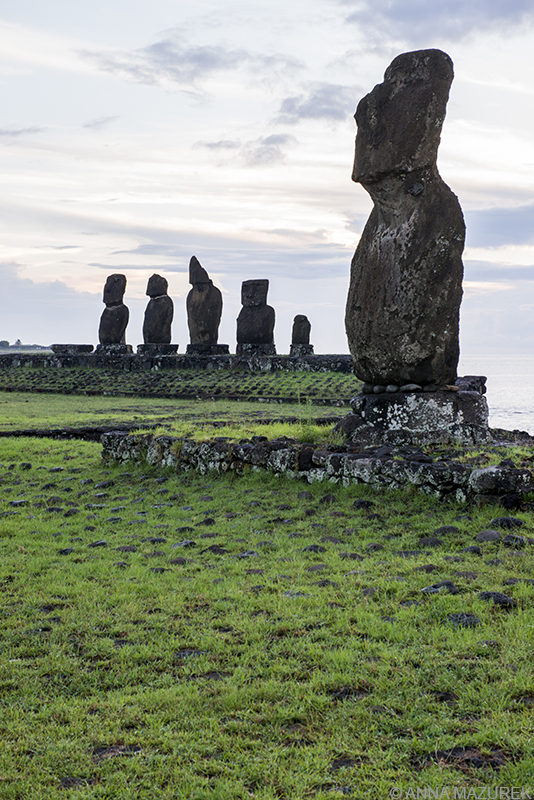
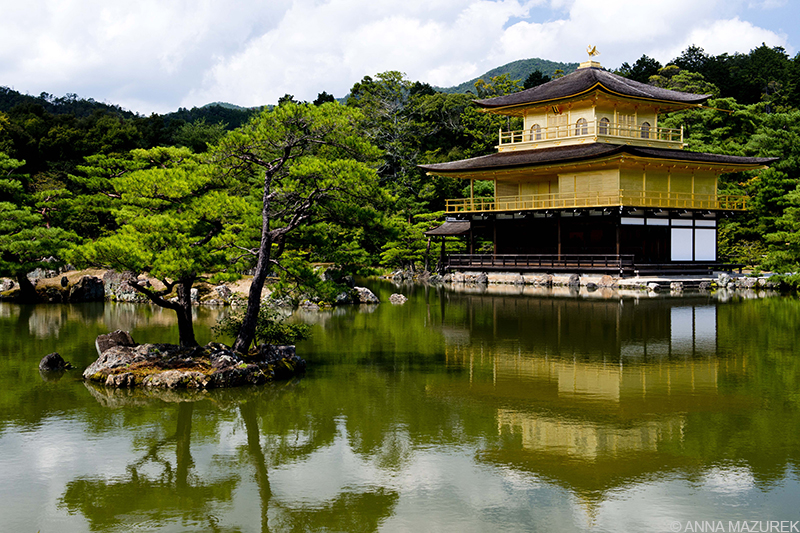
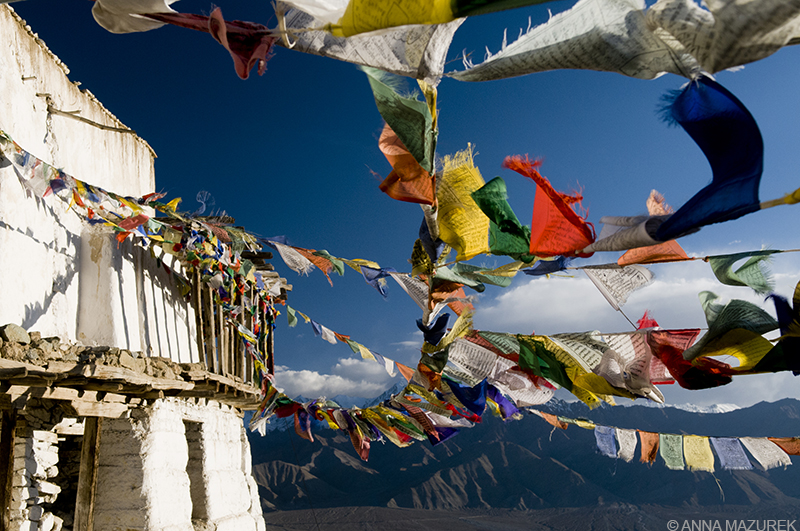
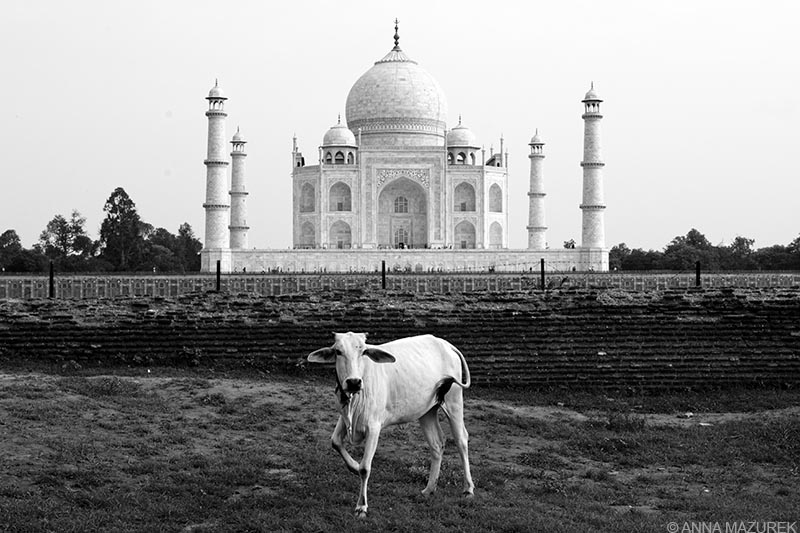
Ahu Tongaraki is normally a popular sunset spot on Easter Island, but I prefer to photograph it in the late afternoon when the light highlights the detail in the moai statues.
This day could not be more perfect— blues skies, windows down and Jack Johnson on the radio.
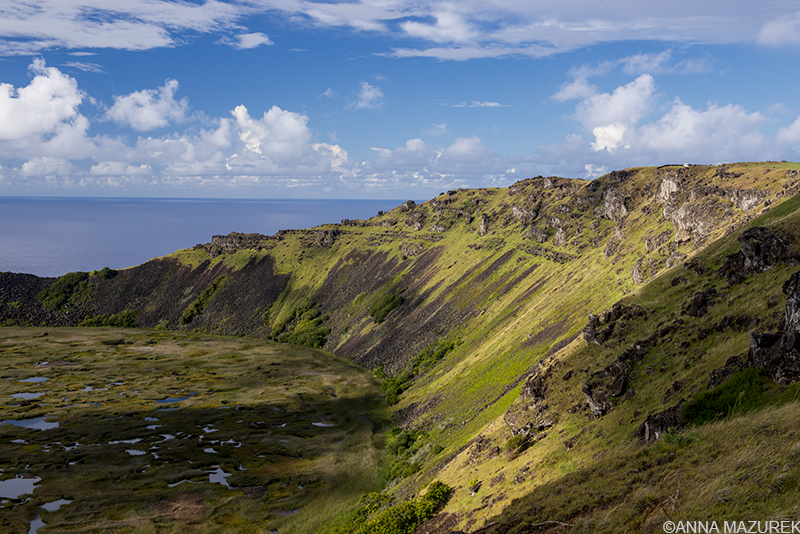
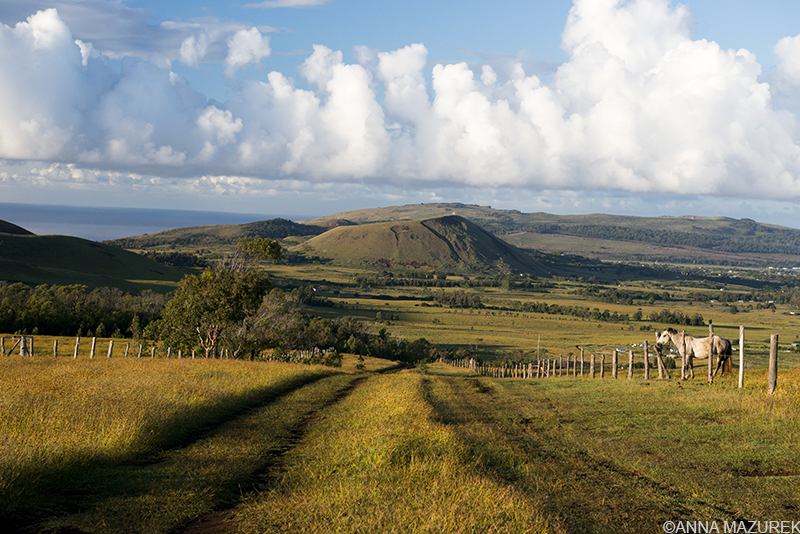
The view is stunning—steep cliffs lined with moai statues hover over the Pacific Ocean. I slow the car down to let the wild horses cross the road. The tiny island is one of the most remote and unique places on the planet. It lies in the middle of the Pacific 2,290 miles from mainland Chile; the nearest inhabited island is 1,150 miles away. It’s only 14 miles wide and with an extinct volcano at each end of the island.
The history of Easter Island, known as Rapi Nui to the natives, is turbulent. Polynesians first discovered the island between the 4th and 8th century. They built the famous towering moai statues on top of stone platforms called ahu. Tribal wars irrupted over land, and statues were toppled. A lack of resources from slash and burn agriculture techniques among other factors led to massive deforestation, which is still present today. The Dutch arrived on Easter day in 1722 and named it Easter Island, which is called Isla de Pascua in Spanish.
The island’s airport is the most remote in the world and has a fascinating history. It was built by the U.S. Air Force in 1966, which opened the island to tourism. The runway was later widened by NASA as an abort site for the space shuttle allowing larger jets to land.
Rising seas, erosion and climate change are a major threat to the tiny island and make it important than ever to visit NOW. Check out my detailed photo guide to the top sites including photography tips, logistics, costs and budget tips! This was one of my favorite parts of my four-month South America trip! Keep reading for my favorite things to do on Easter Island along with photo tips.
A series of trails wind through Rano Ranaku, the quarry where all the statues were made.
History of the Moai Statues on Easter Island
Easter Island is famous for all the moai statues—gigantic carved figures made of volcanic rock lined up on platforms called ahus. The statues represent the ancestors of the Rapi Nui people and once overlooked a village site. Some statues have hats or topknots called pukao that resemble the hairstyle of the natives. All of the moai that are standing have been restored.
For a good history lesson, watch the NOVA PBS documentary on Easter Island before you go. It’s available on PBS and YouTube.
Anakana was the sight of the first settlement on Easter Island, known as Rapi Nui to the native people. It’s the only white sand beach on the volcanic island.
Rapa Nui National Park Tickets for Easter Island
The majority of the sites on Easter Island are part of Rapa Nui National Park. A ticket is required at every major site. Tickets are $80 or 54,000 Chilean pesos and available at the airport. Check the current exchange rate to see which is best. I saved $9 buy paying in USD. Tickets are valid for 10 days. You can only visit Ranu Raraku and Orongo Ceremonial Village once per ticket. The other sites allow multiple entries. You can pay by credit card but only in pesos. No drones are allowed on the island.
Park Hours
Rano Raraku, Orongo, Anakena, Tahai, Ahu Akivi
Monday & Wednesday 9:30 a.m. – 8 p.m.; Other days 9 a.m. – 8 p.m.
All other sites close at 6 p.m. and open at the same time above. Several of the sites are still visible from the road for photography outside these hours.
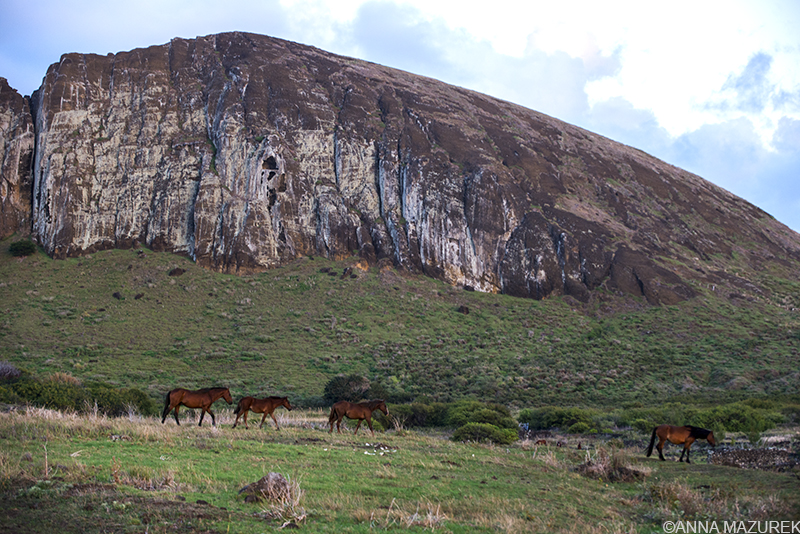
Wild horse roam at the base of the Rano Raraku volcanic crater.
Things to See on Easter Island
Hanga Roa
This is the only town on the island and it’s where all the accommodation, restaurants and nightlife are clustered. It’s also home to the anthropology museum, Museo Antropológico Sebastian Englert, which is the best place to start your trip to get an introduction to the culture and history. Admission is free.
Most tourism agencies, rental car centers and grocery stores are located along Avenue Atamu Tekena. There’s two banks in town with currency exchange ange ATMs. (Banco Estadio & Banco Santander). We used the Santander ATMs and had no issues with our Visa debit cards.
There’s a small swimming area in the town called Playa Pea. There’s no proper beach, but it’s a good place to cool off. There are a few restored moai scattered around the edges of town but are not as grand as others on the island.
Ahu Akapu with Ahu Tahai in background. Both sites are walking distance from Hanga Roa.
Ahu Tahai & Ahu Akapu
On the coast north of Hanga Roa is Ahu Tahai, which supports five moai. There’s a lone moai with eyes on the adjacent cliff, Ahu Akapu. It’s a very popular sunset spot and an easy walk from town.
Best time for photography: Sunset for a silhouette photo or early morning when the light highlights the details in the statues.
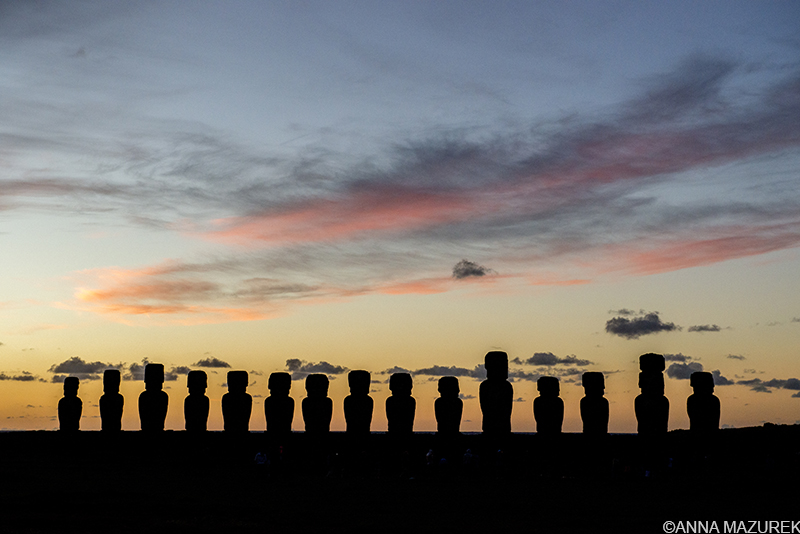
The gates at Ahu Tongariki opened just before sunrise, and there was a crowd of about 25 people waiting. The site is huge so it didn’t feel overcrowded when I visited in March. Crowds might be more of an issue in the peak season (Dec. to Feb.).
Ahu Tongariki
The most popular sunrise spot is Ahu Tongariki, the largest ahu on the island with 15 statues. The scenery behind the 15 statues is breathtaking – the towering cliffs of Peninsula Poike. The sunrises directly behind the statues providing the famous silhouette photo. The moai have their backs to the water and face the ruins of an old village site. There are some petroglyphs near the far end of the site by the road. I personally prefer going back here late in the afternoon when the details of the moai really stand out.
Best time for photography: Late afternoon or sunrise (silhouettes only)
Rano Ranaku is best photographed early in the morning or late in the afternoon to get the details in the statues. This was shot right after the site opened in the morning.
Rano Raraku
All of the moai on the island came from the quarry of Rano Raraku, known as the “nursery.” The sides of the gigantic volcanic crater are covered with moai in various stages of construction. It’s also home to a unique kneeling moai on the southeastern side.
Best time for photography: For good side light, late afternoon or morning is best. The only trouble is keeping people out of the frame. Keep your fingers crossed for a cloudy day!
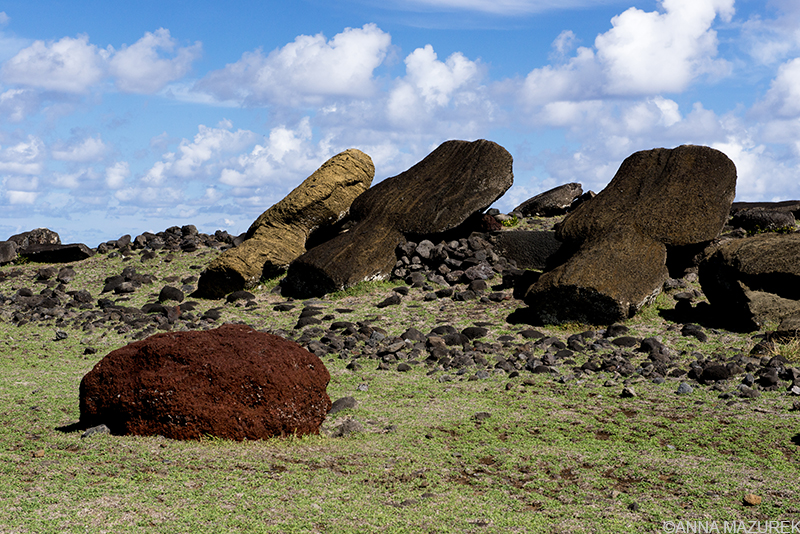
Ahu Vaihu is one of many sites on the island that hasn’t been restored. All of the standing moan statues were restored starting in the 1960s.
Ahu Vaihu & Additional Sites on Southern Coast of Easter Island
Along the road to Ahu Tongariki, there’s several platforms with broken moai laying facedown. At Ahu Vinapu, one of the platforms has mortar-less blocks similar to the Inca ruins in Peru.
Best time for Photography: Late afternoon when the sun is shining on the statues.

Orongo Ceremonial Village lies on the edge of an extinct volcano on Easter Island.
Ranu Kau & Orongo Ceremonial Village
Stunning the best word to describe Orongo Ceremonial Village. It’s perched on the top edge of a crater lake called Ranu Kau and a cliff above the ocean. The walls of the short houses are made of stacks of thin stone slabs and offer views of small offshore islands. The village was the epicenter for an island-wide bird cult during the 18th and 19th centuries and features bird petroglyphs.
Orongo can be reached by car and is 4 kilometers from town. There’s also a short, direct hike from Hang Roa. There’s a viewpoint of the crater that’s accessible before you reach the village that doesn’t require a ticket.
The Ranu Kau crater is best photographed when the light is overhead. If you go too early or late in the day, there will be shadows along the edges like this photo which was taken early in the morning.
Best time for photography: The village faces west so afternoon or sunset light is best. The site is fairly empty by 6 p.m. The crater is best photographed in the afternoon or midday when the sun shines into the carter. If you wait too late, you’ll have dark shadows on the western side and center of the crater.
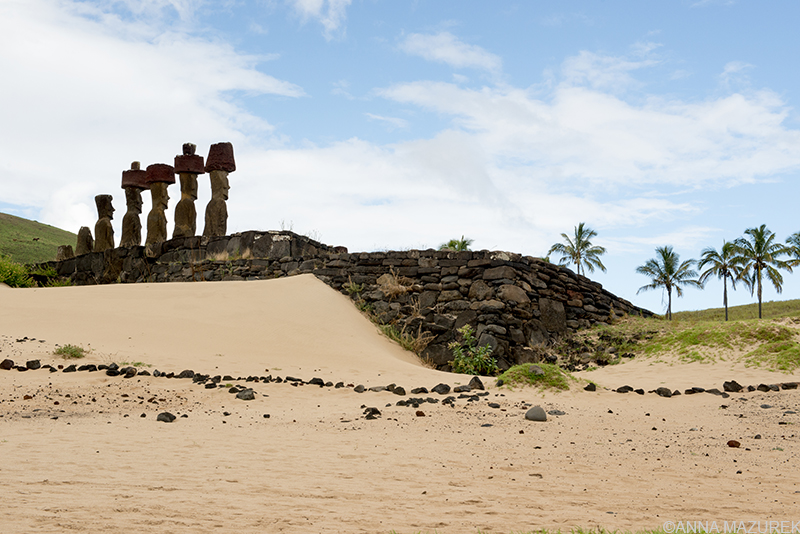
Ahu Nau Nau is the star attraction of Anakena beach. The platform is home to seven moai statues.
Anakena Beach, Easter Island
Anakena is the most photogenic spot on the island and the site of the first settlement. The white-sand beach is lined by palm trees that surround the main attraction – an ahu of seven moai with topknots known as Ahu Nau Nau. This set of moai statues has more topknots than any other restored ahu on the island. There’s another lone moai, Ahu Ature Huki, to the right. A handful of over-priced restaurants and bars line the eastern side of the beach. The crystal-clear waters are a great refuge from the heat.
Best time for photography: Afternoon or sunset. Since the moai face away from the ocean, you need to afternoon light to get good detail in faces of the statues.
The trail to Maunga Terevaka, the island’s highest point, is gorgeous and very easy.
Maunga Terevaka
Climbing to the top of Maunga Terevaka is the only way to really grasp the small size of the island. It is one of the three extinct volcanos and the tallest point on the island. From the top, you can see the ocean on all sides of the island. It’s accessible by foot or horseback. It’s a very easy walk, and the trail is obvious. Go at sunrise when it’s cool, and you’ll have the place to yourself. It took us a little more than an hour to climb stopping a lot for photos. The scenery on the way to the top is just as amazing as the view.
Best time for photography: Sunrise
Puna Pau
This volcanic quarry is the source of the red cylinder topknots that adorn the statues called pukao, which are thought to resemble the hairstyle worn by the native tribes. Over sixty pukaos were transported around the island and another 25 lie near or at the quarry.
Best time for photography: Late afternoon or early morning to get detail in the pukaos.
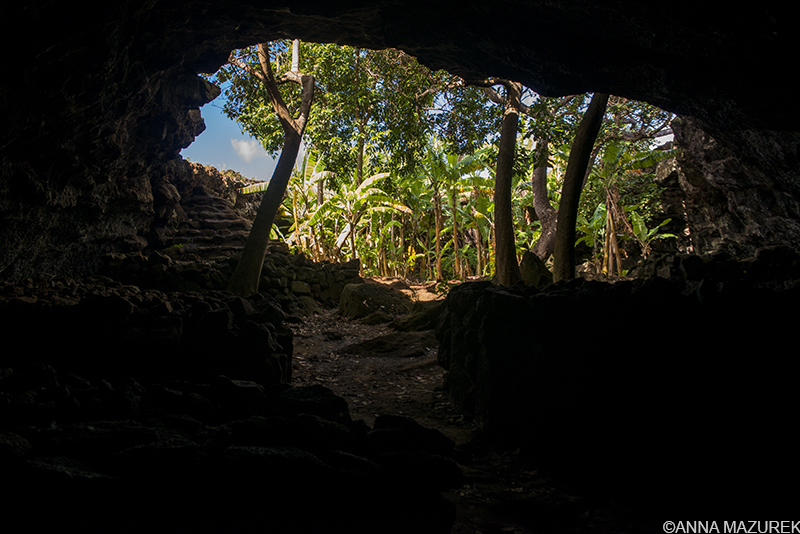
Ana Te Pahu Cave is the largest cave on the island.
Ahu Akivi & Ana Te Pahu Cave
These are the only moai that face the ocean, and the only ones not located along the coast. The seven moai on this ahu were restored in 1960 and have an astrological meaning. During the equinoxes, the statues directly face the setting sun. The trail to Maunga Terevaka starts at the edge of the parking lot.
If you turn left at the entrance to Ahu Akivi, there’s a road that leads to the entrance booth for Ana Te Pahu Cave. You must walk 15 minutes to the cave itself. It’s totally walkable from the parking lot of Ahu Akivi as well. It’s the largest cave on the island and over 7 kilometers long and overgrown with bananas and sweet potatoes.
Best time for photography: Late afternoon light shines directly on the statues and highlights the detail. I was always here in the mornings, and the light was pretty horrible.
The face of a moai statue lies on the ground on the rugged Northern Coast of Rapi Nui. The northern portion of the island has no roads and is very isolated.
North Coast
Hiking the Northern Coast is the best way to experience the REAL Easter Island. There are no roads leading to this section and none of the moai or sites have been restored. You pass several toppled moai, extensive amount of petroglyphs, stone houses and a few caves. Keep an eye out for the lone standing moai that’s hidden in one of ahus. The hike is fairly easy and takes roughly five to six hours. It starts near the Ana Te Pahu cave and ends at Anakena.
This moai statue on the Northern coast was lowered and hidden as part of the platform to prevent it from being toppled during tribal wars.
A guide is recommended since none of the locations are marked by signs, and there’s no real trail. Tour companies offer half-day hiking trips for around $200/person. Ask around for a local guide for a cheaper rate, which is how we got a guide for $80/person.
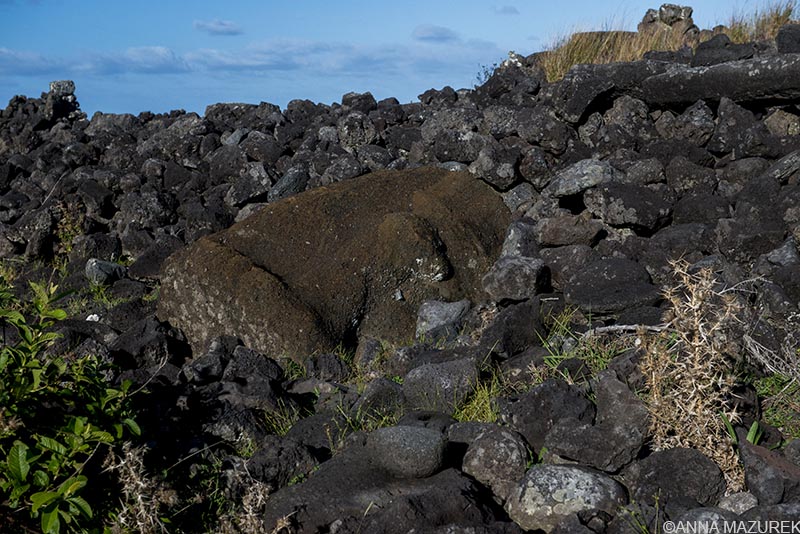
Petroglyphs are scattered all over the island. The best ones are along the untouched northern coast like this one above.
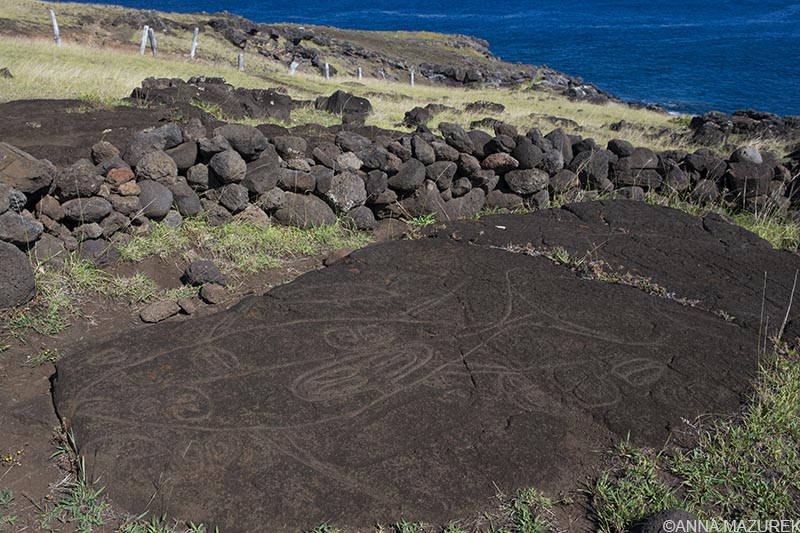
Papa Vaka Petroglyphs
These petroglyphs are located between Anakena and Ahu Tongariki. They are the easiest ones to reach but not as good as the ones along the remote Northern coast.
This isn’t a complete list of sites because there were a few sites we didn’t make it to because of weather. These are the best ones for photography.
Easter Island Logistics:
Costs, Transport & Accommodation
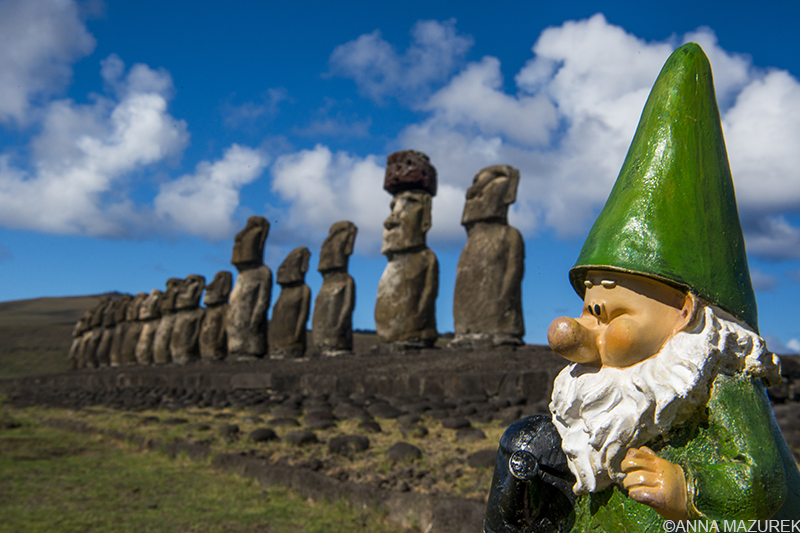
Alfred the gnome believes this shot of him at Ahu Tongariki is one of his best travel photos to date.
Best Time to Visit Easter Island
It’s a great location year-round except for April when it rainfall is the highest. Summer (December to February) is the busiest season especially around the annual Tapati Rapi Nui Festival in February. Temperatures hover in the low 80s F and don’t usually drop below 60 in the winter months. Driest months are October for February. I went in late March to avoid the crowds and get the best weather. It rained a few times, but it was brief.
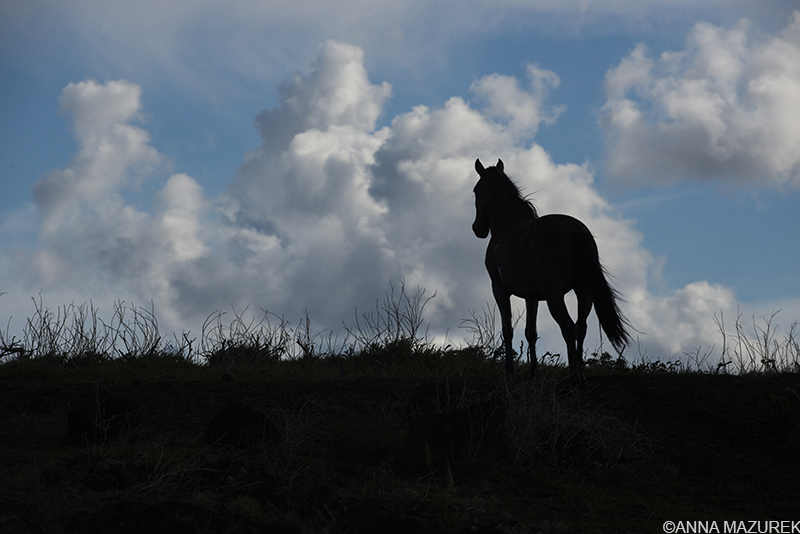
The wild horses were the biggest surprise about Easter Island for me. While many of the horses are branded, they roam free and often hang out in the roads. Be careful when driving.
Seven-Day Trip to Easter Island Costs
Groceries: 49.18
Beer: $5.41
Gas: $22.16
Rental Car for 3 days: $173.35
National Park Ticket: $80
North Coast Hike: $82.08
Accommodation: $123.89
Total Cost: $553.23
This does NOT include my flight, which cost $887 from Santiago roundtrip. (I bought the flight with the miles on my Chase Sapphire Card, which is currently the best rewards card on the market.) Flights range from $400-$1200 roundtrip. I booked my flight six months in advance.
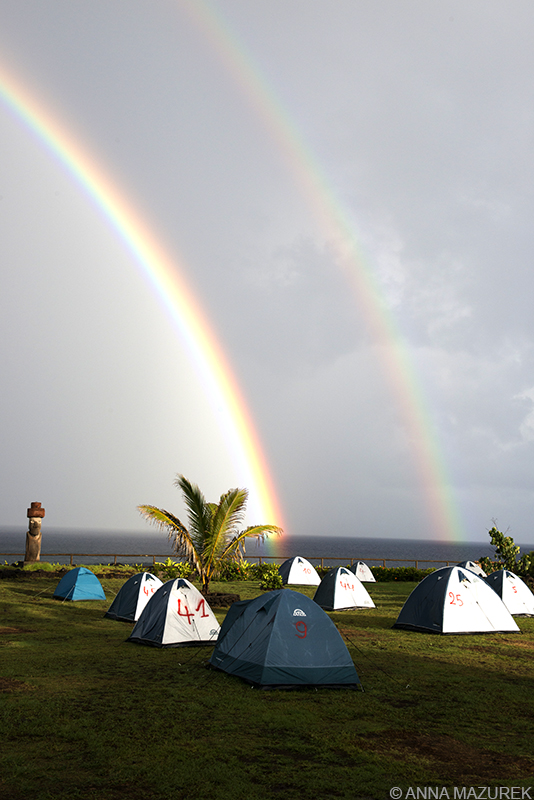
After a heavy rainstorm one morning, these double rainbows appeared at Camping Mihinoa, our accommodation. While we stayed in a room inside one of the buildings, many people rented tents and camped.
Budget Tips for Easter Island
- Book your flight 6-9 months in advance. Flights can be as low as $400 roundtrip from Santiago nine-months in advance! LATAM is the only airline with service to Easter Island. There are eight flights a week from Santiago and one flight on Monday nights that continues to Tahiti. It’s the nicest airline in South America.
- Camp or book budget accommodation. My friend and I stayed at Camping Mihinoa and rented a private room with two beds with a shared bathroom for $40 USD/night. That’s $20/each, which is the cost of most hostels in mainland Chile. They also offer tents and dorms for cheaper rates – usually $15/person. The place was spotless and had a good location.
- Trip Length. Four to five days is sufficient to see the island. Flights just worked out cheaper for us to stay longer, which is why we stayed six nights.
- Cook. Food is insanely expensive! This partly due to the remoteness of the island and lack of resources. We cooked the entire trip except for a small meal out when we arrived. Fish and chips at a restaurant was $30 USD! Beer was $6 at the grocery store!
- Take food with you. I saw people check bags of food on the flight. There isn’t much variety of food on the island or in the grocery stores so if you are on a budget, pack what you can!
- Take USD. Sometimes, it’s cheaper to have USD with you. For example, I saved $9 paying in USD for the Easter Island park entry fee in USD.
- Check the exchange rate. Many things are listed in both USD and Chilean Pesos. I use the free XE app to check prices to see which currency is the best deal. I saved $54 paying for my six-night accommodation on the island in pesos.
- Rent Your Own Car. If you can drive a manual transmission car and have a group of people, it’s significantly cheaper to explore the island on your own. Plus, you’ll get better photos since the tours are always during the worst time of the day for photos. It’s $60/day for a manual transmission car and $100/day for an automatic transmission. Day tours start at $120 USD/person! Gas isn’t cheap so keep that in mind. I still think the flexibility is worth the price of renting a car.
- Expect Bad Wifi. Accept the fact that you are in the middle of the Pacific Ocean. Wifi is painfully slow.
7 Reasons to Visit Uruguay
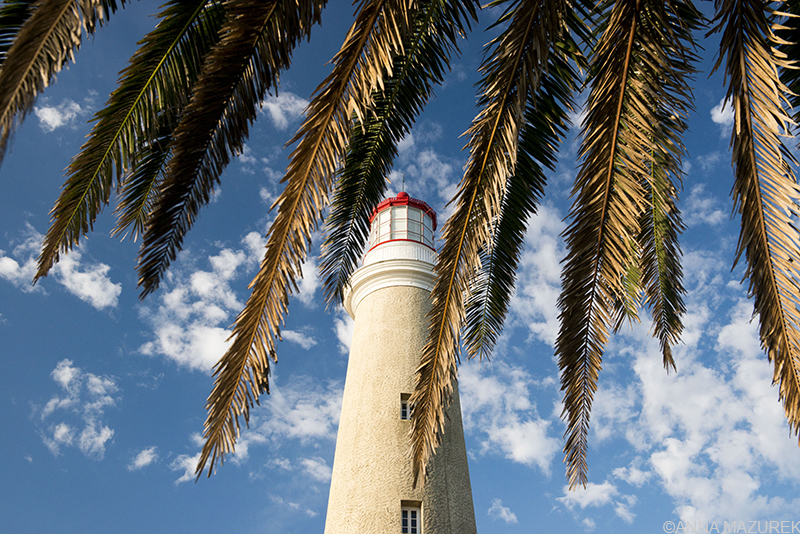
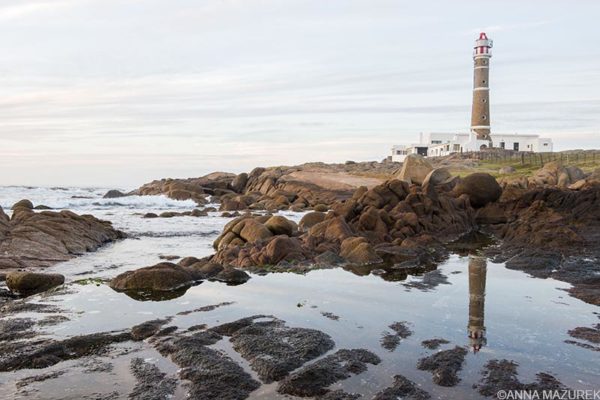
Punta del Este Lighthouse, Uruguay
Safe, stable Uruguay is the underdog of South America, sandwiched between its dramatic, flashy neighbors of Argentina and Brazil who often steal the spotlight. The progressive nation is the Switzerland of the South America filled with delicious restaurants, colonial charm and stunning beaches. It’s often overlooked but easily accessible with direct flights from the U.S.
I first visited Uruguay for a brief stint in 2015 to stock up on U.S. dollars from the ATMs to take back to Argentina, which at the time had higher rates for dollars on the black market than the ATM. This year I spent some time exploring more of the country and fell in love.
Here’s 7 places you can’t miss in Uruguay:
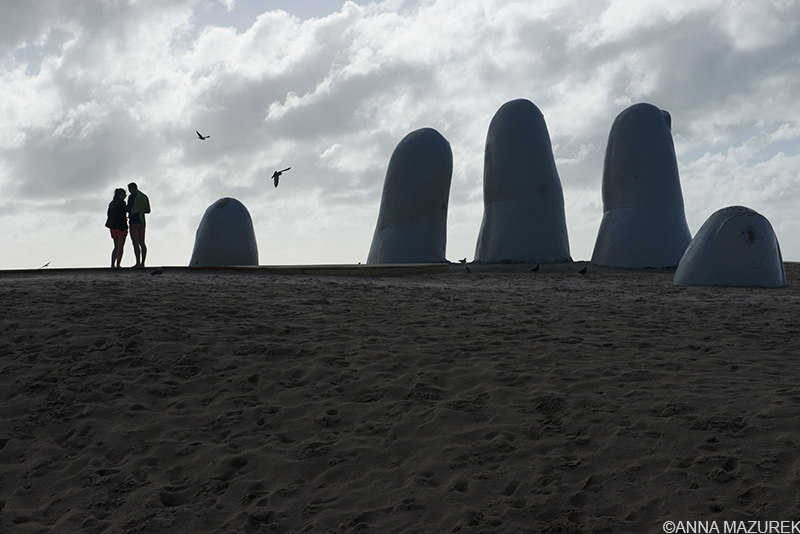
El Mano en la Arena sculpture in Punta del Este , Uruguay; photography by Anna Mazurek. Images cannot be used without permission.
1. La Mano en La Arena
Chances are high you’ve seen photos of this iconic statue of a hand in the sand in the glitzy beach town of Punta del Este. The statue is by Chilean artist Mario Irarrázabal and was completed in 1982. Sunrise is the only time the statue isn’t mobbed by hordes of selfie-stick welding tourists.
Zucchini Ravioli at Toledo Tapas in Montevideo, Uruguay
2. Toledo Tapas
This hidden lunch spot was hands down one of the best meals I had in the past three months in South America. The zucchini ravioli with arugula was life changing. It’s located in the downtown business district of Montevideo and only open from 12 p.m. to 4:30 p.m. Monday to Saturday. Calle Cerrito 499, 11000 Montevideo, Uruguay

Cabo Polonio ,Uruguay; photography by Anna Mazurek. Images cannot be used without permission.
3. Cabo Polonio
This remote beach town is located seven miles off the main highway and is only accessible by 4-wheel drive vehicles. In 2009, the area was declared a national park and is home to the second largest sea lion colony in the country. The sea lions hang out on rocks by the lighthouse, which is worth the climb for the view. Watch the sunset from the giant sand dunes on the western side of town. There’s no ATMs and limited electricity, which just adds to the charm of the town.
How to Get to Cabo Polonio:
Northbound buses will drop you off at the Cabo Polonio turn-off where there’s a huge tourist center with food and bathrooms. You can book buses directly to other parts of the country from here as well.
Casa Pueblo near Punta del Este, Uruguay
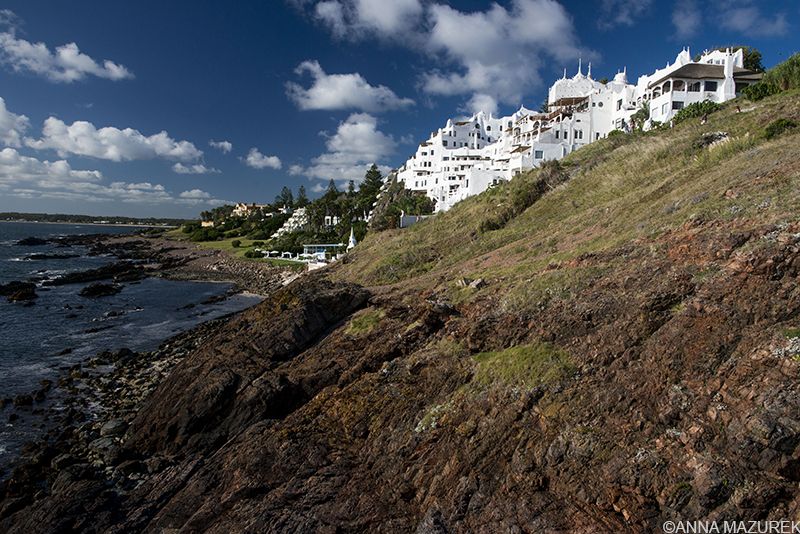
4. Casapueblo
This stunning nine-story villa was built by Uruguayan artist Carlos Páez Vilaró. It houses an art gallery, museum and hotel. It’s an excellent sunset spot. The house spills down the side of the cliff and the best photos are from the adjacent cliff. Most buses will drop you at the turn off which is 13 kilometers from Punta del Este and you can walk another 15 minutes to the villa.
Unless you are a fan of the artist, I wouldn’t recommend the museum. I felt it was overpriced for such a very tiny space and didn’t offer much background information. It’s worth the trek from Punta del Este for the view alone.
Escaramuza bookstore in Montevideo, Uruguay is my favorite cafe in town.
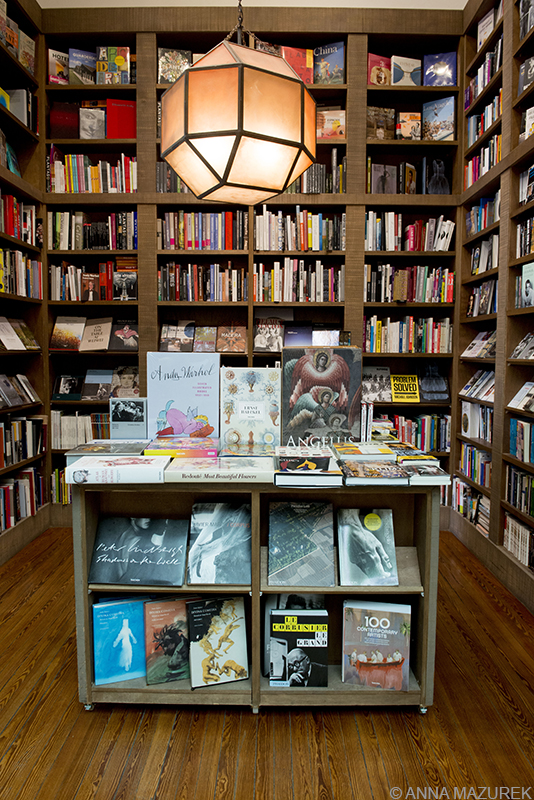
5. Escaramuza
Escaramuza is a stunning high-ceiling bookstore with a cozy café in the back. It was my favorite hangout spot in the capital. The café is a great spot for lunch and has great WIFI. While the menu changes daily, the best options are offered during lunchtime. Be sure to save room for dessert! Dr. Pablo de María 1185, 11200 Montevideo, Uruguay
Calle de los Suspiros, the Street of Sighs, in Colonia del Sacremento, Uruguay is home to one of the best resturants in town: Buen Suspiro!
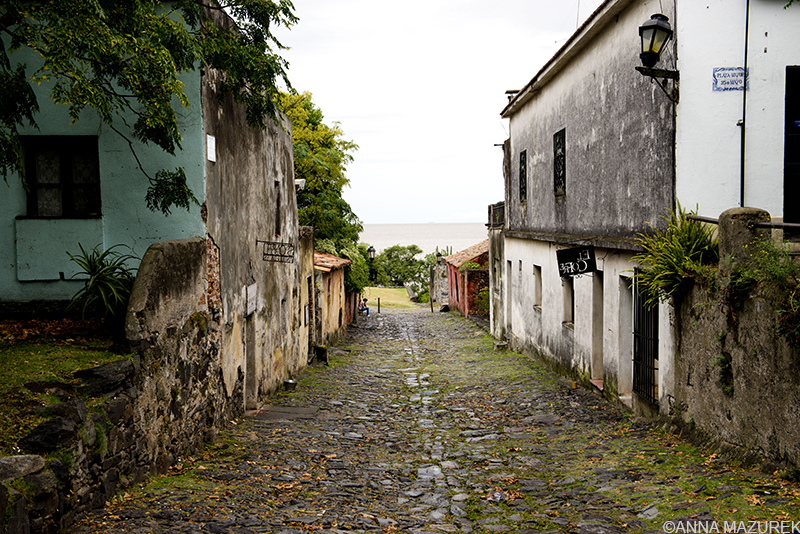
6. Colonia del Sacramento
Colonia is a photographer’s dream – quiet cobblestone streets, rusting classic cars and colorful, crumbling colonial buildings. The former Portuguese settlement and Unesco World Heritage site is 50 km from Buenos Aires by ferry. The town’s location made it a haven for smugglers and was later succeeded to Spain in the 1700s. Frequent ferries make it a popular day trip from Buenos Aires.
Be sure to eat at Buen Suspiro. This cozy restaurant on Calle de los Suspiros has the best food in Colonia. They specialize in large shared appetizer plates called picadas. Check out my photo guide to Colonia!
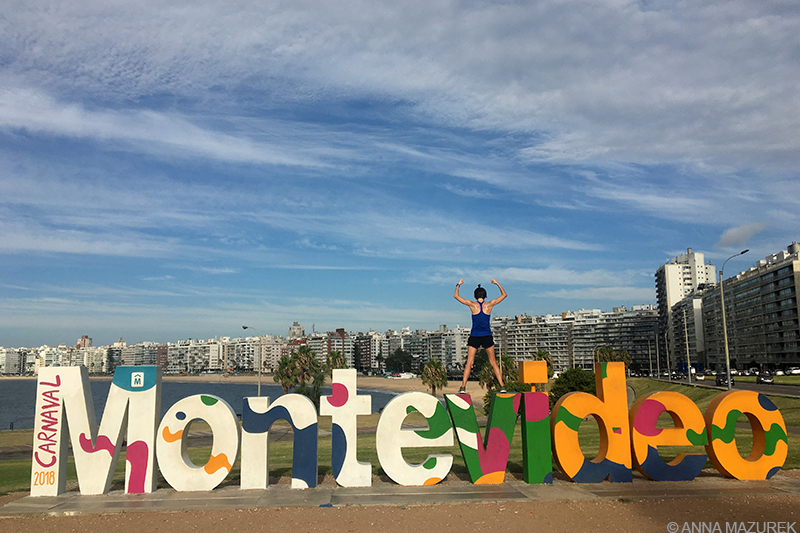
I got up at sunrise and ran to the famous Montevideo sign for a photo!
7. La Rambla
The world’s longest continuous sidewalk, la Rambla, hugs the coastline ofthe capital of Montevideo for 13.7 miles. At sunset, it’s covered with locals relaxing and enjoying their mate, a loose-leaf tea that is sipped through a straw. Get up at sunrise to get a photo of the iconic MONTEVIDEO sign located along the north side of Playa de Los Pocitos. The sign is continuously repainted based on the season.
What’s the best thing about Uruguay? NO TAX for foreign credit cards!
If you pay with a foreign credit card, taxes are waived for both accommodation AND food. This saves roughly 18-20%! The discount also applies to Visa debit cards, which are sometimes accepted more often than credit cards. Visa seems to be the most popularly accepted card in the country. This significantly cuts down the cost of traveling in the country. Be sure to only use credit/debit cards that don’t charge foreign transaction fees!
Packing 101
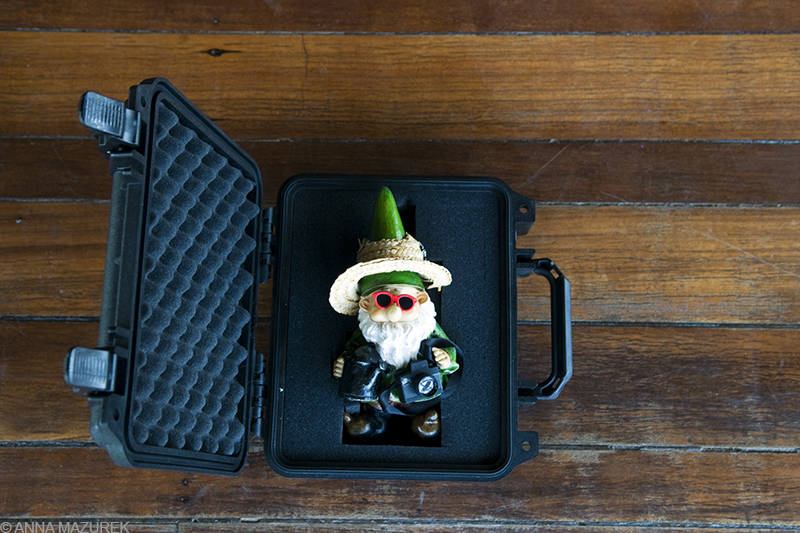
Alfred, the globe-trotting gnome, travels in a Pelican case. He had a mishap in India and had to be glued back together so he only travels in a big case, which you can read about here.
Once upon a time, there was a 20-year-old girl from South Carolina dragging two GIGANTIC rolling suitcases, a carry-on size duffel bag and a backpack through Paddington Station in London. She was en route to study abroad in Northern England and constantly tripping over her luggage to the point where people felt bad for her and offered to help. That girl might have been me. Ok, it was me. I admit it. I’ve come a long way since that day in Paddington Station and constantly try to pack light and smart. My current packing set up is based on my experience traveling over the last 15 years and tips I’ve learned from other travelers. In this post, I break down exactly what I packed for my current trip.
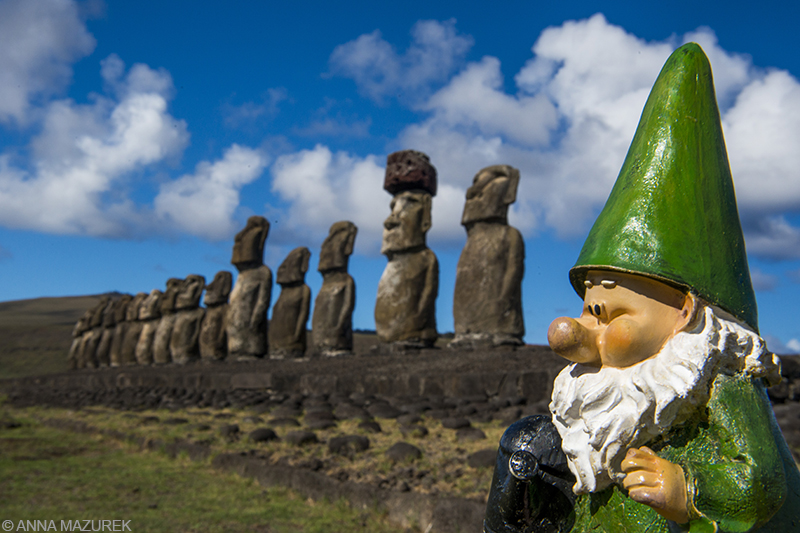
Easter Island (Rapi Nui) was one the highlights of my trip thus far. It’s also by far one of my best gnome photos of all time.
Purpose of the Trip
In order to know what to pack, you need to know the purpose of the trip and most importantly weather. You don’t need a bikini to hike Kilimanjaro. In January, I left for a four-month trip to South America. Packing was tough because I had to pack for two seasons. I was on the list for a last-minute deal to Antarctica so I needed warm clothes. I also needed hiking boots for several hikes I planned to do in Colombia and Chile. Mostly, I just needed summer clothes. Before I left for my trip, I photographed everything I packed. Keep in mind that I’m a photographer so I take roughly 30 pounds of camera gear including my laptop and hard drives. This means I can’t just take a hiking-style backpack because I’m too tiny to carry the gear and everything else on my back. (I weight 112 pounds.) The best solution I have found thus far is detailed below.
My Packing Philosophy
My packing philosophy is to only pack functional, useful items that I will use more than once on the trip. I’m also not a fashionista. I’m more of a beach bum who prefers tank tops and flip-flops. The clothes I pack are mostly for comfort and practical use so you won’t find any sexy travel clothes in this list. If I will only wear something once, I won’t take it. I make sure most of my clothes match so I can interchange my outfits. I “army roll” all of my clothes to fit in the clothes section of my suitcase. I pack things in small zippered bags for putting small items. Packing cubes work well for backpacking as well. This system below works well for me, which I hope helps you. 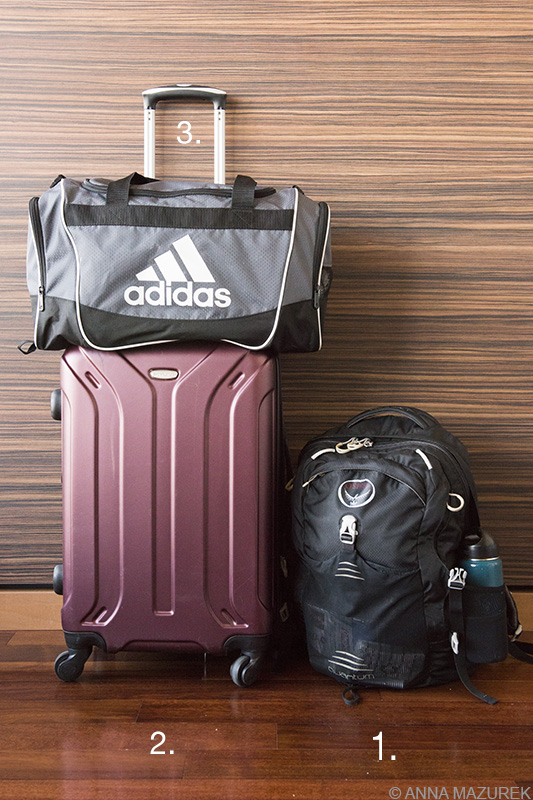
My Luggage
- Osprey DayPack: This 36-liter daypack fits all of my camera gear and has a laptop sleeve. It’s the perfect size for carrying on a flight and fits well in the overhead bin. It doesn’t fit under the seat very well due to my laptop. (I love Osprey because they have a lifetime warranty. They’ve fixed and replaced my pack before. I highly recommend them. Amazing company.)
- 22-inch Carry-On Size Suitcase: This holds all my clothes, shoes, toiletries and electronic chargers. I bought this from Target for $60. It’s a good carry-on size for the plane and fits in the overhead bin. I normally check it because I travel with a full-size sunscreen and contact solution when I travel. (These are EXPENSIVE abroad.) It’s also 360-spinner suitcase. Never buy a suitcase that doesn’t have 360 wheels.
- Nike Duffel:I borrowed a similar gym bag from my nephew for a trip several years ago and loved it. It fits perfect under the seat on a plane. It holds Alfred, the globetrotting gnome, (I never check the gnome.), snacks (I am prone to hanger.), journal, a book to read and jackets. I bought this at JC Penney but since their website doesn’t work overseas, I added a link to the same one on Amazon.
I am very minimal with my camera gear and pretty much pack all the gear I own. I’ve included details descriptions below.
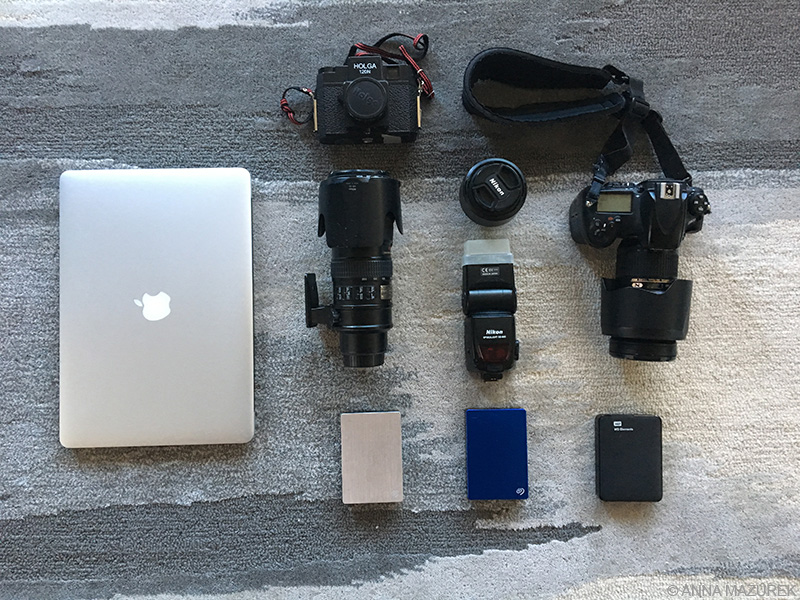
Camera Gear & Electronics
Camera Body I shoot with a Nikon D800 camera body, a full frame DSLR Camera. The D850 is out now but I don’t want to deal with the large file sizes. When mirrorless camera get to this level with low light images and continuous focusing I’ll switch to mirrorless, which would cut the weight of my gear in half. Lenses All of my lenses have fast apertures (f/2.8 or f/1.8) for shooting in low light. I was a music photographer for five years, which is why I have fast lenses. It comes in handy for travel and just about anything so I’ll never buy a lens that’s not f/2.8 in the future.)
- Nikon 24-70mm f/2.8: This is my go-to lens. It’s a standard wide angle.
- Nikon 70-200 mm f/2.8 VR: This is heavy so it doesn’t go places unless I know I’ll need it. I love shooting portraits with it. I’ll be using in the Galapagos a lot.
- Nikon 50 mm f/1.8: This is my lightest lens. Normally, I use it to shoot food or anything handheld in low light. It’s also my go-to for long hikes when I’m too lazy to carry the 24-70mm lens.
Miscellaneous
- Nikon SB 800 Flash: I never use this when I travel. It was in my camera back from a shoot the day before I left, and I forgot to take it out.
- Rodes Microphone: I thought I’d shoot video so I brought this but didn’t use it. I bought it years ago for a video project in Thailand.
- Holga: Medium format film camera. It shots square frames that I love! I use Kodak Portra 120 film ISO 400 and Ilford XP2 120 film ISO 400.
- Circular Polarizing filters: I have two polarizing filters. One that fits the 50mm and another that works for the other two lenses.
Hard drives Two 5Tb Seagate Drives: One is used to backup my Mac and my photos. The other drive holds most of my archive of travel photos that I need access to when I travel for work. I have a 2TB drive that I use to backup the photos I shot on this trip. I’ll dump them on my larger drives when I get back to the States at the end of April. MacBook Pro I have the top of the line MacBook Pro Retina 15 inch. Every single spec is maxed out – RAM, processor, 1TB hard drvie. This is the model before the current retina’s that’s only has USB C ports. Those models had so many issues with no power and keyboards not responding that I wouldn’t go near one. There’s no Apple store near the places I usually travel so I don’t risk it with new model designs. They ALWAYS have issues that are fixed with the next model update in a year or two. They might have already fixed this issue but I haven’t researched it.
What Clothes Did I Pack?
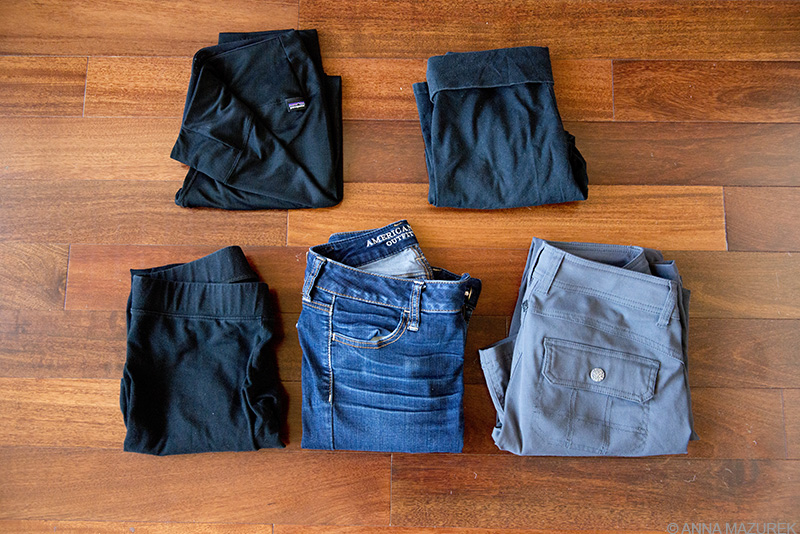
Pants
(Clockwise from top left)
- Patagonia Capilene Thermals:These are the best thermals for cold weather. They got me through Kilimanjaro. They double as pjs and running pants.
- Cropped Yoga Pants: These are for working out and flights. They are $20 from American Eagle, which is where I buy most of my clothes.
- PrAna Hiking Pants:These are the greatest hiking pants in the world and perfect comfy pants for flights. They are very flattering and don’t look like ugly, boxy hiking pants. I get compliments on them all the time.
- Skinny Jeans: Since it’s pretty cold at night some of the places I’m going, I packed these. I’ve worn them enough to justify bringing them. These are also from American Eagle. I won’t take them to Asia in the fall.
- Long Yoga Pants: These are comfy pants for pjs but can be dressed up to go out. They are more comfortable than the thermals. Guess where they are from? American Eagle. (If anyone knows anyone at American Eagle, I’d be happy to work with them. Haha!)
Shorts
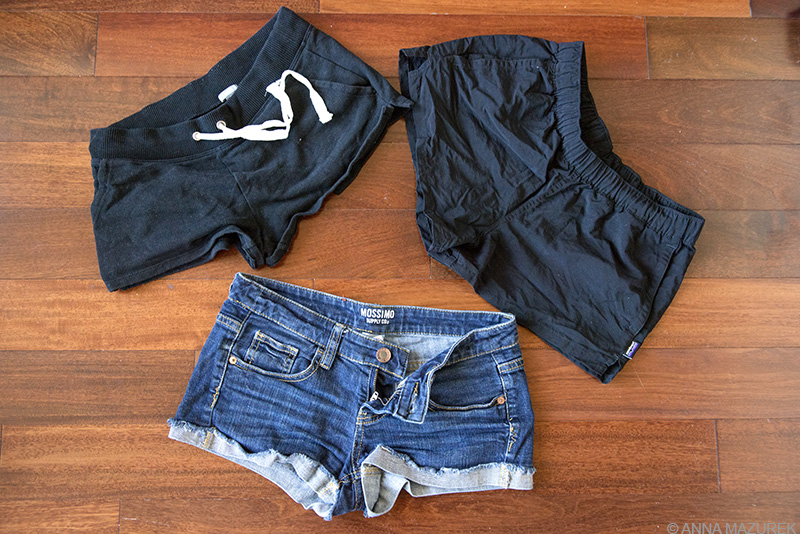
(Clockwise from top left)
- Comfy Shorts: These are my pj shorts for warm places. Clearly, these are from American Eagle.
- Patagonia Outdoor shorts:These are the best overall shorts for hiking, running and daily use. They dry really quick and have a loop in the pocket to attach keys. They are a little longer than my normal shorts but more functional.
- Jean shorts:These are more practical for looking a bit cuter than my other shorts that all look like workout clothes. They match everything. If you can’t tell, I like short shorts. These are from Target.
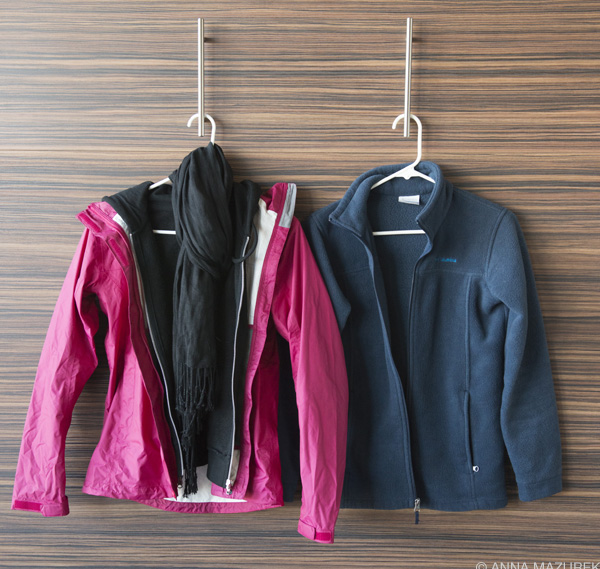
Jackets
(Clockwise from top left)
- Marmot PreCip Jacket: This is a great, lightweight raincoat with zippered underarm vents, which make it great for hot weather. I use it as a top insulating layer for colder climates. They also have a great warranty.
- Black Hoodie: I always take a basic black hoodie for warmth on flights or chilly nights. This one is from H&M for $20. (This is layered under the pink Marmot jacket in the photo.)
- Basic Scarf: This is a cheap Target scarf. I never take my nice scarves traveling because they get destroyed.
- Columbia Fleece: I totally found this at my parent’s house. My sister bought it for my nephew but he outgrew it. It’s a children’s large but fits me perfectly. It’s a great layer over my hoodie and under my raincoat for really cold places.
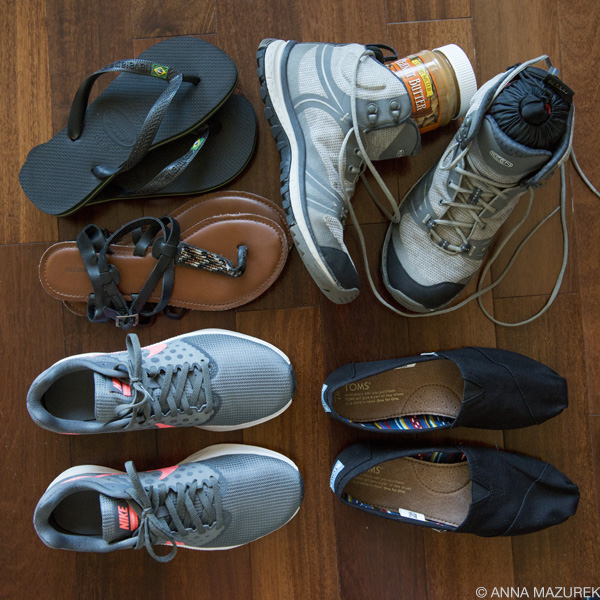
Yes, that’s a jar of peanut butter in my hiking boot. I always stuff things in my shoes to help with luggage space.
Shoes
(Clockwise from top left)
- Haviannas Flipflops:These are hands-down the cutest and most comfortable basic plastic flip-flops on the market. They double as shower shoes and beach attire.
- Keen Terradora Hiking Boots: I’m hiking a bunch on this trip including The Lost City trek in Colombia so packing these is a must even though they take up too much space. (I always stuff things in my boots to save space like the jar of peanut butter and a rain cover in the photo.)
- Toms: These are normally great for wearing in cold places with skinny jeans to dress up an outfit. I wore them a ton on my last South America trip but rarely wore them on this trip because it’s been too warm.
- Nikes: I’m a runner so I can’t live without my running shoes. These also double as my go-to shoe for exploring and walking around the city for comfort. I always wear these on planes to save space in my luggage.
- Flat Sandals: I always pack cheap flat sandals to dress up an outfit. These are an old pair from Target from at least three years ago. They are going in the trash after this trip.
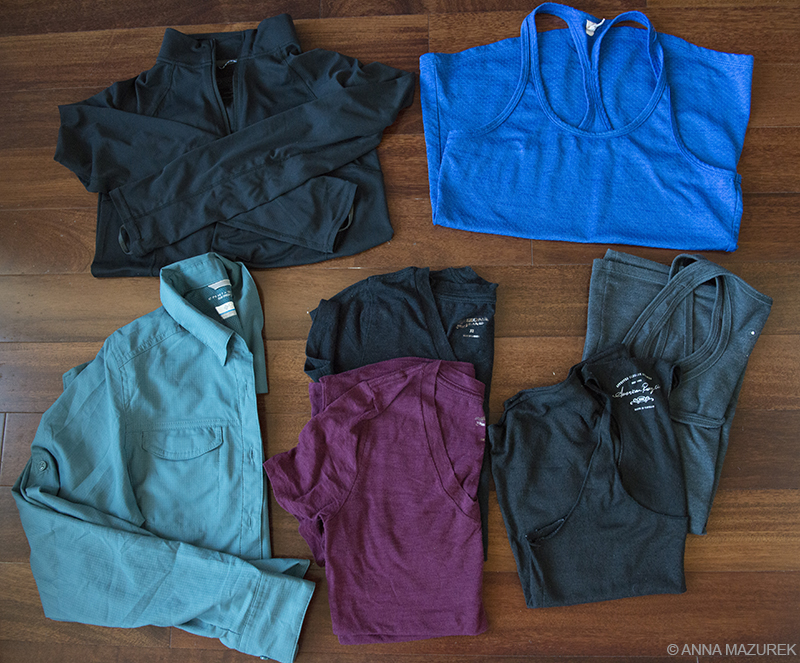
Tops
(Clockwise from top left)
- Patagonia Capliene Thermal Zip-Neck: This is the single greatest thermal topl. I love it and total recommend it.
- Running Tank: I always pack one lightweight, quickdrying workout tank. This is from Target.
- Basic Tanks: I always pack a couple of basic tanks that can be wore separately or as layers. The grey tank is my layering tank. The black one is a cute going out shirt. These both are from Macy’s.
- Basic Tees: I’m obsessed with these basic Arizona brand V-neck tees from JC Penney. They are cheap and come in multiple colors. I packed 8 number of shirts including a Goonies (greatest movie of all time) t-shirt for sleeping. (Again, JC Penney’s blocks people located overseas from even LOADING their webpage or I’d have included a link to the basic t-shirts.)
- Columbia Silverridge SPF/Wicking Shirt: This is my go-to hiking shirt. It’s wicking and has sun protection. It saves my skin and keeps me cool.
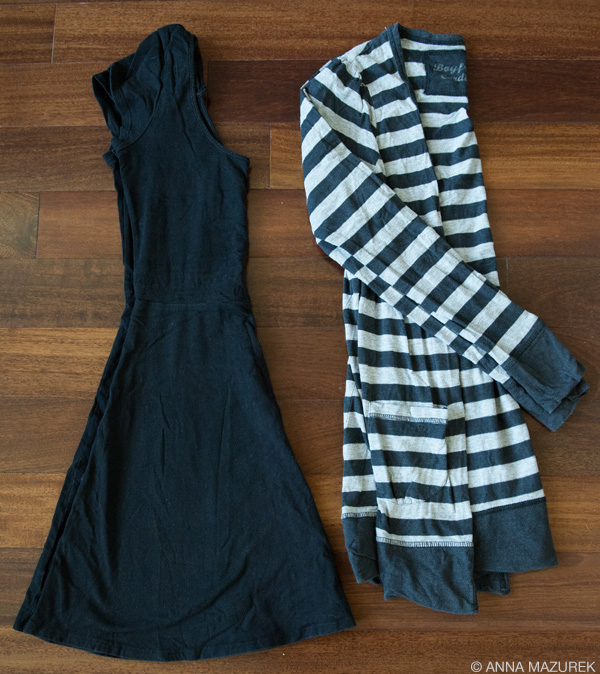
Going Out
You should always pack at least one cute outfit for going out. Make it something simple that you feel good in. I always bring a basic cardigan to go with it that can go with other outfits if it’s cold. This is an old black dress from American Eagle.
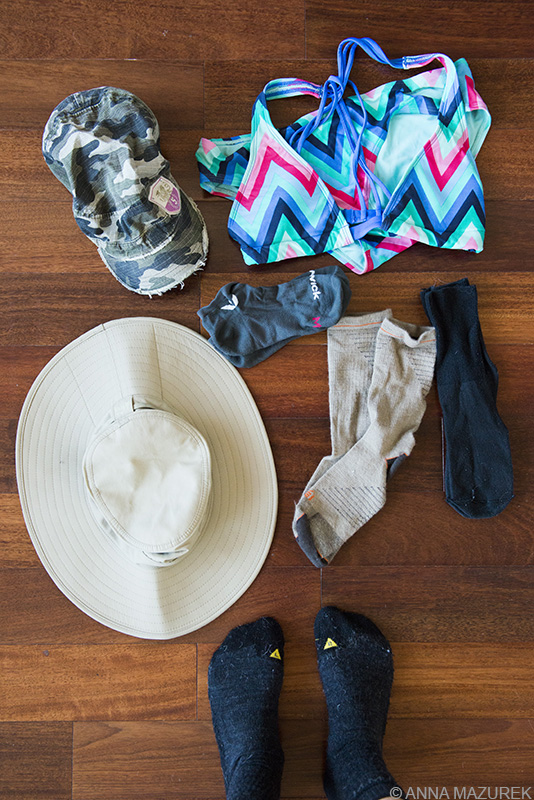
Accessories
- Camo Hat: I bought this thing at a Target in Vegas back in 2006. It’s been across the world. It’s my travel hat. You’ll see it in tons of photos.
- Bikini: You always need a swimsuit. Pack one that’s cute but functional. This is from American Eagle.
- Tall lightweight socks: I always back a couple pairs of these $1 socks from Walmart. They are super comfy for flights and sleeping compared to hiking socks. I always wear them with my Toms or Nikes if it’s really cold. This is the ONLY thing I buy from Walmart ever.
- Hiking socks: I have five pairs because I’m doing a five day hike in Colombia. They are great for cold places as well but aren’t as comfy as my $1 Walmart socks. These are the one’s I’m wearing in the bottom of the photo.
- Wicking Ankel Socks: These Swiftwick wicking/compression socks are my favorite running socks and great for walking around.
- REI Sahara Hat: I look ridiculous in this hat but it’s makes me look younger since it shields my face from the sun. Plus, it means I’m not applying sunscreen nearly as much. It’s a great practical investment for hiking.
Random Things
(Clockwise from top left)
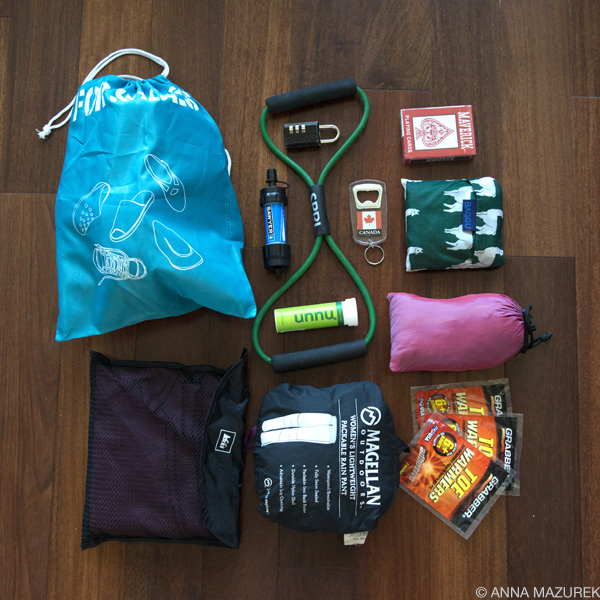
- Shoe Bags: These might just be the single best thing I pack. I put multiple pairs of shoes in one bag usually. It keeps my suitcase a lot cleaner. These are from Diso (the Japanese dollar store). If you don’t live near one (There’s one in Dallas!), then I check out these from Amazon.
- Sawyer Mini Water Filter: This simple water filter saves me so much money. I never buy bottled water when I travel. Instead, I filter it with this and have a Klean Kateen stainless steal water bottle. I’ve even used it to filter the sink water at the airport in Mexico.
- Sturdy Combination Lock: Since I stay in hostels, I have to lock my gear up in lockers many times so I travel with this sturdy combination lock. It’s heavier than a suitcase lock but smaller than an old school combination lock.
- Resistance Exercise Band: I wanted to try these out to see if they helped me stay in shape while I travel. They are cheap and come in different resistnac elvels. It’s been okay so far. I also have other resistance bands not pictured but haven’t used them as much as I’d hoped.
- Nuun Electrolytes: If you are hiking or going anywhere hot, these tablets are a must. They only have one gram of sugar and taste great! I prefer the lemon lime flavor.
- Playing Cards: The ultimate travel essential that I always buy from the Dollar store.
- Baggu Reusable Shopping Bag: Baggu makes sturdy and cute shopping bags that can hold up to 50 pounds. This is one of the most helpful things I packed. I use it as a beach bag, shopping bag, shower bag, etc. Plus, it has llamas on it.
- Sleeping Bag Liner: I LOVE this thing. It’s great for anytime you are renting a sleeping bag or sleeping anywhere rustic. I find that it helps keep bugs off me.
- Toe Warmers: I can’t live without these for cold places. I line my suitcase with them for my potential Antarctica trip, which never happened.
- Rain Pants: These are crucial for hiking in various conditions. They were a lifesaver in Iceland and Kilimanjaro. I have a $20 pair from Academy Sports.
- Full-size Quick Dry Towel: This towel is the best. It’s big enough to wrap around my entire body and dries quickly. I also travel with a hand-towel sized quick-drying towel but find this to be more function. I use it as a beach towel as well.
Toiletries
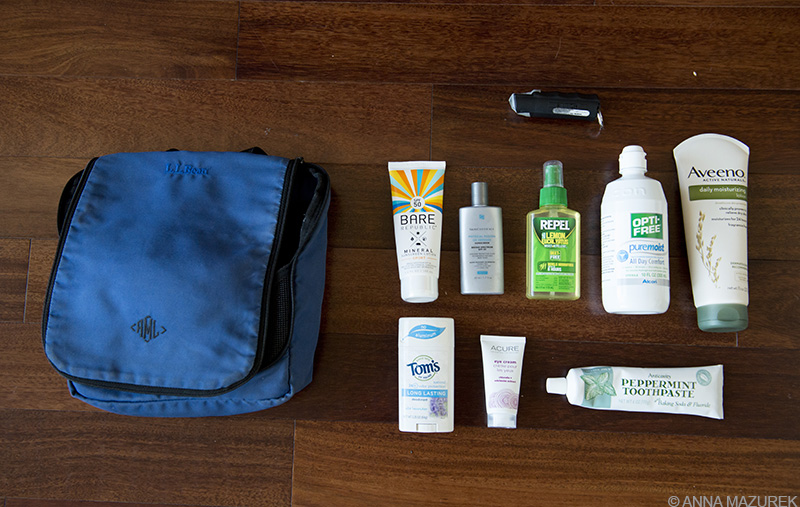
I got this LL Bean toiletry bag with my monogramed initials when I graduated from high school back in 1999 and still use it to this day. I always take full-size toiletries for things that are either hard to find or expensive overseas: sunscreen, bug spray, contact solution, chemical free deodorant and fluoride-free toothpaste from Trader Joe’s. Here’s a few of my favorite chemical-free and healthy products I pack:
- BARE Republic Sunscreen: This is the best chemical-free sunscreen I’ve found. You can get it on Amazon or at Target. I use both the stick and the liquid form.
- SkinCeuticals Physical Fusion UV Face Lotion SPF 50 Tinted: I use this daily on my face. It’s not cheap, but I spend money on my skin.
- REPEL Lemon Eucalyptus Natural Insect Repellent: I know DEET is good at repelling mosquitos, but it also melts plastic so it can’t be good for you. I always dry to buy the DEET-free repellent so my flipflops don’t melt.
- Keychain size pepper spray: This isn’t a “healthy product” but it’s for safety. I keep this with me most of the time no matter where I am. I put it in my checked bag and get out it at the airport especially for late night tax rides. (I always go with the “safe” taxis but you can’t ever be too safe.) When you show up at the Moshi, Tanzania airport at 3 a.m. to find your ride isn’t there and you have to make other arrangements, it’s good to have this in your pocket just in case.

I pack most of my toiletries and other small items in random bags I’ve collected. Clockwise from left to right: Yellow bag (feminine products), blue bag (battery chargers & cables), flowered bag (full-size SPF & bug spray); white/pink bag (makeup – bag is almost empty); pink bag (extra tolietries) & llama bag (main toiletry bag with shampoo, razor, body wash, etc.).
Other Things I Packed & DIDN’T PACK:
- Headlamp: The headlamp is the single greatest invention since the burrito. I always buy a cheap Energizer one because they always have a red light mode, which keeps the bugs away. Bugs are attracted to white light.
- Underwear: 14 pairs of undies. This is probably too much. Okay, it is too much, but it means I never run out since I usually have to do laundry at least once or more every two weeks. Plus, laundry is expensive – $9-12 a load some places abroad!
- Socks: Seven pairs of ankle socks, three pairs of the Walmart socks mentioned above and five pairs of hiking socks. The five pairs of the ankle socks are Swiftwick wicking and compression socks.
- Bras: I packed five sports bras and one normal one. I’m all about comfort.
- Toiletries: I always pack too many shampoos and other toiletries. I somehow always manage to collect more on the trip as well. This is something I’m working on having less of in the future.
- Makeup: I brought very minimal makeup and rarely wear it except on nights out. Since I’m sweaty most of the time or spending a lot of the day in the sun, I have to keep putting on SPF. Since any type of sunscreen (including makeup with SPF) only lasts a couple hours, I have to keep putting reapplying. It annoys me to put if over makeup. Normally, I wear a tinted moisturizer with SPF 50 (SkinCeuticals) and reapply chemical-free SPF the rest of the day (Bare Essentials).
- Sunscreen, Contact Solution, Bug Spray, Tampons & Band-Aids: You should ALWAYS pack full-sizes of each becasue they are either expensive or hard to find abroad. I just had to pay $9 for a box of Band-Aids in Chile! Contact solution was $20 a bottle in Panama!
- Journal: I make it a point to write as much as possible when I travel. I always go with a classic Moleskin journal.
What I Should Have Left At Home
This is everything I left at home when I went back in March for some freelance work.
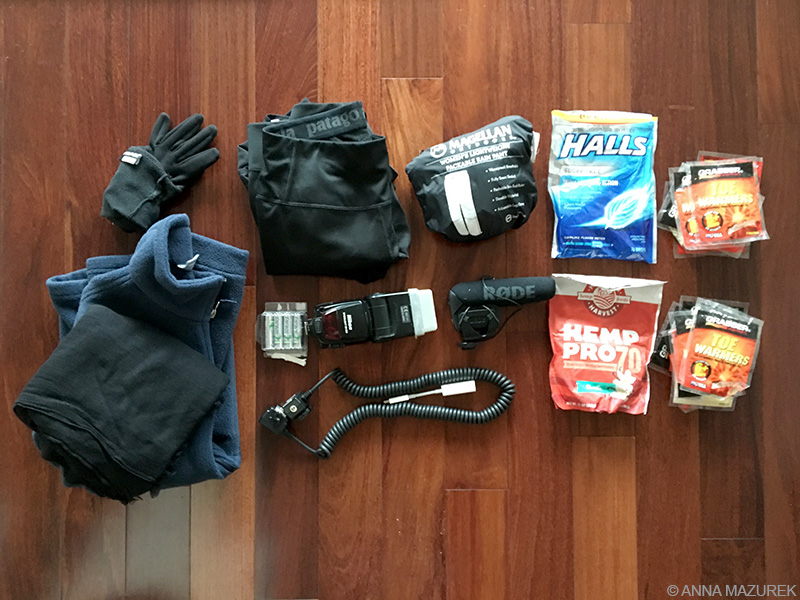
Since the trip to Antarctica didn’t pan out, I was stuck carrying around a ton of winter clothes I didn’t need. I had to fly back to Texas for five days in early March for a freelance job and ditched the gear that was weighing me down. Winter clothes: gloves, thermal tights, thermal zip-neck shirt, scarf, fleece, toe warmers and rain pants. I also left my protein powder and cough drops. I rarely use my external camera flash when I travel so I left it along with the sync cable and mic since I decided not to do any video on my DSLR on this trip. Leaving all of this behind really lightened my load. I took back a few more hiking shirts that I’d forgotten to pack, an additional dress and two extra pairs of hiking socks and a wet/dry bag for my camera for hiking, which I don’t know why I didn’t pack originally.
Got Packing Questions?
What questions do you have about packing? What do you normally pack that’s not on my list? Let me know in the comments below or shoot me an email: Anna (at) TravelLikeAnna.com
____________________________________________________
*P.S. I am not sponsored by any of the brands or products mentioned above. I have used all the products myself and found them extremely helpful. Please note some Amazon affiliate links are included above. If you click on the link and make any type of Amazon purchase, I earn a small commission with no additional cost to you. I hope you found this post helpful and appreciate your support of the blog. Please email me if you have questions.
____________________________________________________
COMING UP NEXT
10 Reasons to Go to Uruguay
Safe, stable Uruguay is the underdog of South America, sandwiched between its often dramatic, flashy neighbors of Argentina and Brazil who often steal the spotlight. The progressive nation is the Switzerland of the South America filled with delicious restaurants, colonial charm and stunning beaches. In my next post, I’ll cover my favorite spots in the country!

South America Diaries: Vol. 1
Bosque de Palermo is my favorite place to run in Buenos Aires.
Since I’m on the road for all of 2018, I’ll be starting a short-term journal series about life on the road starting with the South American Diaries. I’ll post monthly “diary” entries about my journey across the continent for the next three months along with other content.
Winter is a choice. This year I chose wisely and booked a one-way flight to Argentina in mid-January. I belong in flip-flop weather.
Buenos Aires is my home base for the next month. I fell in love with this city on my first trip in 2015. It is intoxicating. It feels like a Latin Europe sprinkled with a bit of third-world charm reminiscent of Havana. It’s the middle of summer, but there’s low humidity. Plus, it never gets above the mid-80s. There’s very few mosquitos.
This city never sleeps. People don’t eat dinner until after 9 p.m. at night. They go dance tango until 5 a.m. Siesta is a thing here. Many restaurants close from 2 p.m. to 8 p.m. daily.
The culinary scene reminds me of Europe – breads, pastries and tons of steak. The fresh fruit is amazing and cheap. I’ve started a quest to find the best empanadas and craft breweries in the city. (More on that in my next post!) Even though you can drink the tap water (I do), many locals don’t. Aside from the threat of pickpockets, the city is relevantly safe.
The people always make the place. I fell right into an amazing and diverse friend group including folks from Venezuela, a few local porteños, which is the term for people from Buenos Aires (BA), and several other Americans. The majority of the folks in our friend group are digital nomads, which means we have all either built business or lives that allow us to work remotely from any corner of the world. It’s very rare in life that you meet people who truly understand you.
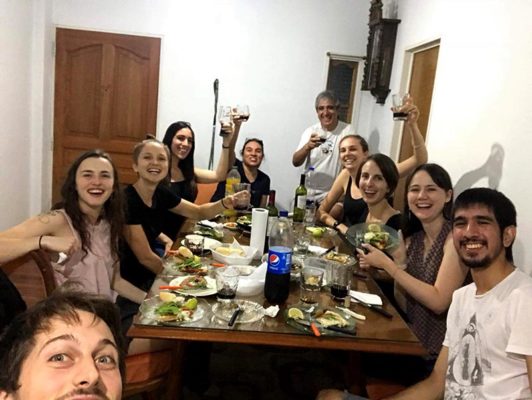
This selfie gives you an idea of the amazing atmosphere of dinner at Raul’s house!
Our friend Raul, who grew up in BA, invited us to dinner at his parent’s house the first week I was in town for an asado (barbecue). The dinner started at 8:30 p.m. and lasted until almost 2 a.m. on a Monday night! It felt like a five-course meal – seasoned eggplant appetizers followed by salad and tender beef with potatoes. The meal ended with ice cream with waffle cones his mom had picked up right before dinner from the ice cream shop around the corner. There was more wine, beer and soda than all 10 of us could drink! After dinner, the three musically talented folks in the group played guitar or ukulele. (Wonderwall by Oasis is by far the most universal cover song that everyone knows!) Afterwards, Raul and his dad walked us to the bus stop. That night is what travel is all about.
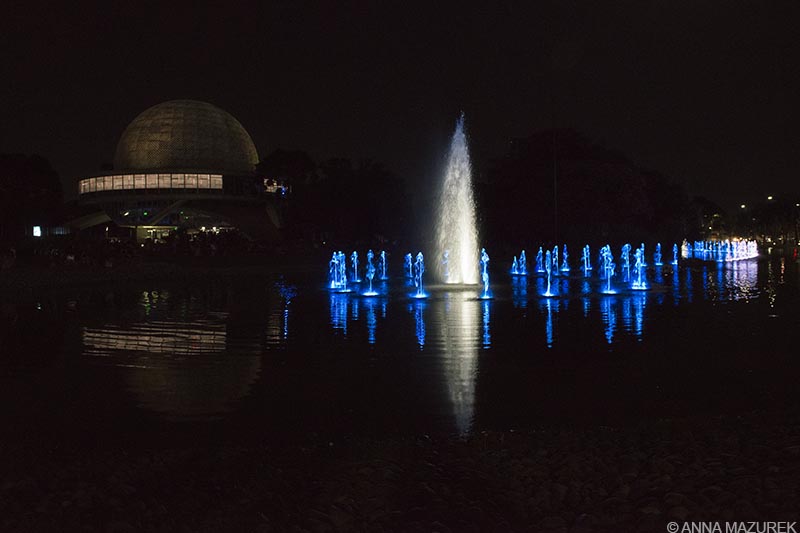
The Galileo Galilei planetarium in Buenos Aires has a nightly light show.
Another highlight is the night I walked over to the planetarium with four friends to take night photos. Turns out, 400 people had the same idea! The place was packed for the nightly light show. The weather was a perfect 75 degrees with low humidity. There’s nothing better than being in a place where you can drink wine in a public park in great weather with awesome people.
I rented an apartment with one of my best friends and fellow digital nomad, Tokyo Becky. The goal of this month was to focus heavily on freelance projects and start writing my newest venture – a self-published eBook that I mentioned in my previous post that outlines my financial philosophy and habits that allow me to save half my income, have no debt and travel nonstop. I’m spending my days split between work and exploring the city. I try to do at least one new fun thing a day to make the most of my time here. Some days are spent exploring more than others—checking out the museums, my quest for the best empanadas and craft beer in the city, $5 tango classes and taking day trips from the city.
After my time in Buenos Aires, I’ll head to Uruguay, Chile and Colombia.
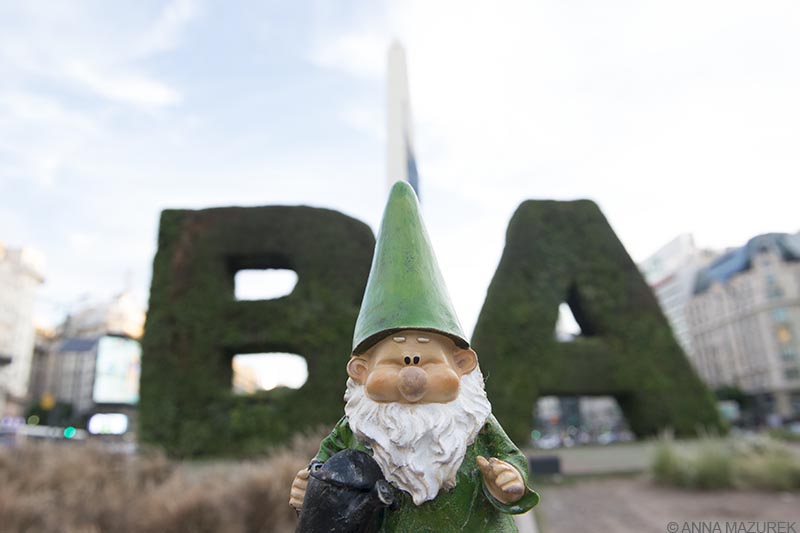
Alfred the Gnome LOVES living in Buenos Aires. He’s eating his weight in empanadas and alpharjoes (cookies with dulce de leche)! Alfred is posing for the photo at the Obelisco de Buenos Aires in the Plaza de la República.
Every single moment of life abroad is an adventure from walking down the street to trying to book flights through a local airline’s website in Spanish. (Trust me, this last one is hilarious.They hate Chase credit cards!)
A few random observations on life in Buenos Aires
- The only thing I don’t like about this city is the mystery water. When I walk down the street, I keep getting hit by droplets of mystery water, which I later realized was coming from the window air conditioning units that are prevalent here.
- The women in Argentina are obsessed with platform shoes. In 2015, I thought it was the trend that season but it’s actually just ingrained in the culture. Many of the women are short and wear 3-4 inch platforms daily. Even with the platforms, they are still shorter than me. I’m only 5 ‘6”! I haven’t seen a single girl wearing regular heels.
- Spice isn’t a thing here. I decided to make breakfast tacos for dinner and searched the entire grocery store for salsa. The closet thing we found was Tabasco. Black beans are also hard to find.
- The subway trains usually have a street vendor on them selling everything from sewing needles to gum. They walk around and put one of each item on everyone’s lap. Then, they come back around to pick it up. If you want it, then you pay but otherwise, you give it back. It’s the most hilarious thing because people just let the street vendor just put the item on their lap even though they don’t want it. There were two little boys walking around selling Minion valentines cards.
- You get a 15% discount when you pay with a credit card at certain grocery stores on weekends. Why is this not a thing in the US?
- Ice cream is an art form here. There are usually four options for cones—a regular sized waffle cone and three tiny sugar cones that decrease in size and price. The smallest cone is less than two inches high, but they pile on the ice cream almost three times the size of the cone!
- I got stuck on an elevator with 11 eleven people the other night between two floors in my apartment building. Luckily, we were only stuck for about five minutes before the security guard pried the door open and we climbed out. (The weight capacity for the elevator was 12 people, and we had 11 tiny people.) I’m convinced that we would have been stuck for hours if it wasn’t for the fact that there was three bottles of wine on the elevator with us!
- One of our American friends here got the phone call that every person on the planet dreads—a family member received some devastating health news. He flew back to the States shortly after. On our way home from his goodbye party, the mood was somber. I chatted with the other Americans about the sad situation. We all agreed that we were grateful to be traveling now because you never know what will happen in life. We could all get the same call one day but were glad we had decided to embark on our current adventures and digital nomad careers now instead of putting our dreams on a shelf to get dusty with age. Bottom line: Life is short. Live NOW.
That’s all for this edition. Sign up for my email list to be notified for the next edition of the South America Diaries! (You can sign up in the sidebar on the right side of the page!)
__________________________________________
COMING UP NEXT
Photo Guide to Buenos Aires, Argentina
In my next post, I’m working on a city guide to Buenos Aires! I’ll write up a summary of all the highlights to the city include where to eat, drink and visit!
Best of 2017
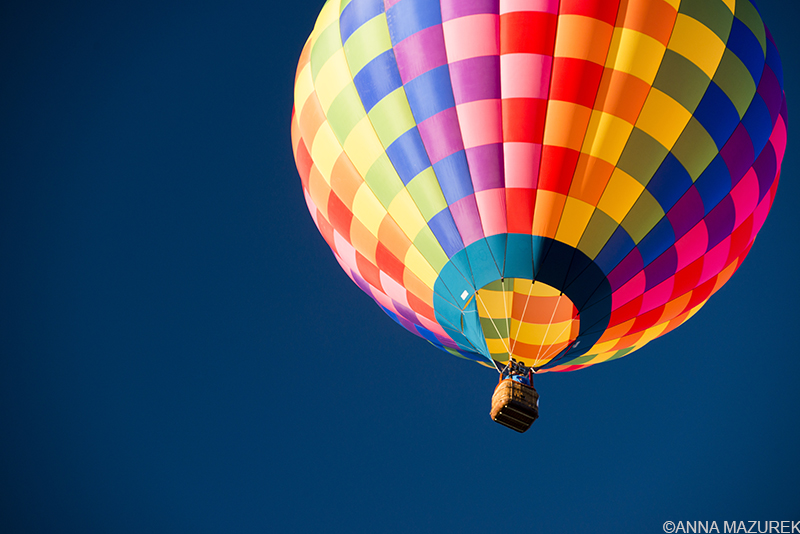
The Albuquerque Hot Air Balloon Fiesta is one of my favorite events of the year. I’ve been the last two years!
Key West? Yellowstone? Kilimanjaro? 2017 was an endless adventure, but it’s nothing in comparison to my 2018 travel lineup, which I’ll announce in my next post. To wrap up the year, I’ve compiled a summary of some of my favorite photographs and blog posts from 2017 to help inspire your adventures in the New Year!
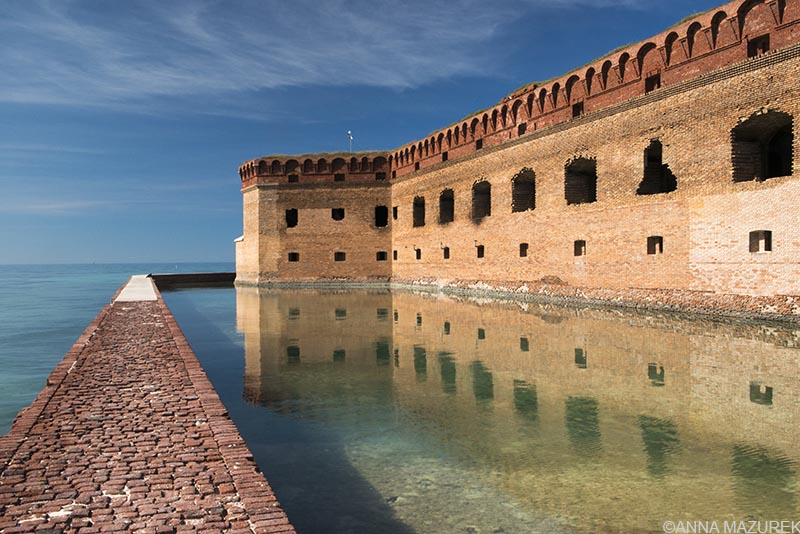
Fort Jefferson is a 19th century fort located a 100 miles from Key West in the Dry Tortuga’s National Park. The snorkeling is amazing!
1. Key West
I kicked off 2017 with a Florida Keys road trip with three friends. We flew into Miami, rented a car and hit the road. We stopped along the way for key lime pie, fish and chips, craft beer and kayaking. One of the highlights of the trip was our day trip to the Dry Tortugas National Park. The 100-square mile national park lies 70 miles west of Key West and includes seven islands along with a historic fort built between 1846 and 1875 (pictured above). The park is only accessible by one daily public ferry, private boats and seaplane. Ninety-percent of the park is water including a range of famous diving and snorkeling sites! (FYI: I’m working on a mile-marker guide to Key West for a future post!)
The Golden Palace, Kyoto, Japan
2. Japan
The more I travel, the more one place reminds me of another in small ways. Japan is one of the few exceptions. There’s no place in the world as safe, bustling or as efficient as this tiny island nation, which houses 127.3 million people on land mass smaller than California. Check out my two-part Japan series including Where to Go in Japan and a Travel Tuesday Interview with Tokyo Becky, an expat who’s lived in Tokyo for 12 years!
The Oculus, the World Trade Center Transportation Hub in New York City
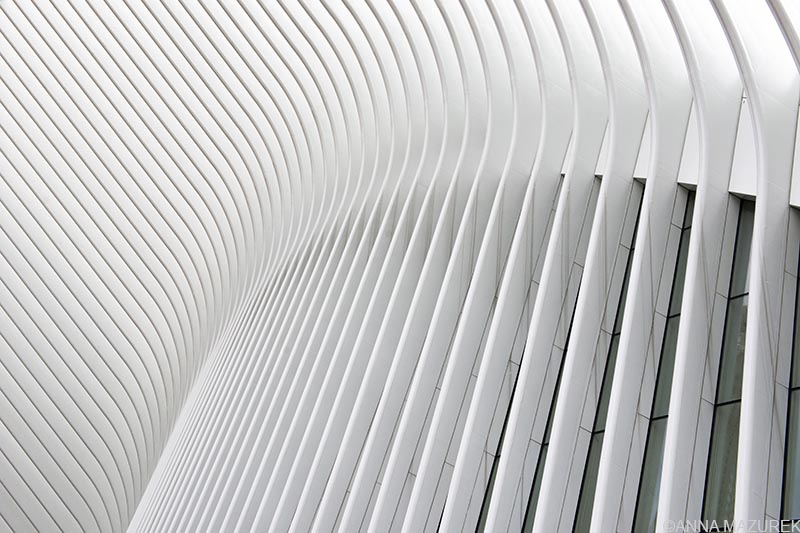
3. NYC
Every time I visit New York City, I discover something new. I make it a point to schedule a few days in NYC between trips to see friends, meet with editors, eat my weight in dumplings and explore. I was on my way to meet a friend for lunch by One World Trade this summer when I saw the Oculus, the towering modern structure that houses the World Trade Center Transportation Hub and retail shops, for the first time. While I’d seen photos, I was never clear where or what it was until I walked right by it.
If you’re traveling to NYC on a budget check out these Six FREE Things to Do in NYC and my interview with a NYC native!
Hot and Hot tomato salad from the Hot and Hot Fish Club in Birmingham, Alabama; Shot for the Wall Street Journal
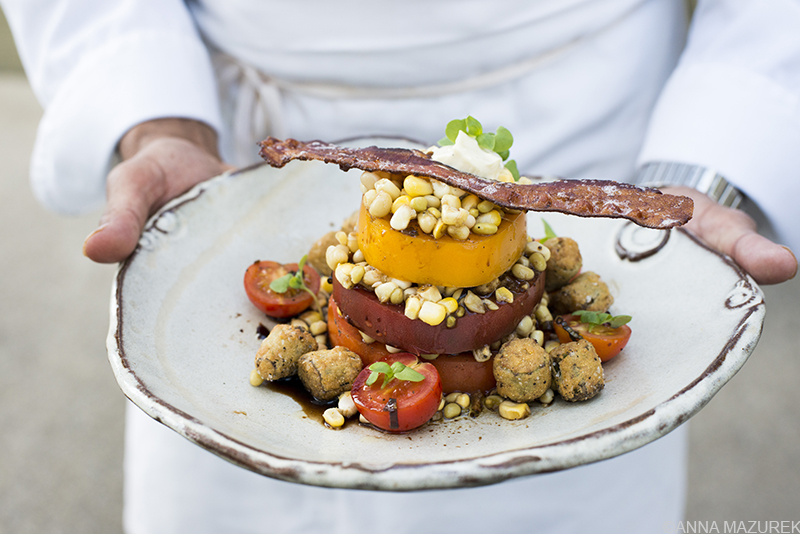
4. Birmingham, Alabama
In June, I had the honor of photographing my former home of five years (Birmingham, Alabama) for a travel story for the Wall Street Journal! It was exciting to see which places made the writer’s list! I’m so proud of Birmingham and how much the city is booming to into an urban foodie destination! For more of my photos, check out the full-story that published in September!
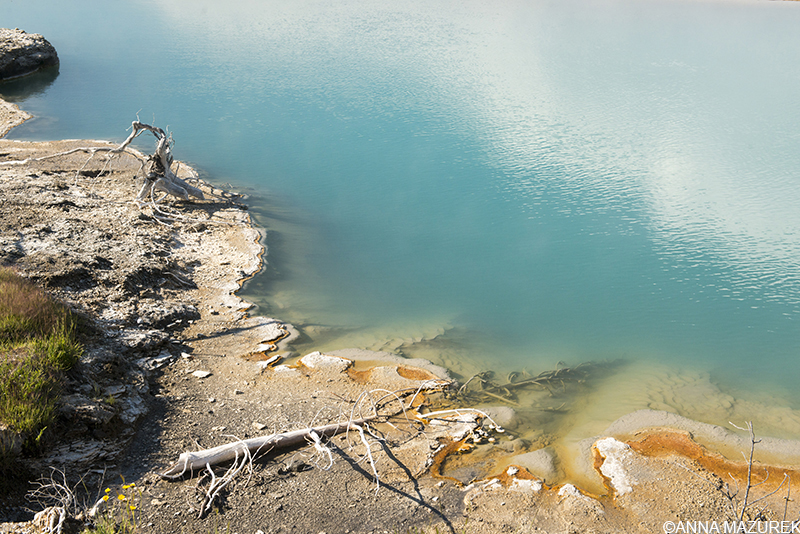
Biscuit Basin, Yellowstone National Park
5. Yellowstone
While the 4 a.m. wake-up calls were rough, the view was always worth it—bison, elk and bears walking through the morning mist. In July, I ran a two-week photo workshop for National Geographic Student Expeditions. It was an unreal experience. Despite being peak season, I found a way to make sure we avoided most of the crowds. For more about Yellowstone, be sure to checkout my photo guide!
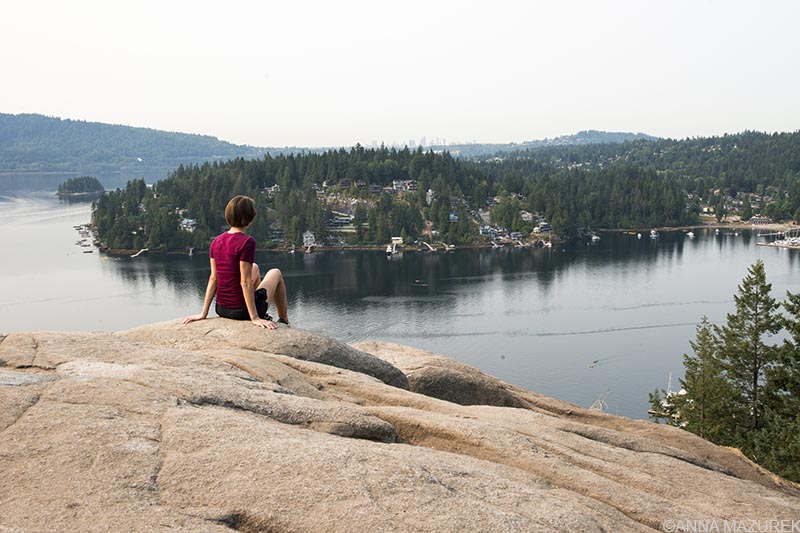
I asked someone to take my photo at the top of Quarry Rock in North Vancovuer this summer. Smoke from the summer wildfires was creeping in in the distance.
6. Vancouver
A good portion of my travels are spent visiting friends I’ve met on the road. While I love Vancouver, I went back this year solely to visit one of my favorite people—the Traveling Granny! I met her on a rocky overnight ferry ride from Panama to Colombia in January 2015. She’s 70 now and still spends four to five months a year traveling solo! It was great to sit out on her water-front patio in North Vancouver and talk about our travels. She’s currently traveling in India for the third time! Be sure to check out my interview with the Traveling Granny! She is proof that you are never too old to travel!
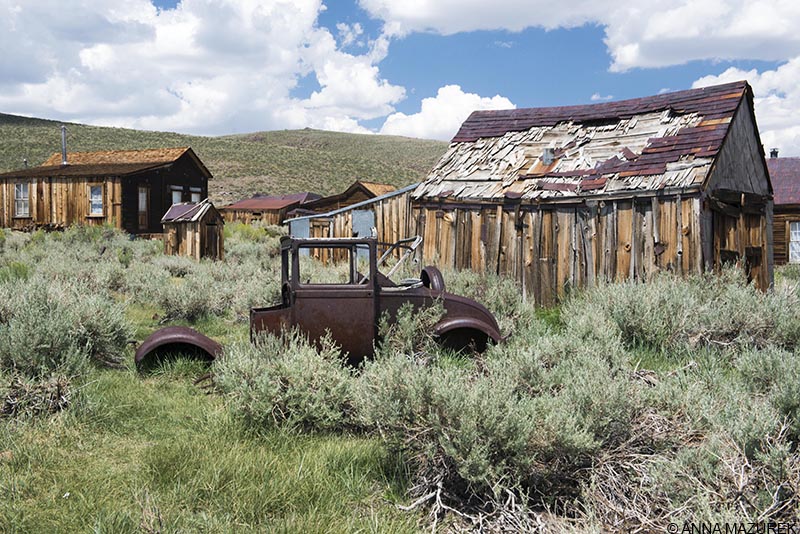
Bodie, California Ghost Town
7. Bodie, California Ghost Town
The most amazing places are the hardest to find. There’s nothing I love more than a good ghost town or dilapidated building to photograph. The ruins of the old mining town of Bodie are literally located in the middle of nowhere but worth the trek from Lake Tahoe. The town is now a state park and was preserved in a state of arrested decay meaning there’s no shiny paint, bowls of wax grapes or mannequins wearing ill-fitted costumes. The entire place looks as if the residents went out for lunch 60 years ago and never returned. Check out my road trip guide to Bodie!
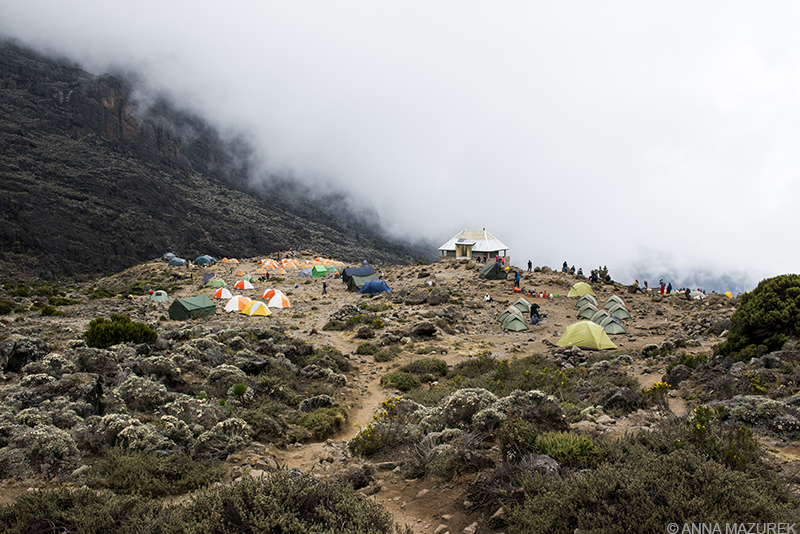
The hike into Barranco Camp was one of the most stunning views of the entire trek on Kilimanjaro. Four routes converge at the camp.
8. Kilimanjaro
Why would you fly across the world and pay a few thousand dollars to spend seven days hiking up a mountain in the cold? Last year was a year of clarity, reflection and a series of reorganizing my priorities. When my best friend asked me to join her trek, I literally rearranged my entire life. It was the hardest, coldest and most amazing thing I’ve ever done. Testing your limits challenges you to your core and makes you feel alive in a way that’s hard to describe. It offers the opportunity to view your life through a clear window that is often fogged by all the things and people that normally influence your decisions.
What’s it like to climb Kilimanjaro? Check out my two-post series: day-by-day guide and Kilimanjaro 101 for costs, packing lists and logistics.
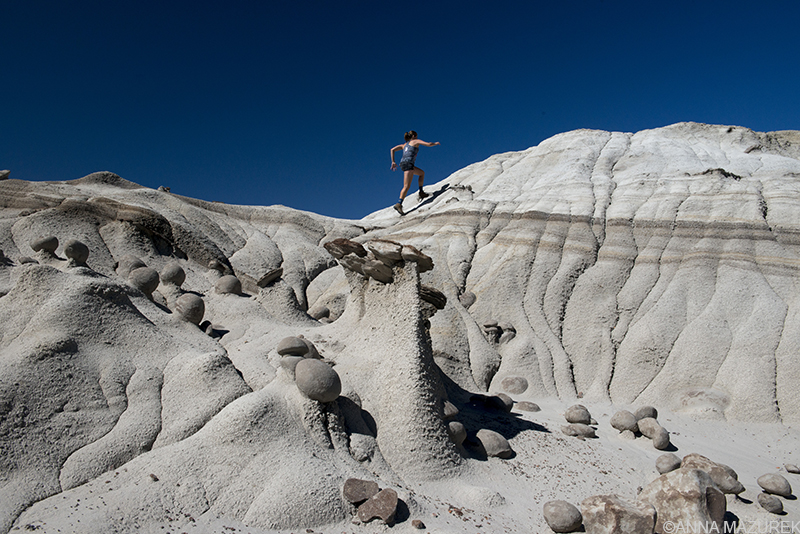
The scenery in Bisti Wilderness in Northern New Mexico looks like it belongs on another planet.
9. New Mexico
A week after I got back from Kilimanjaro, I made the 11-hour drive to New Mexico with friends for more hiking and to see the hot air balloon festival. My favorite hiking spot is the Bisti Wilderness, which is roughly 2.5 hours from Albuquerque. There’s no maps or cell service. Download the free Maps.me app and then download the GPS map of the area from this website: https://www.thewave.info/BistiBadlandsCode/Map.html Click on the first .KMZ file and open in the Maps.me app. There’s no water or services so plan accordingly with food, water and gas. The road into the park is all gravel as well. Consider heading to Chaco Canyon afterwards!
Directions to Bisti Wilderness: From Albuquerque, take 371 north and look for signs to the parking lot. It’s an mile or so from the road. From Santa Fe, take 550 and take a left on 7500, which cuts over to 371, and leads you to the same parking lot. 7500 is a rough dirt and gravel road. If it’s been raining a lot, then the road can be in horrible condition. They are drilling oil in the area so the road has improved compared to my previous visits due to maintenance by the oil companies I presume.
A view of the city of Leh from the Namgyal Tsemo Gompa monastery in Northern India.
10. India
No place has ever changed my life as much as India. Last month, I wrote a personal essay about why everyone should go to India and included a list of 12 places not to miss in the country. A return visit to India is on my list for 2018. I hope it’s on yours as well!
I hope you have a happy holiday season and 2018 is filled with exciting new adventures. Feel free to follow along my adventures in real time on Instagram!
__________________________________________
COMING UP NEXT
My Next BIG Adventure
In my first post of 2018, I’ll share all the details about my grand travel plans for 2018, which encompass a good portion of the globe! I’m currently wrapping up all the details for the trip and can’t wait to tell you all about it!
How to Work in Antarctica

In this week’s Travel Tuesday Interview, I chat with Antarctica expert Mark Walsh. Mark has worked in Antarctica five seasons and dishes all the details about living on the continent. He also shares a link to his FREE ebook about working on “the ice.”

One of the main highlights of working in Antarctica for Mark Walsh is exploring Ice caves. Photo by Nate Peerbolt.
Name: Mark Walsh
Age: 35
Hometown: Moss Point, MS
Country count: 12
Blog/Website: www.markwalsh.co
1. How did you start traveling?
I was a pretty adventurous child. We would take extended bike, boat and camping trips from a pretty young age. I think that curiosity eventually extended into places farther from my initial stomping grounds along the Gulf Coast of Mississippi. I started moving away from home during the summers in high school, and then went far-off for college. Each time, I would come back as a better version of myself and always strived for lengthy and immersive travel experiences to help further that growth.
2. Tell us about how you end up working in Antarctica.
I found out about the US Antarctic Program (USAP) while working as an undergrad Research Assistant at the College of Charleston. My professor was familiar with the program and encouraged me to apply. I didn’t get far those first couple of years, and so I eventually flew to Denver where USAP’s main offices are located. I met with some hiring managers and came up with a plan – to become a weather observer. It took about a year to get certified as a weather observer, and then another three years working part-time at Mobile airport before gaining enough experience to actually get hired. My first trip to “the ice” [Antarctica] was in 2009, and I’ve been a total of five times now: three summers and two winters. It was a long process for me—five years from first application to deployment—but it was certainly worth it.
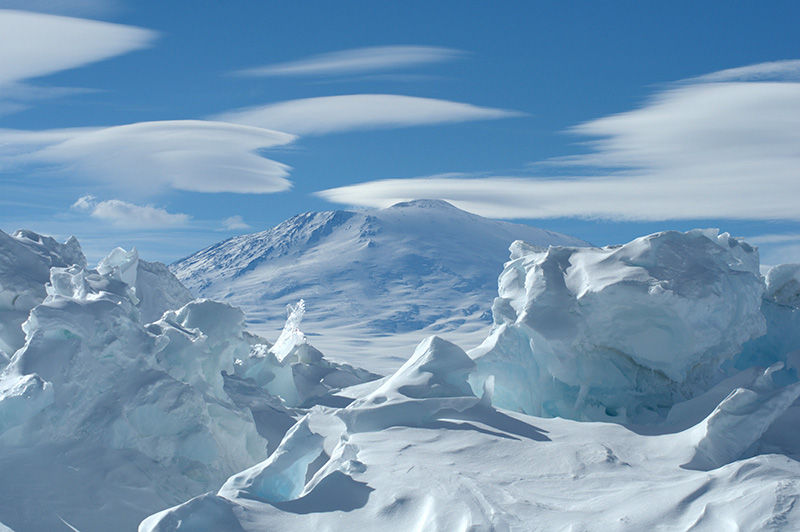
Antarctica is known for 24-hour daylight during the North American winter. Photo by Nate Peerbolt.
3. When is the best time to go to Antarctica?
Antarctica is most accessible during the Austral summer (October – March) when there is 24-hour daylight and relatively warm temperatures (+20 F). Most of the science happens during those months, so more jobs are available within the USAP and there are lots of people on the station. The cruise ships also operate during the summer for anyone who just wants to quickly visit the continent. Most people will see Antarctica during the summer; however, the Antarctic winter also brings job opportunities as well as unique experiences. The constant darkness, colder temperatures, and small working populations give the winter season a completely different feel. So, it really depends on what you’re looking for: the bright, fast-paced flurry of summer activity or the slower, darker, more personal-sabbatical feel of the winter. I suggest trying both.
4. What types of jobs are available in Antarctica?
There are many different jobs available in Antarctica. Basically, anything required to keep a small city operating is also required on the ice. This is especially true of blue-collar jobs and skilled labor. There are far fewer admin/computer jobs available, but they exist, as do other positions that do not require specific degrees or experience. However, these entry-level jobs tend to be more competitive. The pay for all jobs is about the same as you would get on mainland U.S. so it’s not a get-rich-quick scheme. But, people are generally able to save more money in Antarctica since room/ board are provided. I wrote a short guide about getting jobs in Antarctica that can be downloaded here for free. The guide provides a list of the different types of jobs available that range from carpenters to mechanics to chefs
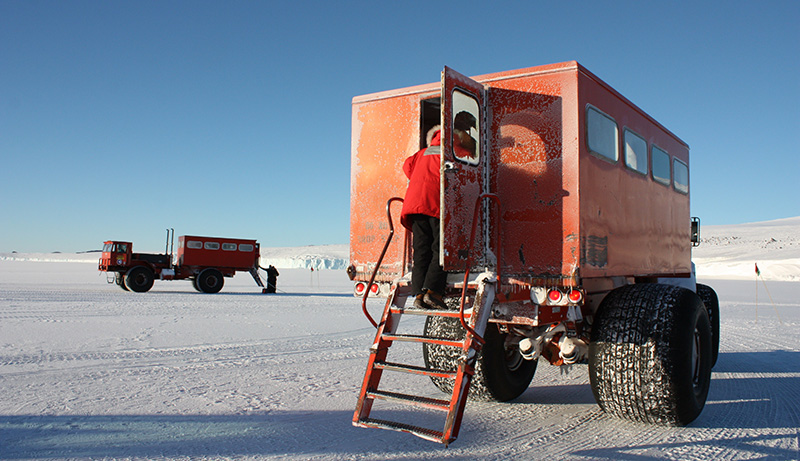
Large trucks known as “Deltas” are used to transport people through the ice. A driver sits in the cab, and people climb up the back steps and sit along two long benched in the back. They have really large, wide tires so they don’t get stuck in the snow. Photo by Nate Peerbolt.
5. Share some tips for people wanting to work in Antarctica.
Apply. It’s awesome how much information is available on getting jobs in Antarctica today. This has not always been the case, which is one reason why it took me so long to get there. Sure, even today, you may not get hired on your first try. But, there is no reason that you can’t get a job doing something within a year or two. And rest assured, U.S. citizens have more opportunities to work in Antarctica than anyone on this planet because the U.S. Antarctic Program hires three to four times more people than any other countries’ Antarctic program. We are very fortunate.
6. What’s the average cost of a trip to Antarctica if you aren’t working there? Share some tips for getting there on a budget.
I’ve never actually paid money to go to Antarctica, so cannot say from actual experience. However, I do know that most people will take a cruise to Antarctica from South America so [they] will have to fly to Chile or Argentina ($1-2k). An average cruise will be about $4-6k per person, plus some gear, excursion costs, incidentals, etc. I would bet on $7-10k per person for a standard Antarctic experience. But like anything, the sky is the limit. I have heard of people hanging around Tierra Del Fuego and catching some last-minute cruise deals for about $2k.
[Update on Antarctica costs from TravelLikeAnna: The average cost is roughly $10,000 for a cruise if booked in advance with flights. There are a lot of last minute deals out of Ushuaia, Argentina, which is the main hub for cruises. When I was in Ushuaia, there were deals ranging from $7,500 to $5,000. But, I met a guy who just got back from a last-minute deal that was only $2,500. It is possible to get last minute deals, but you might have to hang out around Ushuaia for a while to get one. It’s not the cheapest place to hang out. The area is beautiful though with lots of fun things to do. Antarctica is possibly on my list for next year so I’ll post more details if/when I make it down there.]
But here’s the thing – you can bypass all this by working for the USAP. Not only are you being paid to go but are able to have experiences that money cannot buy. Want to go to the South Pole? Sure, there is a company can take you there. Just plan on spending $40-60k. Want to actually sleep in the South Pole station? Sorry, you have to work for the U.S. Antarctic Program. Otherwise, you’ll be outside in a tent. Granted, a very nice tent.
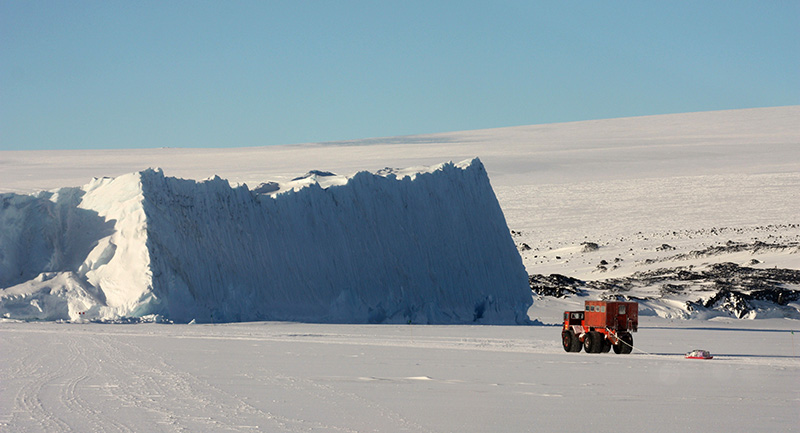
Rush hour in Antarctica. Photo by Nate Peerbolt.
7. Share one of your travel highlights in Antarctica.
There are so many. I mean, the entire experience of working in Antarctica is a highlight. I’ve enjoyed exploring ice caves, mountain biking, going to South Pole, visiting historic huts, seeing wildlife, conducting scientific research, performing at an outdoor music festival, polar plunging, flying in military aircraft, experiencing -61 F temperatures (not wind-chills), running a 5k, etc. But the fact is these day-to-day activities become routine, even in Antarctica! I think the best part of going to Antarctica is similar to what you experience whenever you relocate to a different environment. It’s the ability to create new habits and routines, to learn from new people and surroundings, and to ultimately leave as a better and more developed person. This is certainly possible in Antarctica, and is the thing to which I look most forward every time I go.
8. What is the biggest myth about Antarctica?
Aliens built pyramids there. I’m kidding… sort of. But that does seem to come across Facebook pretty regularly. Otherwise, I’m not sure people actually know that much about it. Most of the questions I get from people are pretty generic. Although, there does seem to be some confusion about penguins and polar bears. Polar Bears = Arctic = North Pole. Penguins = Antarctica = South Pole.
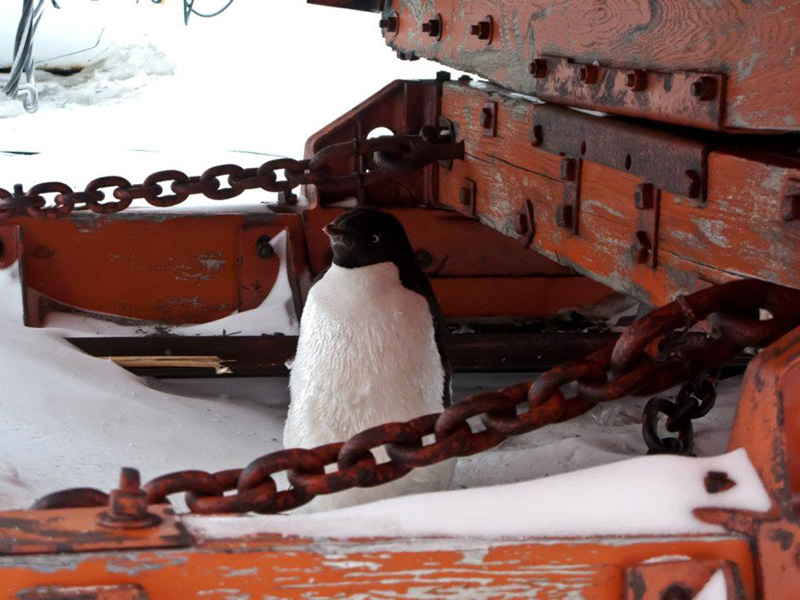
Mark Walsh jokes that the biggest misconception is that Antarctica has polar bears. Polar bears live in the North Pole and penguins live in the South Pole. Photo by Nate Peerbolt.
9. Name three things you always pack for Antarctica.
A sewing machine, indoor soccer shoes and a cordless phone.
One of the best things about working in Antarctica is the simplicity of life. You live on an island, both literally and figuratively. There are no cell phones (but we have pagers!) and have slow internet with landline telephones. Your room and board are provided, and most people don’t ever have to cook or clean. There is no commute to work, as your dorm is a short walk from everything: the cafeteria, gym, three bars, and rumor has it – a library (although I’ve never been there….I’m kidding. It’s nice and quaint with more books than you could ever read).
You typically work nine hour shifts, six days a week, but will find you actually have more free time than you would in the States. This gives you the opportunity to do many of the personal projects and recreational activities you may not otherwise be able to do. There are clubs to join, sports leagues to play, craft rooms to create, and bands to practice with. Most people’s creativity is allowed to flourish in this environment, and there is plenty of evidence that it does.
10. What is your next adventure?
Good question. I’m currently in Mississippi rebuilding a 38’ sailboat. I imagine I’ll have some warm-weather adventures between future trips to the ice.
__________________________________________
COMING UP NEXT

Best of 2017
Next week, I’ll wrap up 2017 with a recap of the most popular posts and adventures from the year to inspire your 2018 New Year’s travel resolutions! What are your travel resolutions for 2018?
12 Places Not to Miss in India
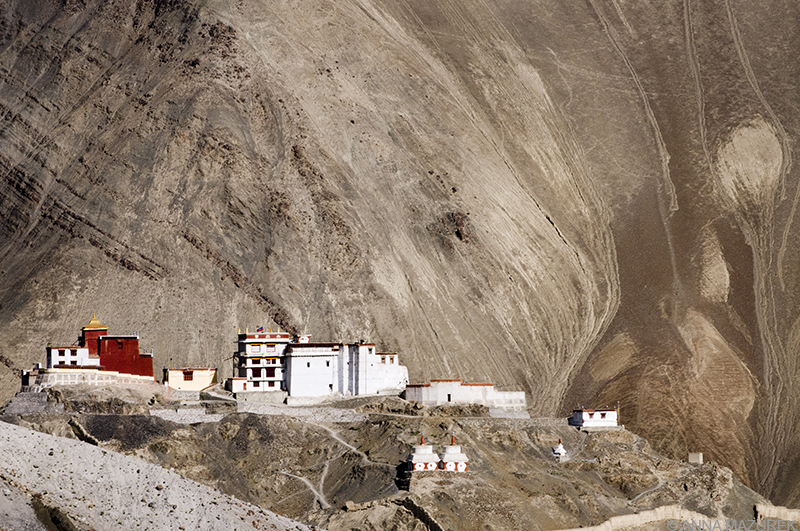
Temisgam Monastery, Ladakh, India
Traveling in India is the greatest adventure. Yes, it smells at times, but the scenery is so stunning it defies words. It will make you feel as if you stepped into a wall calendar. The poverty, heat and spices can be intense, but it’s worth every minute. The people will win you over with their kindness and resilience. There is no place in the world as intensely beautiful or complicated.
I’ve compiled a list of my favorite places—a mixture of both well-known and off the radar spots that I discovered during my five summers in India. I never knew most of these places existed until I arrived there by happenstance or a recommendation from a friend/coworker. Writing this post made me more homesick for India. I hope it inspires you to book a flight!
A stray cow stops to pose for a photo at Metab Bagh gardens, which are across the river from the Taj Mahal.
1. Metab Bagh
Metab Bagh is the best place to get an iconic view of the Taj Mahal minus the crowds. These stunning gardens lie across the river from the Taj. From my experience, it’s one of Agra’s best kept secrets because taxi drivers never seem to want to take you here unless you are clear about where you want to go. TIP: Go at sunset then go see the Taj at sunrise the next day. (Trust me on this, I’ve been to the Taj seven times.)

I faced my fear of heights to climb on this rock over the edge of the cliff at Kardung La pass in Ladakh, India.
2. Khardung La
Imagine a spider web of colorful, tattered Buddhist prayer flags strung from a rocky snowcapped mountain top. Include a small tea stand and a giant sign that says you are on the world’s highest motorable road, and you’re at Khardung La. The scenic mountain pass is located in the Ladakh region 39 km from the trekking tourist hub of Leh and connects the Shyok and Nubra Valley. While the sign at the top claims, the altitude is 18, 379 feet, it’s actually 17,582 feet. Until a few months ago, the pass held the title as the highest motorable pass in the world but a new road in India has now claimed the title.
Stepwell, Panna Meena ka Kund, Amber, India
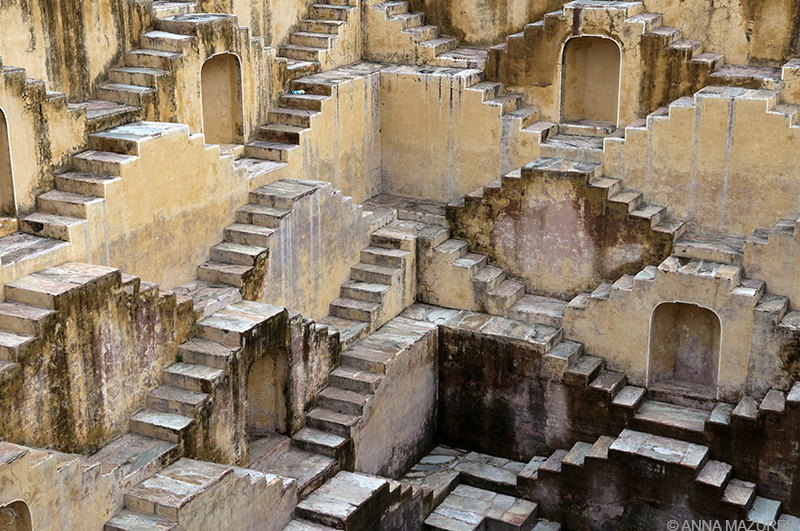
3. Panna Meena ka Kund, Jaipur, Rajasthan
This 16th century stepwell lies near the Amer Fort in Jaipur. It’s smaller than the famous Chand Baori stepwell, and there are no barriers keeping you from climbing the steps to the water. It’s deserted after the crowds leave the Amer Fort.
4. Kerala Backwaters
Everyone should spend a few days or a week living on a houseboat exploring the tropical backwaters of Kerala, a palm-tree lined labyrinth of canals, rivers and lakes that parallel the Arabian Sea in Southern India. The state of Kerala is rated as one of the safest and most environmentally friendly. In my opinion, it’s one of the cleanest parts of India. Southern Indian food is amazing especially thoran, a dry curry with shredded coconut and beets.
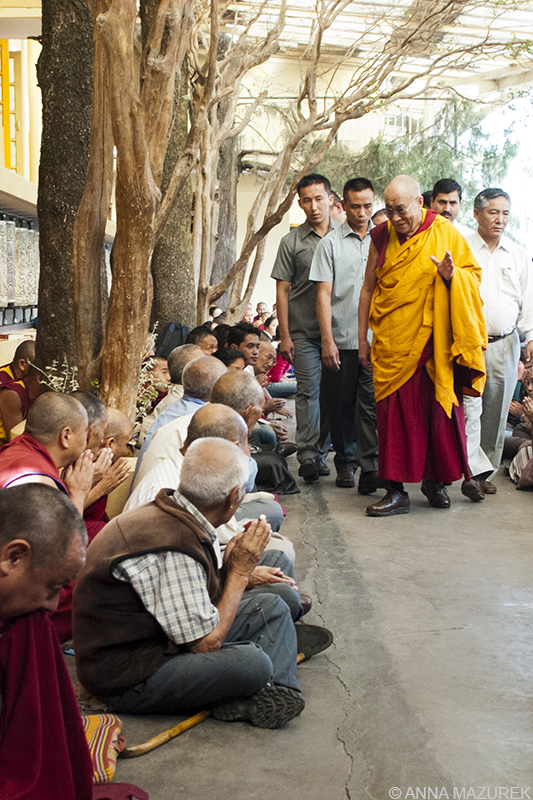
His Holiness the Dalai Lama waves the crowd as before his teaching at his temple in McLeod Ganj, India on June 9, 2012.
5. Dalai Lama’s Teaching in McLeod Ganj
One of the most amazing experiences in my life was attending the Dalai Lama’s teaching at his temple in McLeod Ganj India. I managed to get a photo pass two years in a row. (You can’t take in a camera unless you have a photo pass.) The experience itself is amazing – the power of his humble smile, the smell of the fresh bread the monks pass out while he speaks and the hum of countless languages floating around the room. His temple itself is stunning. Even if you can’t hear him speak, be sure to explore his stunning temple.
How to attend the Dalai Lama’s teaching in McLeod Ganj: You need a ticket, which are only available three days before the teaching at the Tibetan Branch Security Office. Foreigners must bring their passports to register. Seating is first come, first serve with most locals saving their seats a few days before by marking their spot with a pillow. There’s heavy security and metal detectors when you enter so arrive early. For more information, check the Dalai Lama’s website.
The Qutb Minar is one of my favorite spots in Delhi to take my friends and photo students.
6. Qutab Minar
If you love ancient ruins, then you’ll love India. The Qutab Minar is one of my favorite. The UNESCO World Heritage Site lies in Delhi and features a 239-foot tall sandstone tower built in the 13th century. It was a victory tower built after the Islamic conquest of India. Be sure to explore the intricate cloister columns of the Quwwat-ul-Islam mosque at the base of the tower. (Entry fee: Foreigners 500 Rupees/$7.65 USD; Indians 30 Rupees/ 45 cents USD)
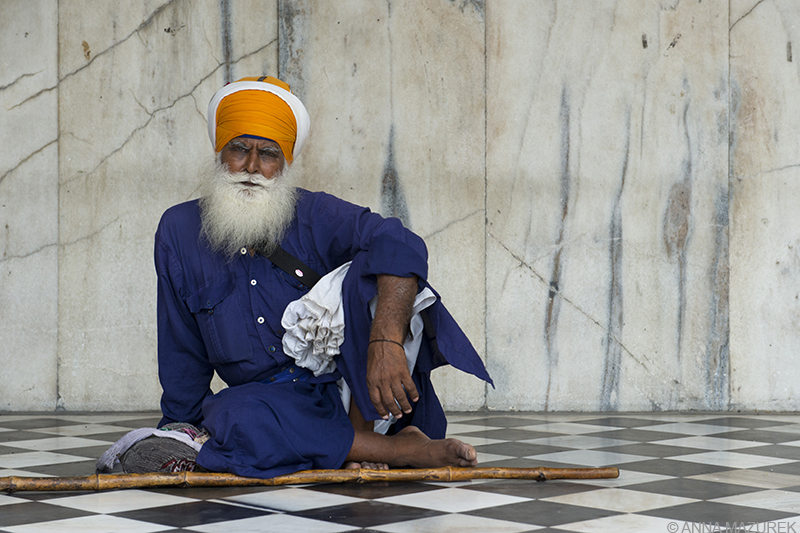
A man rests along the edges of the holy pond at the Gurudwara Bangla Sahib Sikh Temple in Delhi, India.
7. Bangla Sahib Gurudwara (Sikh temple), Delhi
If you only visit one place in Delhi, this is it. Built in 1783, the white-marble Sikh temple complex, topped with golden domes is surreal. It features a Gurudwara (main worship hall), large holy pond and langar (kitchen). The kitchen serves free meals twice a day and is open to everyone. People of all faiths are welcomed to visit the temple and volunteer. Everyone here is so welcoming and kind. I once visited the temple to watch a lunar eclipse, which was an amazing experience. Bring a bandana or scarf to cover the top of your head to visit. No shoes are allowed inside. Entry is free, and there’s a helpful tourist office.
8. The Blue City (Jodhpur)
Jodhpur will be my first stop on my next trip to India. It’s been on my list for years. It’s the largest city in Rajasthan and known for its blue buildings. It’s called the “sun city” because it has sunny weather year-round. The houses are painted blue to keep them cooler. It’s accessible by train from Delhi and Instagram-worthy.
Oberoi Hotel Gurgaon, Delhi, India
9. Breakfast Buffet at the Oberoi Hotel
The Oberoi Hotel breakfast buffet is roughly $20 and worth every penny. After a few months in India, this buffet saved me. I was craving real blueberries and yogurt! There is an elaborate display of both Western and Indian breakfast items. Everything listed on their menus along with fresh juices and a long list of teas is also included in the price. There are two locations in Delhi and both are equally amazing. Breakfast runs from 6:30 a.m. to roughly 10:30 a.m. The third location is undergoing renovation and will open in January 2018. To be clear, I never stayed here because it’s out of my price range. I would just stop by for breakfast as a treat to myself.
I love skipping rocks at Tso Moriri lake in Korzok, India near the Tibetan border. It’s a six hour drive from Leh roughly.
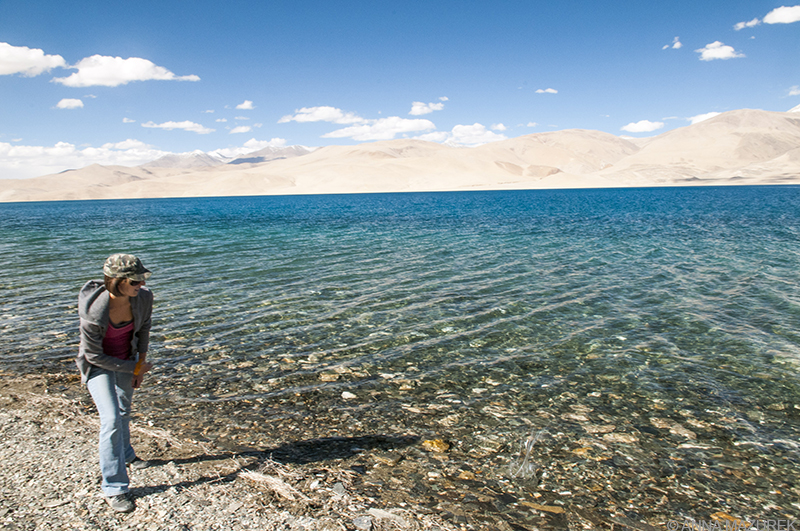
10. Skip Rocks at Tso Moriri Lake
Tso Moriri Lake is one of the best places to skip rocks in the world. It’s the largest high altitude lake in India at 14,836 feet and lies near the Tibetan border. The water is crystal clear and fed by springs and melting snow. (It’s freezing. I stuck my feet in once.) It’s located near the town of Korzok about a six-hour drive from Leh down bumpy roads. There’s an unlimited supply of flat rocks along the edge of the lake. The locals are total pros at skipping rocks!
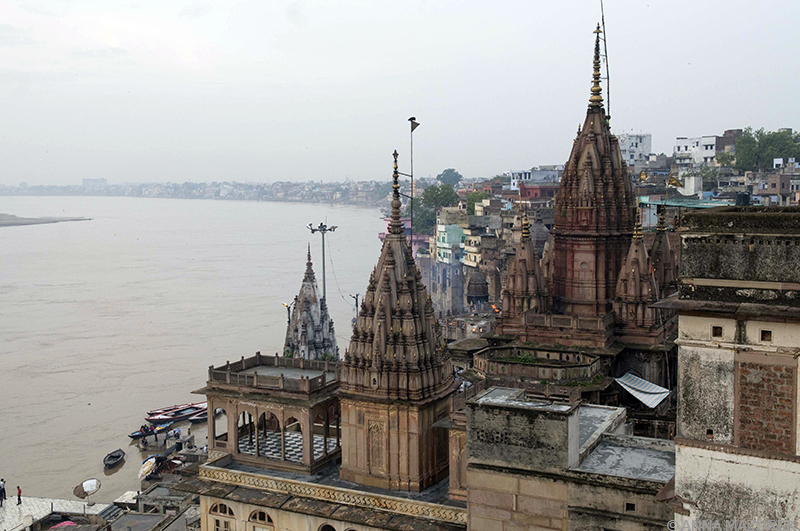
View of the Ganges River in Varanasi, the holiest city in India
11. Varanasi
Varanasi is the epicenter of the charming chaos of India. It is the holiest city in the country – the center of life and death – and possibly the oldest living city in the world. Hindu pilgrims journey to the city to wash away their sins at the bathing ghats along the holy Ganges River. Being cremated at the burning ghats along the river is said to end the cycle of rebirth. Ironically, the sacred river is severely polluted and unsafe for drinking and bathing. Yet, it is normal for a dead cow carcass to be floating within 20 feet of a man bathing. Religion is by far the most powerful force in the world.
A view of the city of Leh from the Namgyal Tsemo Gompa monastery
12. Leh
Leh is a little tourist town in the Himalayas (11,500 feet) accessible via scary mountain roads or an equally frightening plane landing. It’s a great place for rest between treks and amazing for street photography! It’s by far one of my favorite towns in India. Take the short hike to Leh Palace and Namgyal Tsemo Gompa monastery from town. There’s several great monasteries and palaces nearby including Stok Palace, Shey Palace, Spituk Monastery, Thiksey Monastery, Matho Monasteary, which can be done in a day tour. I recommend visit nearby Alchi and doing homestays in Ang.
______________________________________
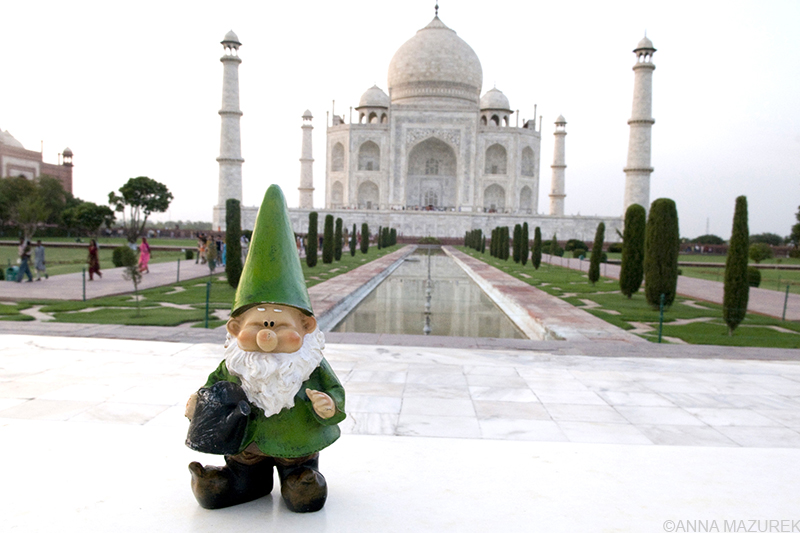
Alfred is probably the only gnome that’s ever been kicked out of the Taj Mahal.
Tips for Visiting the Taj Mahal
- Visit at sunrise. Be there first thing when they open at sunrise. There’s less people, bugs and vendors trying to shove little Taj snow globes in your face. Plus, the light is nice for photos and it’s cooler. The Taj is open sunrise to sunset daily. There’s no exact times listed on their website. They are closed on Fridays.
- Don’t go on Fridays. Again, it’s always closed on Fridays.
- Dress appropriately. Both men and women should cover their knees and shoulders. I recommend wearing those baggy hirim pants, which are cool and great for keeping the mosquitos away.
- Don’t take a bag. Carry your camera. They are very strict about what you take inside. No pens, gum or toys are allowed. It’s a very holy and fragile place. (My gnome got kicked out the second time I took him. Although, there was a professional level British film crew shooting parkour inside but yet my gnome wasn’t allowed.)
- For the best photos, visit Metab Bagh mentioned above. These are the gardens across from the Taj. I recommend to visit at sunset the night before you see the Taj.
- Plan your transport. The trains to Delhi only run at certain times so you pretty much have to spend a night in the city. It’s annoying. I think the trains back to Delhi only leave in afternoon. You can rent a driver to take you from Delhi as well. If you do this, pay the $15 for the toll road. It’s only 3 hours and much nicer than the seven hour insanity you’ll endure on the other route.
- Visit the Red Fort. You get a discount on admission if you do this and Taj on same day.
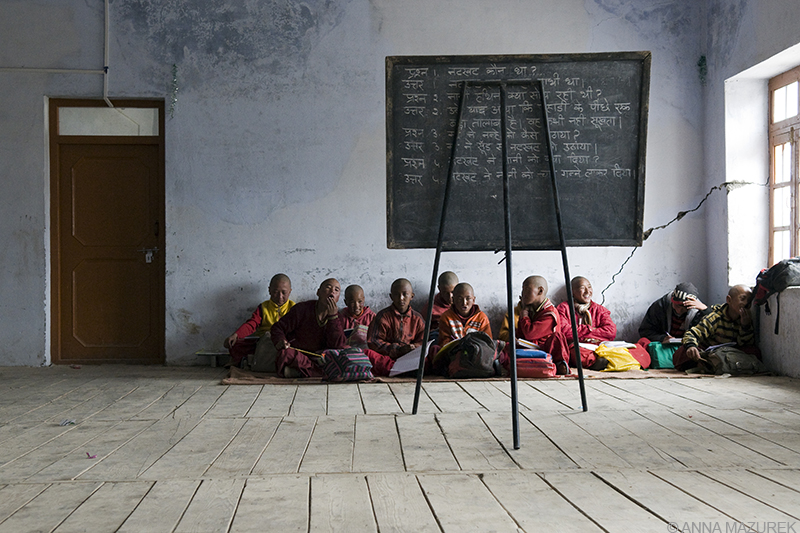
A school for monks in Korzok, India
Other tips for India
- India is a vast country. You can’t see it all at once. Plan according to seasons based on where you want to go. Summer is miserable in Delhi but perfect in Ladakh. Choose accordingly.
- Take safe taxis in Delhi especially at night. MERU is a safe taxi service I recommend in Delhi. They operate from the airport and you can call them anytime. Otherwise, have your accommodation order you a taxi. Tuktuks are fine during the day but be weary at night. The metro trains in Delhi are really nice and have a separate women’s car.
- Dress conservatively out of respect. Cover shoulders and knees at all times.
- Accept the fact that you will get sick. It’s part of the experience. Pack antibiotics and electrolytes.
__________________________________________
COMING UP NEXT
Every year I shoot a different gnome Christmas card. This is my card from 2008 when I lived in Sydney. Check out all of his previous Christmas cards here.
Best Travel Gifts for the Holidays
After an intense year of traveling (Kilimanjaro, Yellowstone, etc.), I’ve discovered a ton of great gear and accessories that have made my life easier. I’ll share my top travel gift ideas for the holidays in my next post, which you can easily send to Santa or pass along to your family.
How to Get to Bodie State Historic Park
Gold was found in Bodie, California in 1859 and mining continued until 1942 when the town was abandoned. The town became a California State Park in 1962.
Ghost Town Road Trip: A Guide to Bodie State Historic Park in California
Let me tell you a travel secret: The most amazing places are usually the hardest to find. The ghost town of Bodie State Historic Park in California is one of those places. It’s literally in the middle of nowhere 106 miles south of Lake Tahoe and east of Yosemite National Park.
The former 1800s gold mining town is now a California State Park. It was preserved in a state of “arrested decay,” which means the foundations, windows and roofs were repaired and stabilized but not restored. There’s no mannequins with ill-fitted costumes or bowls of wax grapes in sight. No fake reenactments or ice cream shops. It’s refreshingly beautiful especially for someone like me who is obsessed with photographing abandoned places and ancient ruins. I squeezed in a day trip to Bodie on a trip to Tahoe when I was visiting a friend in San Francisco at the end of the summer.
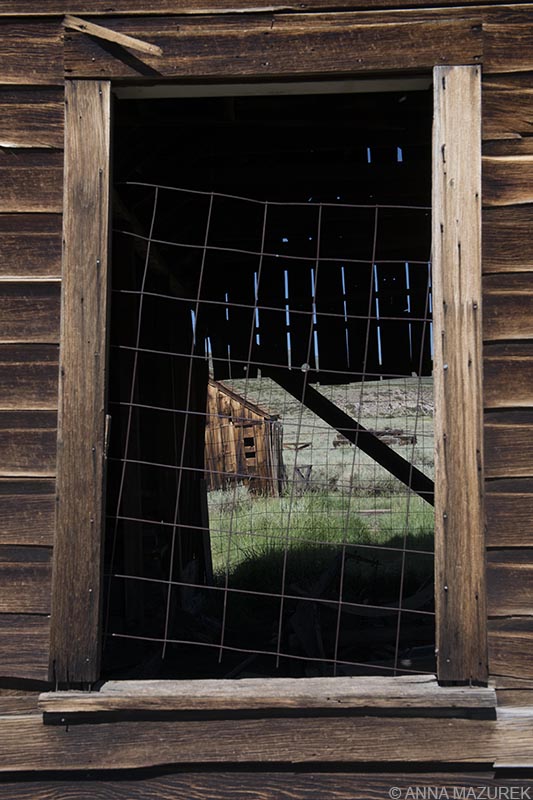
Bodie’s population ranged from 7,000 to 8,000 at its highest point.
Gold was first discovered by W.S. Bodey of New York in 1859. He died in a blizzard a few months later and never saw the town that became his namesake, which oddly enough was spelled differently. The boomtown days of Bodie started after mine collapsed in 1875 to reveal a rich body of gold ore. During the rush, the mining district included 30 different mines and nine stamp mills from 1877-1881. Unsuccessful mines started closing and the population plummeted in the early 1900s. Mining ceased in 1942. Caretakers were hired by the family of James S. Cain, Bodie’s last major landowner, to protect the town from vandals and looters. California State Parks purchased the town in 1962 to preserve the town and buildings.
Prepare to spend most of the day in Bodie. Over 50 buildings are still standing and a handful are open to the public including the 1890 Standard Mill, which is accessible only by guided tour three times a day. The town covers a large area and might feel like a bit of a workout since the town is at an altitude of 8,375 feet.
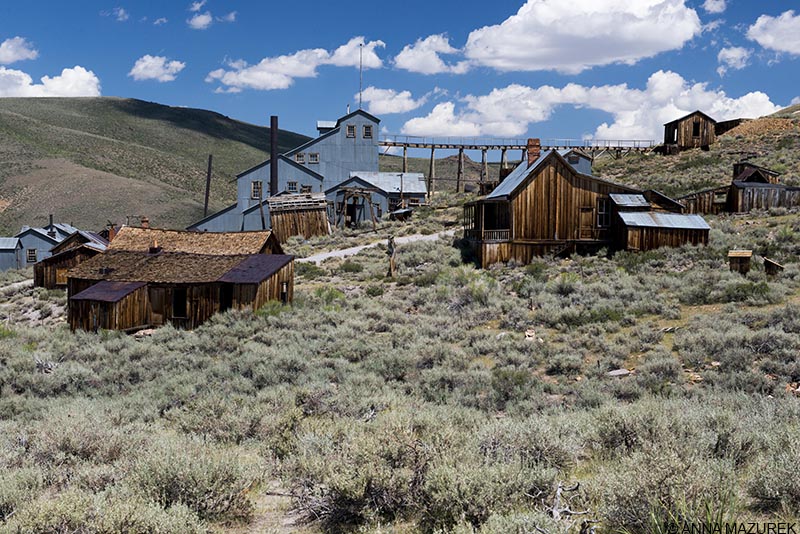
The Standard Consolidated Mining Company’s Stamp Mill was the most successful of the 30 mining companies in Bodie. It yielded $18 million over the course of 38 years. The mill is open for guided tours daily.
Tours
Once you pay the entrance fee, you are free to roam the town accept the Stamp Mill and other areas that are fenced off for safety reasons (old mine shafts). The only way to see the inside of the Stamp Mill is on a 50-minute tour, which are offered daily for $6. Tours are offered at 11 a.m., 1 p.m. and 3 p.m. from June to early September. If you’re visiting outside of that date range, ask the park museum for tour times. (I highly recommend the tour for photo opportunities.)
During the summer months, the park offers night Ghost Walks and Ghost Mill Tours featuring legends and ghost stories about the town. There are usually three different tour dates that sell out quickly.
Be sure to bring water and snacks. They do have water fountains by the restrooms, but they don’t always work.
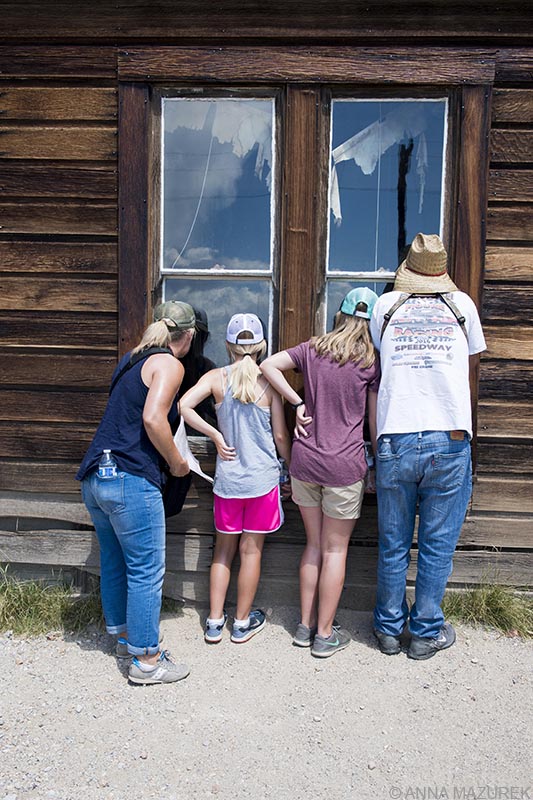
Bodie is crowded in the summer months so arrive early for the best parking and photos!
When to Go
Due to the altitude (8,375 feet), it can be difficult to reach Bodie in the winter except by skis, snowmobile and snowshoes. The park is open all year.
Summer Hours (March 18th – October 31st): 9 a.m. – 6 p.m.
Winter Hours (November 1st – March 17th): 9 a.m. – 4 p.m.

The Bon Ton Lodging House became the second schoolhouse in Bodie after the first one burned down. It closed in 1942 and had its highest enrollment of 615 from 1879-1880. This image was shot through a window, which created the semi-blurry effect.
Entry fee
Adults: $8
Children (age 3-17): $5
Children under age three: Free
Be sure to buy the $2 map and guide because the buildings aren’t labeled.
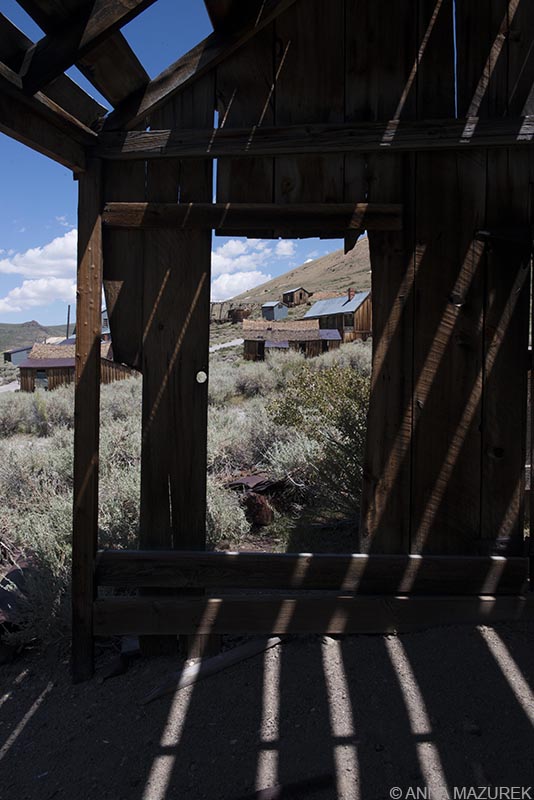
There were more than 60 saloons in the Bodie and opium dens in the Chinatown section.
How to get to Bodie State Historic Park
While the town is 106 miles southeast of Lake Tahoe, the drive takes two hours due to the tiny two-lane roads and construction at times. Cell service is spotty. Be sure to arrive early as the parking lot fills quickly. The park is 13 miles down a bumpy, dusty road from Highway 395. For more information on Bodie, visit the park website.
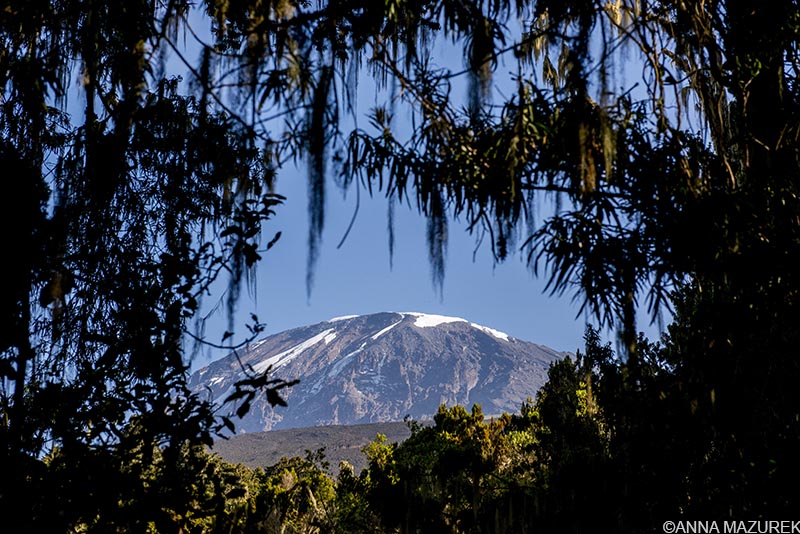
Kilimanjaro 101: Cost, Routes & Packing List
Our last view of Kilimanjaro through the rainforest on the trail to the Mweka Gate on the last day of our trek.
Two weeks ago, I hiked the Lemosho Route to the summit of Kilimanjaro. I’ve compiled all the main questions about the trek including when to go, which route to choose, what to pack and a breakdown of the costs. In my previous post, I provided a day-by-day breakdown of what it’s like to climb Kilimanjaro along with photos.
Best Time to Climb Kilimanjaro
Overall, there are two main trekking seasons: January to March, which is usually colder and quieter, and June to October, which is usually the busiest because of holiday travel in Europe and North America. Snow fall is highest from November to May. December is becoming popular due to holiday season, but it’s very cold. March to May is the rainy season, and the worst time to climb. November is also rainy.
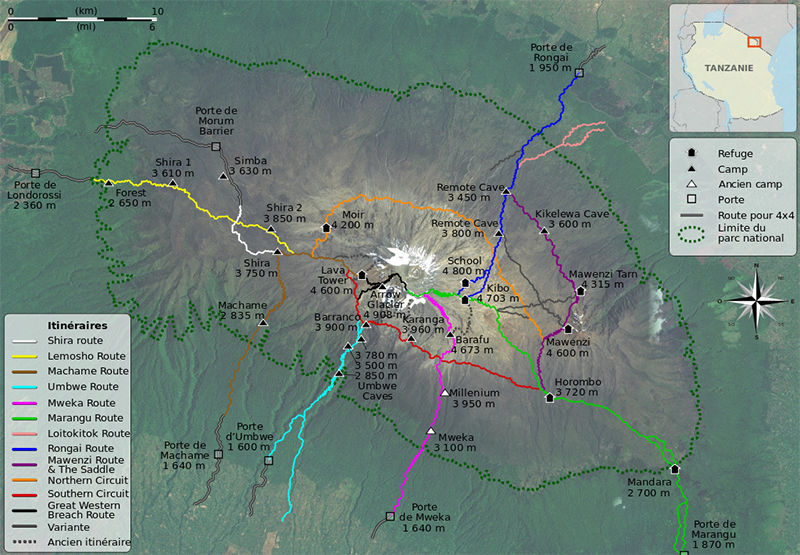
Kilimanjaro Route Map courtesy of WikiMedia Commons
Which Route is Best to Climb Kilimanjaro?
I sat down with my guide and interviewed him one night about hiking the mountain. Here’s everything you need to know from a guide who’s hiked the mountain 150 times.
All of our guides preferred the Lemosho and Macheme routes the best because they have the best weather and scenic views. He says the easiest summit routes are Shira, Lemosho, Macheme and Umbwe, which all summit the same route. Many routes offer an option to add a day to help acclimatize.
The Seven Main Routes to Climb Kilimanjaro
1. Lemosho Route (6-7 days)
Along with Macheme, this has the highest success rate because it’s longer and offers the best opportunity to acclimatize. The hike out of the park on the last day is very easy (3 hours) compared to Macheme.
2. Macheme Route (5-7 days)
Macheme is very similar to Lemosho except the first and last days are longer. It offers the same amount of acclimatization. The last day is a full day of hiking.
3. Shira Route (6-7 days)
This route is easier because you drive directly to Shira I camp and start from there, which personally I think is cheating a bit. The hike to Shira I is steep but nothing compared to summit day.
4. Ubwe Route (5-7 days)
This is the hardest route because it’s very steep especially the first two days. It offers a very picturesque view of Baranco camp, which is why people choose it.
5. Marangu Route (5-6 days)
This route has huts instead of camping. There are bathrooms but no showers. The sinks have cold water, and they give you warm water to wash your face. You can acclimatize well on the six-day route. The weather isn’t the best, and the summit route is more difficult. The route to Keebo Hut is also very dusty. This route is just for people who don’t wan’t to camp.
6. Rongiai Route (5-7 days)
This route is the easiest and is located by the Kenya border. It’s dangerous because of the potential of animals (lion, elephant, water buffalo). It follows the same summit route as Maraugu. It’s only a 2-3 hour walk each day and the hardest day is summit day.
7. Mweka Route – Down Route Only
This route is a down-only route. It starts at Barfu High Camp and has two camps – Mweka Hut Camp and High Camp (Millennium Camp on some maps).
Other options: The Northern Circuit Route is the newest and longest route. It follows the Lemosho Route initially then circles around the quieter northern side of the mountain.
The Western Breech is the most dangerous route and should be avoided. Most high-profile tour operators won’t even offer this route. It runs by Arrow Glacier. The route is steep and there’s a high risk of rock fall. Three people were killed by rocks here in 2006. The Tanzanian government requires you sign a waiver just to climb this specific route. All the guides hate it.
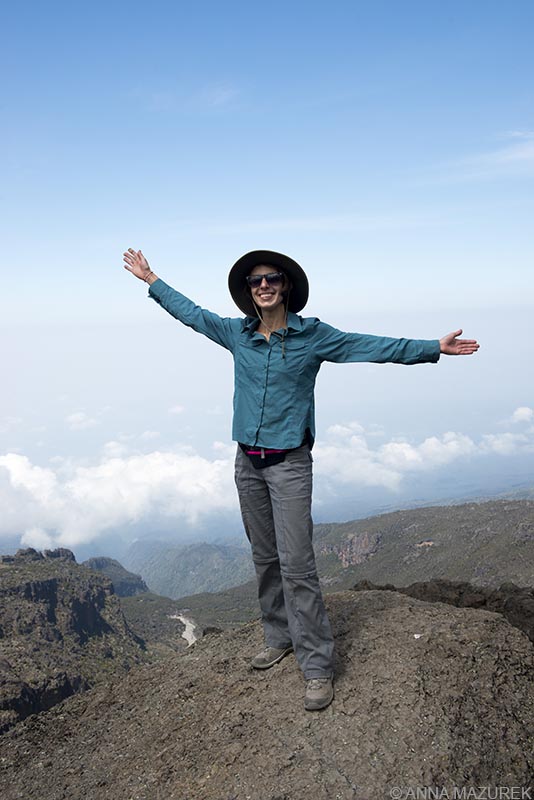
I’m totally rocking my wide brimmed hat, amazing SPF/wicking shirt, Prana pants, Keen hiking boots and the SPIbelt waist belt for my phone at the top of Baranco Wall on day four of the trek.
Kilimanjaro Packing List*
Clothing
- 2 pairs of long sleeve thermal tops (I prefer these zip-neck thermals the best.)
- 2 thermal pants (merino wool or Capilene)
- 1-2 short sleeve shirts OR 1 long-sleeve wicking SPF shirt
- Heavy fleece or down jacket
- Fleece pants
- 2 pairs of trekking pants (These Prana pants are the best.)
- Waterproof jacket/raincoat
- Waterproof pants (Consider getting insulated waterproof pants.)
- Underwear (one for every day of the trek)
Hat & Gloves
- Wide brimmed hat
- Wool hat that covers ears
- Ski mask or balaclava
- Lightweight gloves
- Wool or down mittens to layer over gloves (This pair was the cheapest I could find.)
Footwear
- Hiking books that cover ankle (I loved my Keen Terradoras.)
- Camp shoes (I took my old Nikes.)
- Shoe bag to carry spare shoes
- Hiking Socks (7 pairs)
- Gaiters (These were the most helpful on summit day.)
Sleeping Bag
Most tours provide sleeping bags, but I recommend bringing another to double layer because it gets really cold. I wore almost all my layers every night to sleep. Don’t forget to bring a travel pillow!
On the Trail
- 20- to 30-liter daypack for carrying what you need on the trail (I recommend Osprey Packs for their lifetime warranty.)
- Rain cover for daypack
- 1.5 to 2 liter CamelBak (This will freeze on summit day but amazing the rest of the time.)
- CamelBak bite valve cover (Trust me, it’s worth the extra money.)
- 2 – Nalgene bottles (32 ounces)
- Sunglasses
- Headlamp with extra batteries
- Trekking Poles (rent these in Moshi)
- Snacks
Other items:
- Waist belt for phone (This SPIbelt was the best thing I took on the trip! I always had my phone handy without having to dig it out of daypack.)
- Hand & Foot Warmers
- Electrolytes (These Nuun tablets are the best! Taste great and only 1g sugar! Lemon Lime flavor is my favorite.)
- Moleskin and Band-Aids for blisters
- Journal and pen
- Extra batteries and phone charger
- Packing cubes
- Ibuprofen
- Antibiotics for diarrhea and altitude sickness (Talk to a doctor before your trip.)
- Wet wipes & hand sanitizer
- Basic toiletries
- Hand towel
- Protein powder
- Passport and money (Keep it with you at all times!)
- Dry bags and laundry bag to put dirty clothes
- Sunscreen (I recommend a natural stick SPF like Bare Republic.)
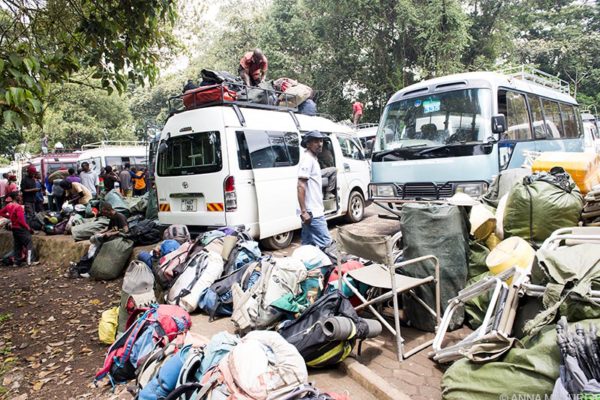
Packing Tips for Kilimanjaro
- The more things you can access without taking off your daypack, the easier the trek will be. That’s why finally investing in a 1.5-liter CamelBak was the best decision I made. I recommend the bite value cover to keep the value clean. I had two 32-ounze Nalgene bottles for summit day since I knew the CamelBak would freeze.
- I managed not to get sunburned thanks to the ridiculous large brimmed hat that I bought and the Columbia Silver Ridge Lite wicking/SPF I wore that shirt everyday almost.
- I recommend using packing cubes to organize your bag. Trekking companies provide a waterproof duffel bag for your things. It makes life so much easier if you have packing cubes organized socks, another for top layers and another for meds, etc. so it’s easy to find things.
- I bought vanilla flavored hemp protein powder to help give me energy on the long days and especially on summit day. It was a huge help.
- Every afternoon, I dissolved the Nuun electrolyte tablets in water to help rehydrate. They were a total lifesaver. One to two tubes were sufficient for trek. There’s 10 tablets in each tube and lemon lime is the best flavor.
- Talk to a doctor about possibly taking antibiotics with you on the trip to help with altitude, nausea and diarrhea. (I got food poisoning 12 hours before my flight home and antibiotics saved me. I also took Diamox for altitude. I took a very, very low dose since I had a bad reaction in India the one year I took it.)
- For easy access to your phone for photos, consider this SPIbelt for your waist. I borrowed one from a friend and it saved me.
- Most tours provide sleeping bags but consider bringing your own if you have one to double layer. It was REALLY cold and I slept in all of my layers most nights.
- Make sure all your thermals are either merino wool or Patagonia’s synthetic Capilene. Your socks should all be merino wool. I just bought whatever socks REI had on clearance regardless of the color.
- Take a trash bag or shoe bag to pack your hiking boots after the trip. You’ll want a shoe bag for your camp shoes during the trek as well. Your shoes will be GROSS especially after the bathrooms.
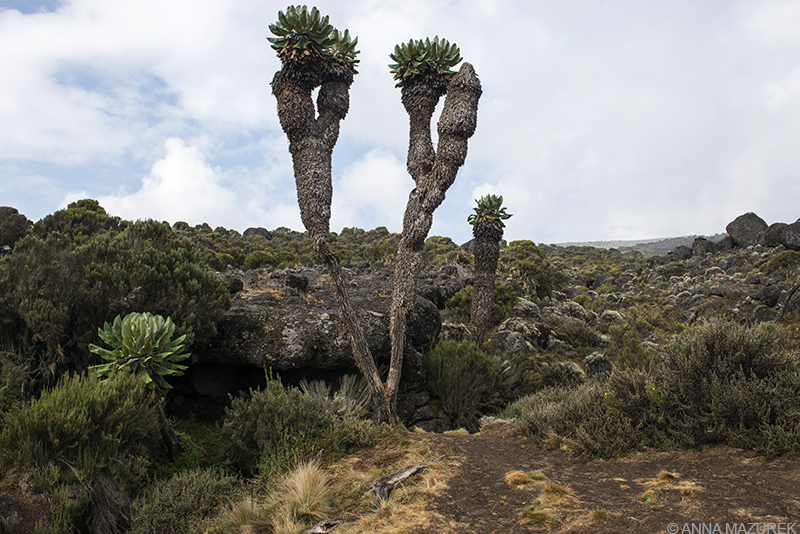
The route to Baranco Camp is covered with these stunning cactus-like trees known as giant groundsel.
How Much Does It Cost to Climb Kilimanjaro?
Trek: $1,850
Tips: $300
Flight: $1,150
Visa: $100
Gear: $284.12
Total Cost of Climbing Kilimanjaro: $3,584.12 USD
- Trek Cost: Most routes start at $1,600 and range to around $2,000. All treks include transport into the park, guides, porters and cooks. You can’t hike the mountain without a guide. Accommodation the night before and after are usually included as well as airport transfers. We paid $1,850 for our Lemosho Route, which is normally advertised for around $2,100. We got a discount because of the number of people in our group and the fact that my friend had used the same company in Nepal.
- TIPS: We were advised to bring $250 to tip our guides, porters and staff. I tipped the porters who carried my camera and the gnome individually a bit extra. I arrange this in advance.
- VISA: It cost a $100 for a Tanzania visa for me because I’m American. Most countries are $50.
- Flight Cost: My flight was $1,150 roundtrip from Houston to Kilimanjaro on Turkish Airlines with a stop in Istanbul. It was the most direct route I could find from Texas that didn’t involve more than one stop. Plus, Turkish Airlines is really nice.
- Gear: I had a lot of gear and borrowed what I could. I bought two pairs of thermals, lots of socks, electrolytes, CamelBak, a wide brimmed hat and a Columbia long sleeve SPF wicking shirt. I took advantage of the back-to-school tax-free holidays and Labor Day sales so I got a great deal. The gear in Moshi is horrible quality so buy things before you leave. The only exception is trekking poles or gaiters.
For more about climbing Kilimanjaro, check out my previous post that provides a day-by-day breakdown of the Lemosho Trek!
____________________________________________________
*P.S. I am not sponsored by any of the brands or products mentioned above. I have used all the products myself and found them extremely helpful. Please note some Amazon affiliate links are included above. If you click on a link and make any type of Amazon purchase, I earn a small commission with no additional cost to you. I hope you found this post helpful and appreciate your support of the blog. Please email me if you have questions.
What It’s Like to Climb Kilimanjaro
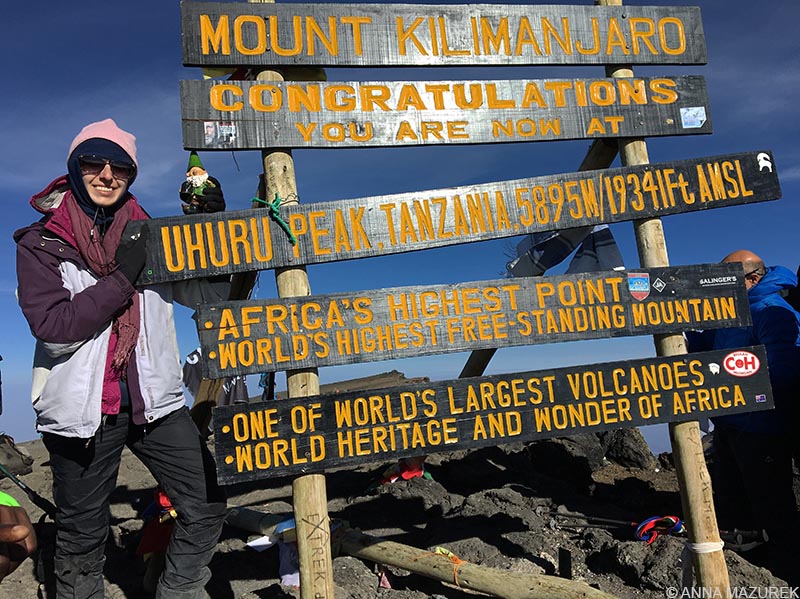
Alfred the Gnome and I made it to the top of Kilimanjaro. Alfred hopes he was the first gnome to the summit.
A Day-by-Day Guide to the Lemosho Route on Kilimanjaro
We are insane.
Those were my initial thoughts when I saw the mountain for the first time. I was in the back of a bus riding down a bumpy road toward the Lemosho Gate to start the trek. Kilimanjaro was looming in the distance over a barren field filled with flat topped trees. The greatest adventure of my life was about to begin.
We are insane.
This would be a reoccurring thought over the next seven days as we attempted to summit Africa’s highest peak and the tallest free standing mountain in the world at 19,341 feet (5,895 meters).

Walking through the moorlands en route to Shira II Camp
Why Kilimanjaro?
I found an old bucket list in my phone from 2014. Kilimanjaro was on the list and had been for years. When I was running photo trips in the Himalayas in India, a few of my co-workers had worked in Tanzania and climbed the mountain. After unsuccessfully trying to work in Tanzania and getting assigned other parts of the world, I put Kilimanjaro aside for a while. A WhatsApp message in June changed everything. One of my best friends half-jokingly invited me to climb Kilimanjaro with her in September. The idea was insane with my current work schedule. I asked the cost assuming it would be absurd. But, it really wasn’t as bad as I thought: roughly $3,250 USD ($1,850 plus $250 tips for the trek itself and a $1,150 roundtrip flight out of Houston). I thought the entire trip would be around $5,000 USD! I rearranged my life and made it work.
I’m 36 and not getting any younger. Plus, I am probably in the best shape of my life. When I was working in India, I spent a lot of time at high altitude both camping at 15,000 feet (the same height as basecamp for Kilimanjaro) and driving up to 18,500 feet to take photos without any major issues. Kilimanjaro is the highest mountain you can climb without the aid of mountaineering gear. It’s just plain uphill hiking; there’s no ice picks, ropes or crampons. All I had to do was walk slowly for six days.
Still, it was the hardest, coldest and most amazing thing I’ve ever done. While exact statistics are hard to find, approximately 30,000 people attempt to climb every year and 75% reach the top. Altitude-related issues are the biggest challenge preventing people from summiting.
I’ve complied a day-by-day breakdown of our trek on the Lemosho route below. For a breakdown of all routes, best times to go and packing lists, check out my Kilimanjaro 101 post. Please note all elevations are from the park signs and hiking times are based on my experience.
Day 1 – Lemosho Gate to Mkubwa Camp
Altitude: 2650 m/8,694 ft; Distance: 7 km/4 mi; Time: 3 – 4 hours

Our first group photo at the gate before we started our trek!
Our first day was very easy. We left Moshi at 9:30 a.m. to finish gathering supplies for the trek and drove over to the Lemosho Gate. We had to sign in and all the porters’ loads had to be weighed since they are only allowed to carry 20 kg/44 lb.
We hiked through the rainforest for a few hours with several monkey sightings including the blue monkey and colobus monkey that has a fluffy black tail with a white stripe that looks like a skunk. We reached out first camp known as Big Tree Camp or Mkubwa before sunset.
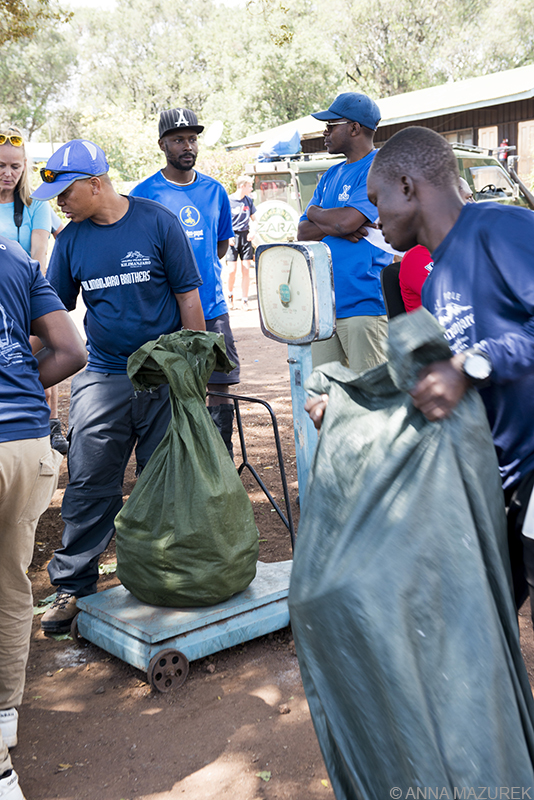
We had to wait at the main gate for the group of ahead of us to weigh all their bags that the porters were carrying. Each porter is supposed to only carry 20 kg/44 lb.
We choose a camping route. All campsites had toilet buildings of some sort, which were normally just squat-style pit toilets. There were no showers during the entire trek. We got hot water to wash our faces and hands every morning and night except at base camp. I wasn’t expecting it to be cold the first night, but it was pretty chilly.
This orange tent was my home for seven days on the trek.
There were five people in our group total including my best friend Becky, a Cincinnati-native living in Tokyo, who organized the whole trek. Two Kiwi girls joined us – Nicci, a diplomat and a friend of Becky’s from Japan, and Polly, a data privacy lawyer based in London who is friends with Nicci. The fifth person in our group was a Canadian accountant named Francois from New Brunswick who decided the best way to celebrate his milestone 40th birthday would be to climb Kilimanjaro, which I think is pretty awesome!
Day 2 – Mkuwbwa Camp to Shira II Camp
Altitude: 3,850 m/12,631 ft; Distance: 17 km/10.5 mi; Time: 6-8 hours
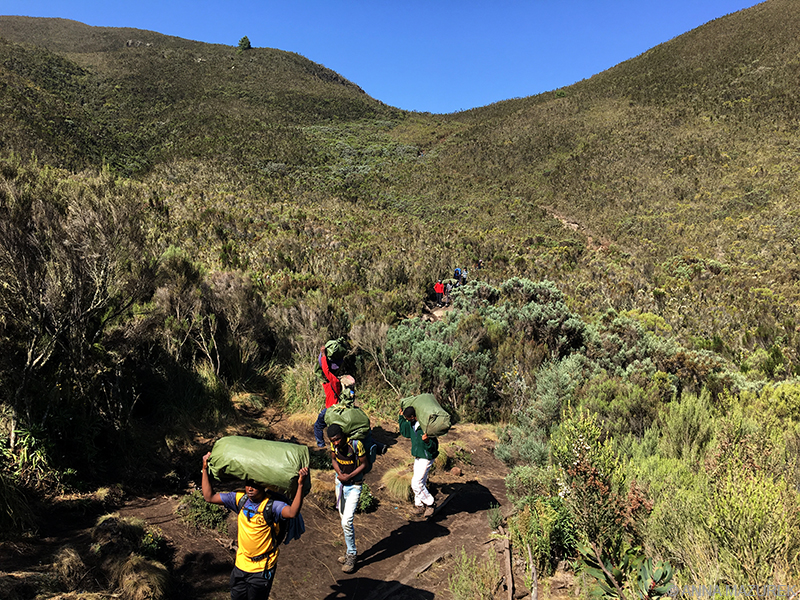
Porter’s carry bags through the moorlands to Shira II camp.
It was a four-hour uphill hike to Shira I from our campsite. The rainforest transitioned into the moorlands with short scrubby trees about my height, which made the last two hours of the hike pretty grueling without the shade from the rainforest trees. I was carrying three liters of water in my backpack, rain gear and not much else. I’d already arranged for one of the assistant guides to carry my camera bag. (My camera body and wide-angle lens weigh about seven pounds and always kills my shoulders during long hikes.)
The main theme of hiking Kilimanjaro is “pole, pole,” which is Swahili for “slowly, slowly.” I learned this lesson a few years ago in Peru when I hiked the Colca Canyon, the second deepest canyon in the world.
I was grateful for the silly wide brimmed hat and the long-sleeve Columbia SPF/wicking button-down shirt I’d reluctantly bought at REI before I left. While I looked silly, they really kept me cool and saved my skin from the sun. You’ll see both in many photos.
After we reached Shira I, we had lunch. It was another few hours to Shira II, which were fairly easy compared to the trek to Shira I. Our guides planned long days in the beginning and shorter trekking days before the summit to help us acclimate and rest.
Day 3 – Shira II Camp to Baranco Camp (via Lava Tower)
Altitude: 3,900 m/ 12,785 ft; Distance: 10 km/ 6.21 mi; Time: 6 hours via Lava Tower
Barranco camp was one of the nicest and most photogenic camps on the trek. The building in the center is the toilets.
We hiked four hours from Shira II to Lava Tower, our highest point thus far (4,600 meters/15,091 feet) to help acclimate. It was a much better hike than the day before. We had lunch there before descending to a lower altitude at Baranco camp, two hours away. It’s one of the biggest and most scenic camps because four routes (Lemosho, Machame, Umbwe and Shira) all stay in Baranco. Since this is an acclimatization day, some people can be affected by the altitude. No one on our group had any issues. Our guide had an oxygen meter. All of our readings were in the high 80s to 90s.
The trek from Lava Tower to Baranco was beautiful! It was filled with stunning cactus-like trees known as giant groundsel (Dendrosenecio kilimanjari) and even a tiny waterfall. We arrived at camp around 3 p.m., which is a few hours earlier than the two previous days when we arrived at 5 p.m. Sunset is around 6 p.m. It’s crazy to think we are only 200 miles south of the equator!
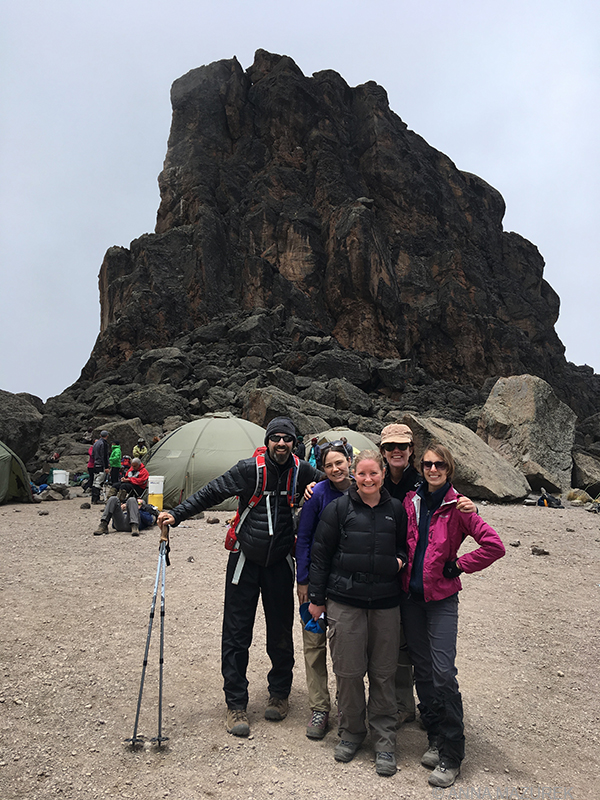
All five of us made it to Lava Tower with no altitude sickness issues!
I haven’t slept well the entire trip due to jet lag. I’ve never had jet lag as bad as I have this trip. I regret not flying in two days early to adjust a bit better. The jet lag combined with the altitude meant that most of us were only sleeping from 9 p.m. to 1 a.m. and just laying there in the cold wide awake. Due to all the water we drank and the Diamox (altitude medicine), we kept having to pee in the middle of the night. I started drinking a lot of water in the late afternoon and not drinking any at dinner to avoid midnight bathroom runs. I drank electrolyte mixes every afternoon as well to rehydrate.
Day 4 – Baranco Camp to Karanga Camp
Altitude: 3,995 m/ 13,106 ft; Distance: 6km/ 3.7 mi; Time: 4 hours
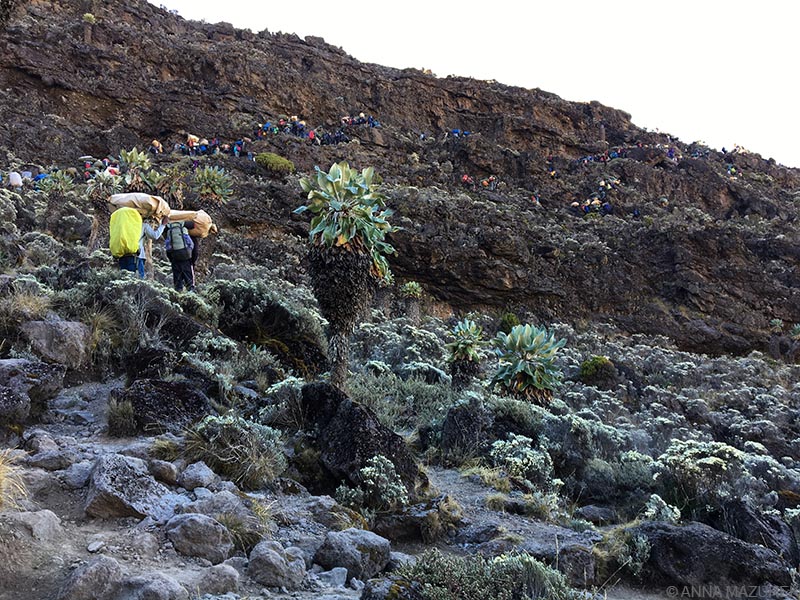
The line of trekkers and porters climbing Baranco Wall was insane. Due to the crowds, it took a good while to get to the top.
Our first task was to climb the Baranco Wall, which looms ominously overhead but actually requires no technical climbing skills. It involves climbing over a few rocks but mostly waiting in line behind the other climbers and porters. We paused at the top of the wall (4,200 meters/13,779 feet) for photos before descending to Karanga Camp. The camp is smaller than the previous and all the toilets are outhouse style. It’s super foggy and almost difficult to find the tent on the way back from the bathroom. Karanga is also the last water point before base camp. The porters have to collect water from here to bring to base camp for us.
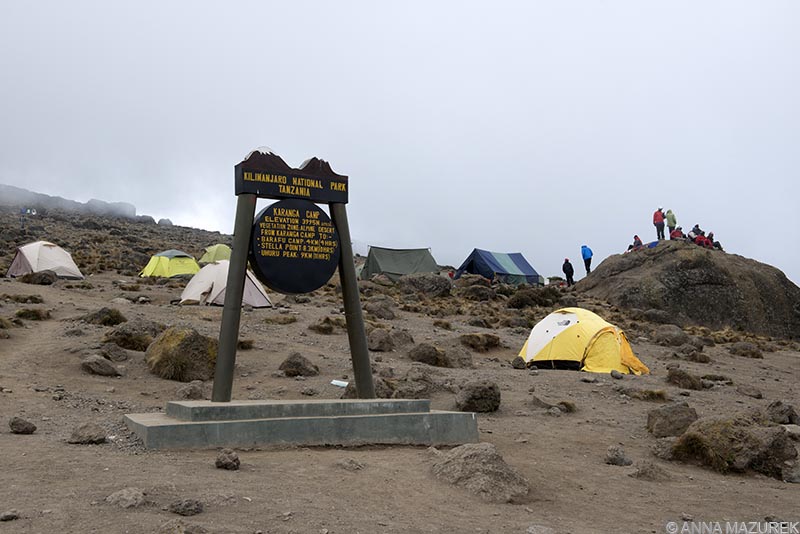
Guides and porters gather on the highest point of the camp on the right to get cell reception. All camps have cell reception.
At every campsite, there’s always a group of porters and guides standing on rocks on one of the highest points. Turns out, there’s cell phone reception at every camp at high points. I choose to stay unplugged during the whole trip and wasn’t even sure if my phone would work anyways.
Day 5 – Karanga Camp to Barfu High Camp
Altitude: 4,673 m/15,331 ft; Distance: 4km/2.4 mi; Time: 4 hours
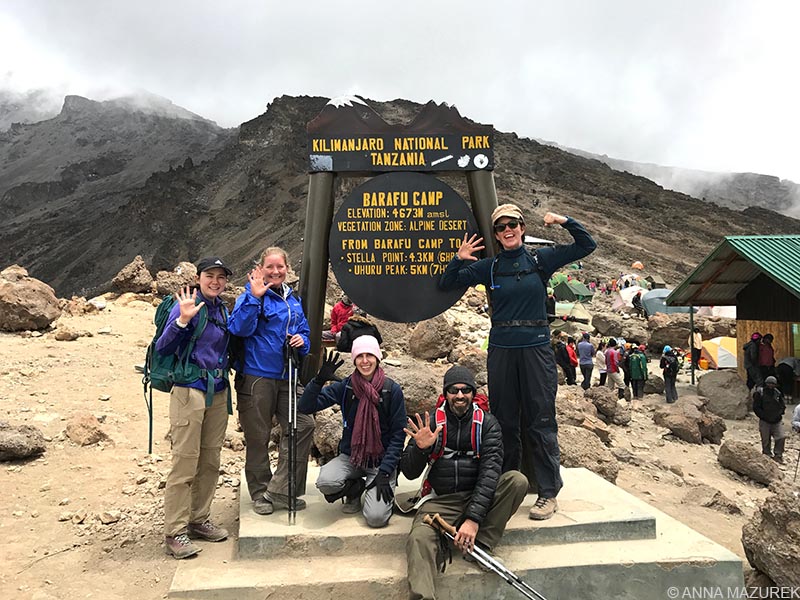
Celebrating day five of our trek with an early arrival to our basecamp – Barafu Camp!
We had a short hike to Barfu this morning and arrived around lunchtime. We had to wait a few minutes for people returning from the summit to pack up their camps so we could set up ours. We had lunch then napped for a couple hours from 2 p.m. to 5 p.m. when we had dinner. Then, our guide gave us our plan for the night. We would sleep until 11 p.m. then get ready to leave for the summit by midnight. I slept well before dinner but due to nerves and the cold, I barely slept at all before the summit. It was freezing and the wind was pummeling our tent nonstop.
The bathrooms at Barafu High Camp
The photo above is for those of you that wondered about the bathrooms. They were all better than most of the bathrooms in the mountains in India.
Day 6 – Barfu High Camp to Uhuru Point (the summit)
Altitude: 5,895 m/19,341 ft; Distance: 5km/3.1 mi, Time: 7 hours
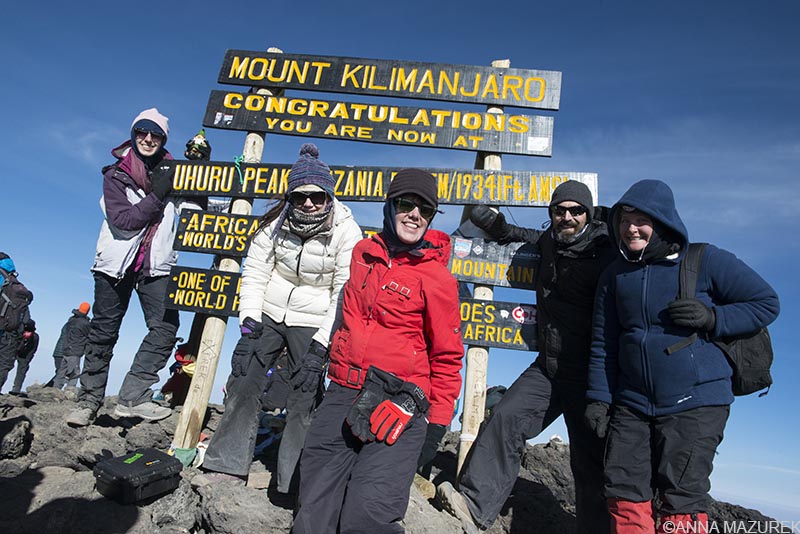
The entire group and the gnome made it to the top! Getting a photo was tricky due to the massive crowd around the sign!
Our alarm went off at 10:30 p.m. for us to get ready. My nerves had prevented me from sleeping. I put on five layers of pants – two Patagonia mid-weight thermals, my Prana hiking pants, a pair of old fleece sweatpants from Target and a pair of $20 rain pants I bought last summer for my Iceland trip. I could barely move in all the layers. My top layers consisted of two long sleeve thermals (one lightweight crew neck and a mid-weight zip neck), a Columbia fleece I’d stolen from my nephew who’d grown it, a Marmot raincoat and an old fleece-lined LL Bean winter jacket I’ve had since grad school. I wore two pairs of merino wool hiking socks, a pair of gloves with a pair of wool mittens on top of them and a balaclava layered under a wool hat along with both my raincoat and winter jacket hood. Oh, and a ski mask on top of that. My foot and hand warmers really saved me!
Our guides gave us tea and cookies before we left. I brought protein powder so everyone had a few scoops mixed with water. We left the campsite at 12:15 a.m. and started the seemingly-never ending series of steep switchbacks that lead to the first summit, Stella Point. The path was crowded with everyone walking single-file upwards. Headlamps bobbed in the distance as a constant reminder of how far we had to go.
My 1.5 liter CamelBak froze after the first two hours of the trek, which I expected. I had two 32-ounce plastic Nalgene bottles filled with water and stuffed in socks to keep them from freezing. We stopped only a few times to quickly eat a handful of nuts or drink water. I kept switching to new hand warmers. Due to our constant movement, I didn’t feel the cold as much as I thought. (It was -11°C /12°F with the wind chill!)
A photo of the girls with Furtwangler Glacier in the background
We slowly trudged through the cold for six hours up the steep, sandy switchbacks. Occasionally, we saw a few people being helped down the mountain, but the majority were going upwards. My stomach started to growl because I was hungry. (I’m the type of person who gets “hangry” fairly easily and needs to eats every few hours.) I felt a little weak and tiny bit nauseous but never got sick. All of these symptoms are typical “hangry” behavior for me. Since I ran photo trips in the Himalayas for five years without any issues, I wasn’t very concerned about the altitude. At this point, I was determined to make it to the top no matter what. There was no way I was walking back down all those horrid switchbacks without having been to the top! (Our guide said he had a 76-year-old women make it to the top a few weeks prior so that was my motivation as well!)
A view of Furtwangler Glacier from the summit. According to a 2012 report by NASA, the glaciers on top of Kilimanjaro are expected to disappear by 2060.
The horizon started to brighten to our right. It was stunning, but I refused to stop to take a photo because we were so close to the top. We reached Stella Point (18,885 feet/5,756 meters) and of course, I had to go to the bathroom. Let me just say that getting those five layers of pants down was literally exhausting at that altitude. (Make sure all your layers aren’t as skin tight as mine!) Our guides wasted no time getting us moving to the second and final peak, Uhuru. While it was only 700 meters away, it took us an hour to walk the mostly flat path. I was the second one to reach the iconic brown sign announcing that we’d made it to the top of Kilimanjaro (19,341 feet/5,895 meters)! The one thing that surprised me the most was the mob of people pushing and jumping in front of each other just to get a photo at the sign. I had expected an orderly line, but I assume the rush was to get people to lower altitude quickly. I was still able to get a photo of myself with Alfred at the top and a group photo. (I later learned there was a second sign 10 minutes down the path.)
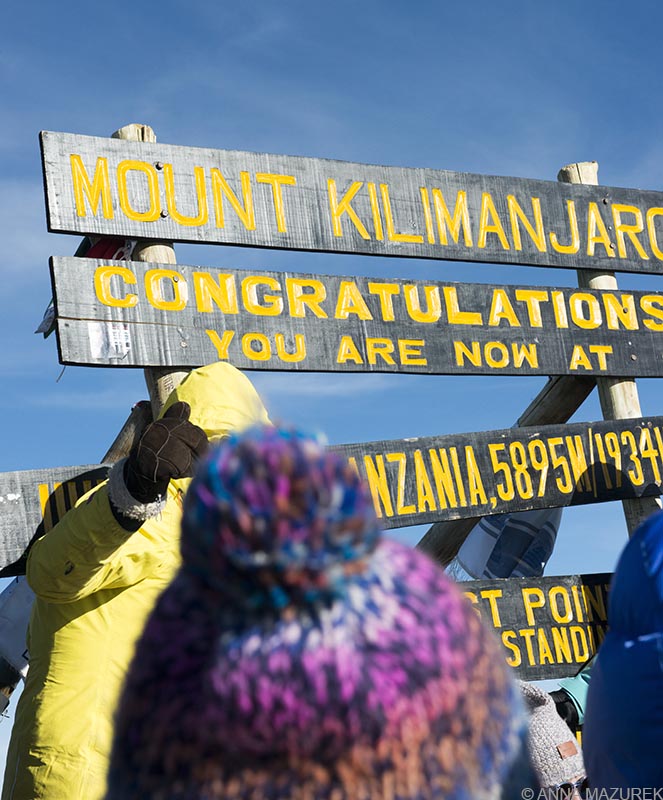
It’s difficult to get a photo at the sign at top due to all the crowds.
Everyone in our group made it to the top! (Our route, Lemosho, has one of the highest success rates.) We went back to Stella Peak and took a few photos before heading down the dreaded gauntlet of steep sandy switchbacks. It took me a little less than three hours to get back to camp. I stopped several times to shed layers of clothing. My CamelBak defrosted and started working again. This downhill stretch was probably the worst part because I was exhausted and the hangriest I’ve ever been in my life. I went back to the tent and passed out for an hour nap then we ate lunch. I felt so much better after napping and eating.
After lunch, we had to trek another four hours to Mweka Camp at 3,100 meters/10,170 feet for our final night on the mountain. By descending in altitude so much, we avoided any issues with altitude sickness. We were all weak and slept amazing that night.
Day 7 – Mweka Camp to Mweka Gate (End of Trek)
Altitude: 3,100 meters/10,170 feet; Distance: 10km/6.21 miles; Time: 3 hours
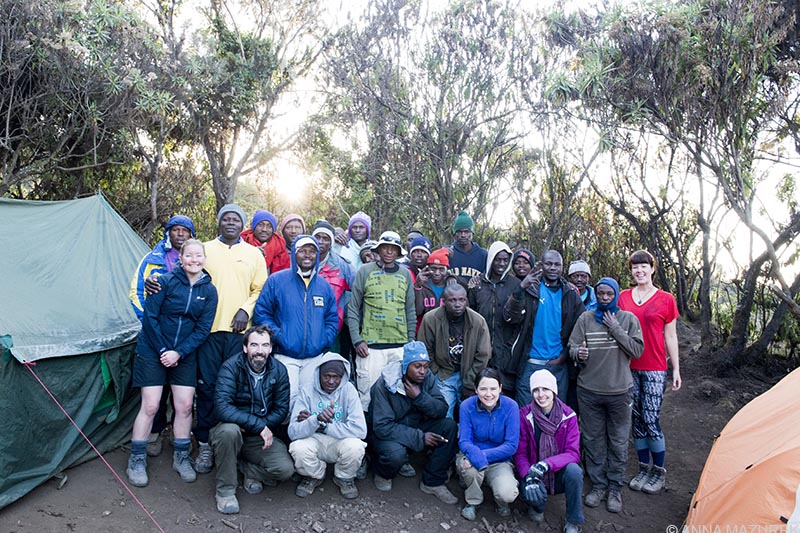
We never would have made it to the summit without our amazing guides and porters. It took 21 people to get the five of us to the top of the mountain!
We woke up at sunrise to sad news. An older European hiker had died of asthma issues on the mountain that morning. All the porters were gathering to help carry the body down the mountain. (There’s a series of wheeled carts that resemble stretchers for getting injured people down the mountain.) I tried to find a news story after we got back but can’t find anything online about the hiker.

These carts are scattered around the Mweka Route and are used to transport injured people down the mountain.
Our hike to the gate and the end of our trek was only about three hours through the rainforest. At the gate, we took photos with the sign, signed the book to say we’d left the mountain and waited to get our official certificates. We were stuck there for over an hour and finally made it back to Moshi that afternoon. They were out of certificates so our guide brought them to us at dinner. (You always have a big dinner with your guides the night you finish
your trek.)
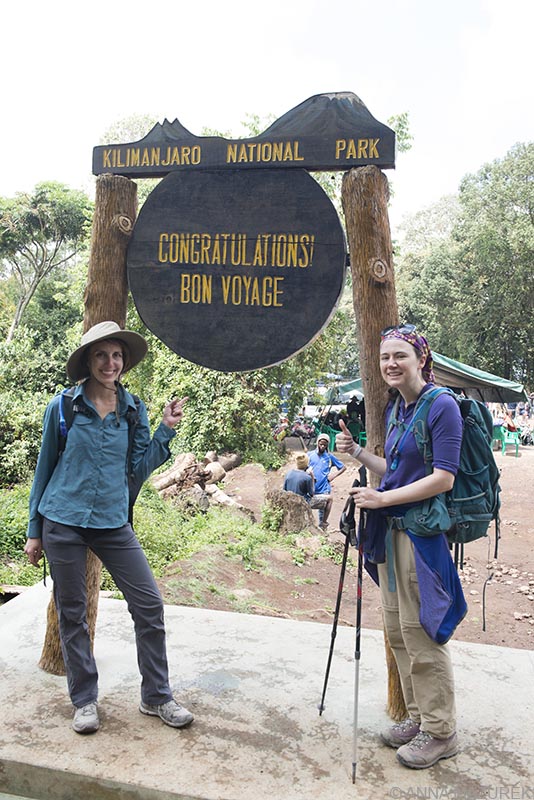
Becky, right, and I celebrate our success. I’m so grateful she invited me to join the trek!
Of course, the water was cold when I went to take a shower the first time so I decided to grab a beer and a snack instead. Afterwards, the water was hot. That beer and shower were probably the best in my life.
In the end, the hardest part was summit day. The rest of the trek wasn’t so bad. It’s not something I would do twice. I might do Everest Basecamp. Although, it’s lower, it involves steeper climbs but allows you to acclimate to the altitude better so it’s not as rough.
It took a crew of roughly 20 people to get us up the mountain including 16 porters for our luggage and supplies. We had one main guide, three assistant guides and a cook. These guys are some of the strongest and most amazing people I’ve ever met. They would totally survive a zombie apocalypse. I trusted them with my life the same way I trusted my guides and drivers in India. They know the mountain better than anyone and earned my respect.
__________________________________________
COMING UP NEXT

Kilimanjaro 101: Cost, Routes & Packing Lists
In my second Kilimanjaro post, I breakdown all the details about the trek including the cost of my trip, when to go and a list of the main routes. I also provide a detailed packing list based on my experience and offer suggestions of what to buy.
__________________________________________
P.S. I am not sponsored by any of the brands or products I mention in posts. I only recommend products that I love. Please note some Amazon affiliate links are included above. If you click on a link and make any type of Amazon purchase, I earn a small commission with no additional cost to you.