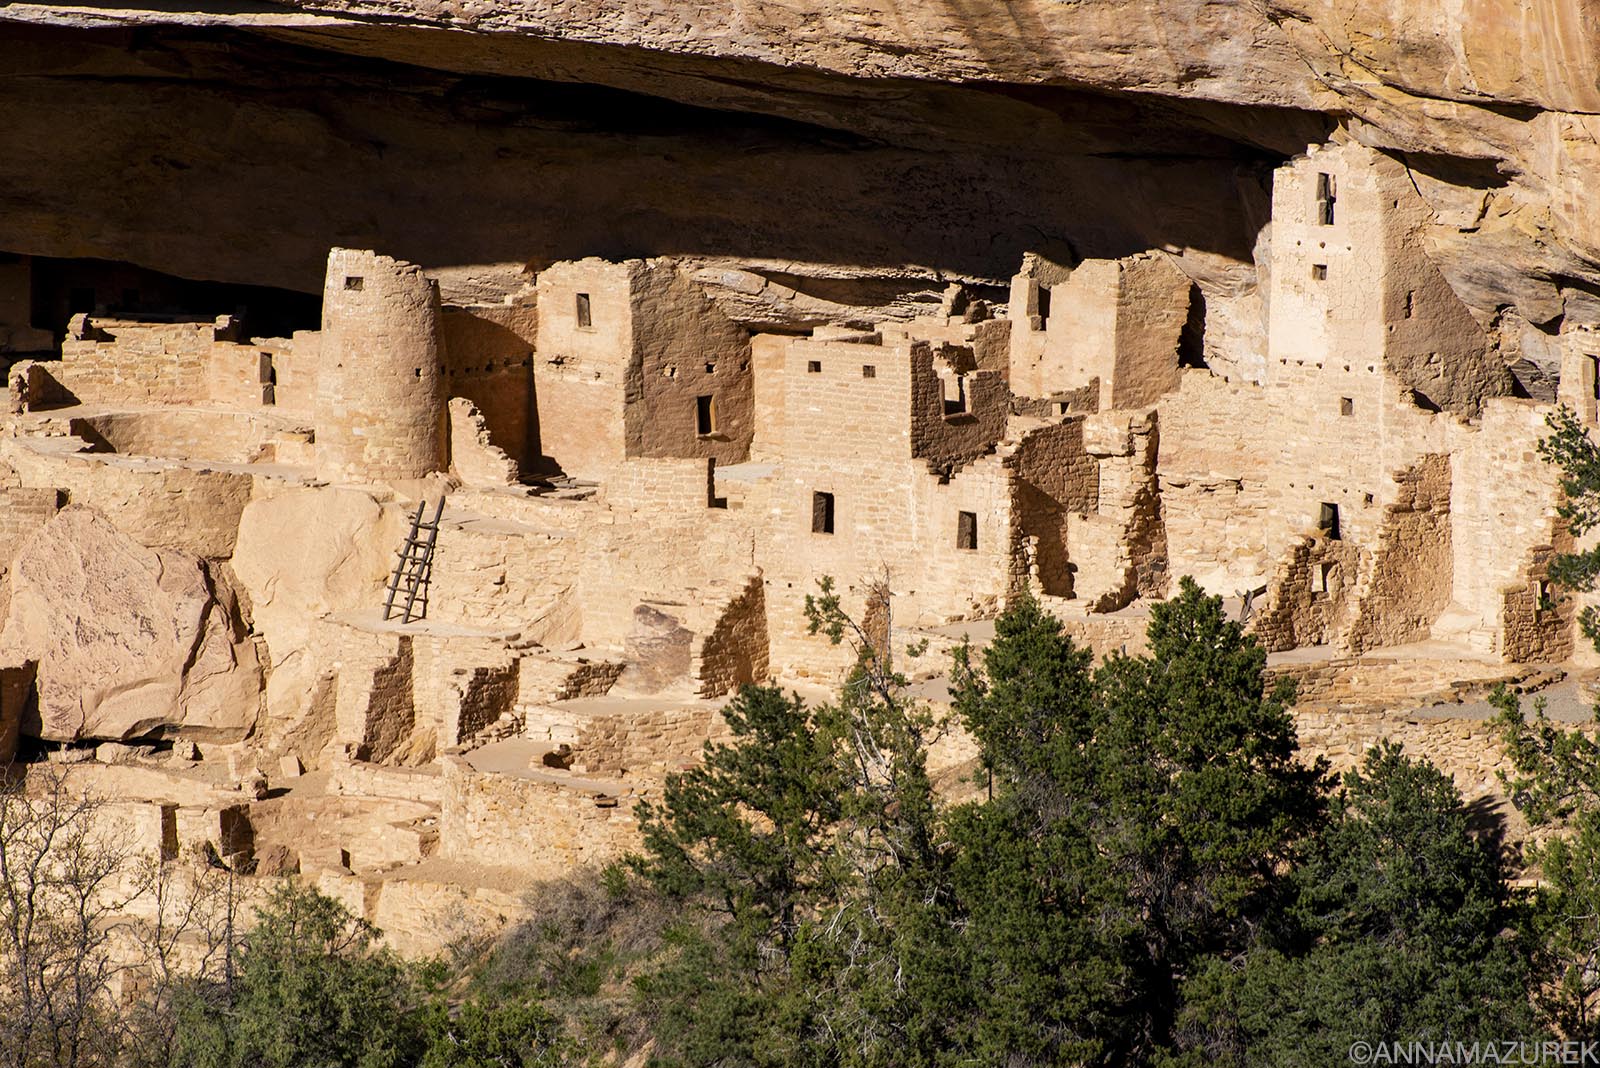
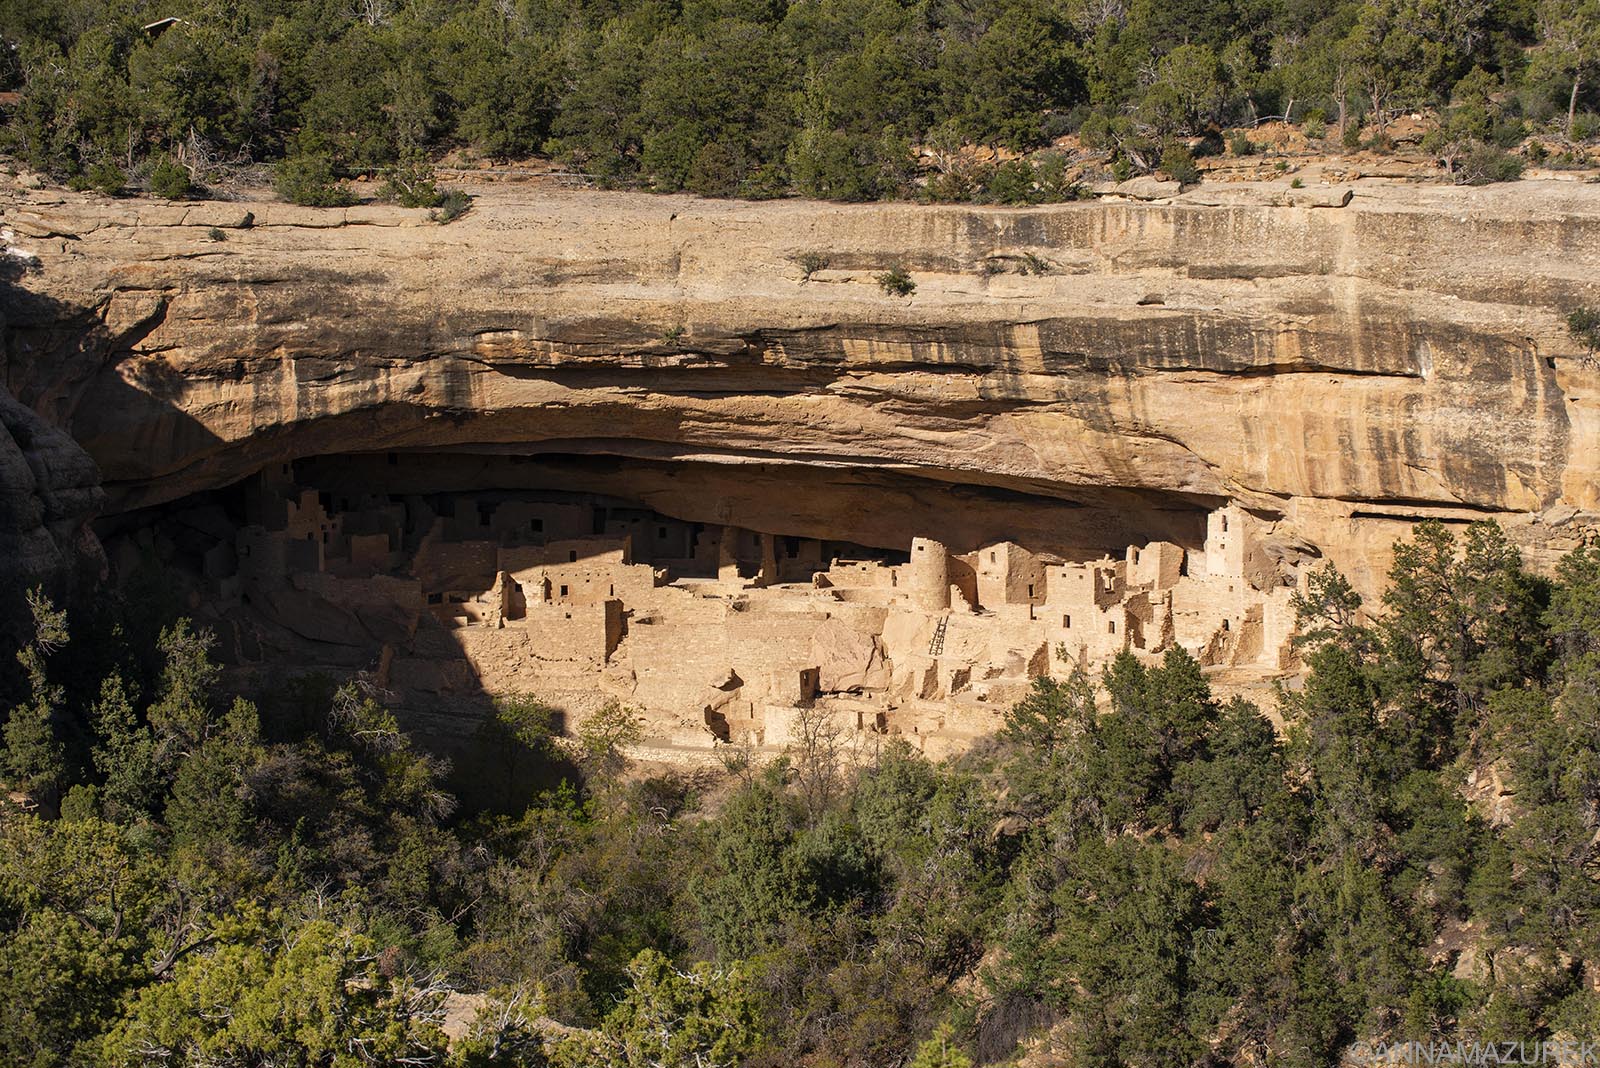
 Cliff Palace cliff dwelling photographed from the Cliff Palace Viewpoint by Sun Temple on Mesa Loop. Camera Settings: f/16 @ 1/250, ISO 400, 350 mm (70-200mm lens with 2X teleconverter.)
Mesa Verde National Park is one of my favorite places in the Southwest. In 1906, it became the seventh national park in the U.S. in 1906 and is home to hundreds of ancient cliff dwellings. Now, it’s a World Heritage Site and International Dark Sky Park. In this post, I included a detailed list of the best things to see in Mesa Verde along with the best times for photography. For logistics about cost and where to stay at Mesa Verde National Park, please read the FAQ section at the end of the post.
Why is Mesa Verde Worth Visiting?
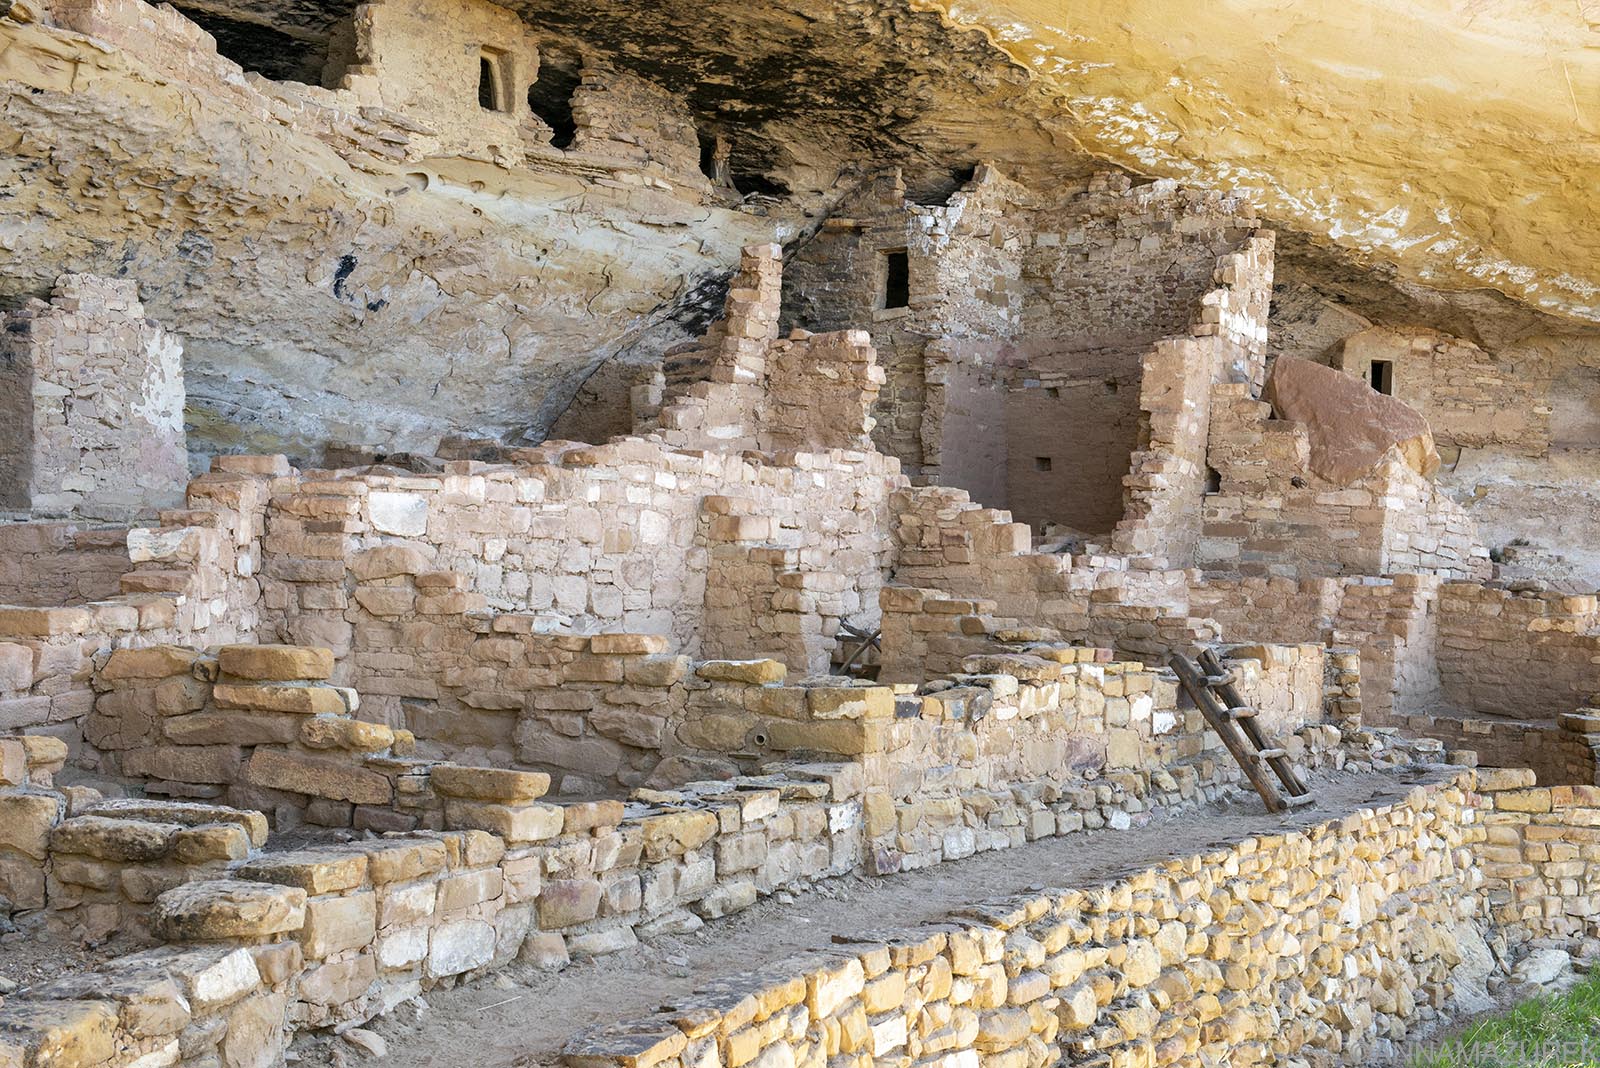
Mesa Verde National Park is home to over 600 cliff dwellings built by the ancestral Pueblo people starting in A.D. 550. The settlements evolved from half-buried pit houses to above-ground multi-room and often multi-story complexes made of stones and mud mortar, with thick wooden beams supporting roofs topped with a layer of dirt. Kivas, circular ceremonial chambers, were also key features. The walls were often covered in plaster. The settlement was abandoned by 1300 with any clear indication of why, but several theories suggest climate change or conflict. In addition to the cliff dwelling tours, be sure to stop by the Mesa Verde Museum and the Mesa Verde Visitors Center.
Where is Mesa Verde National Park?
Mesa Verde National Park is in southwestern Colorado and the closet town is Cortez, Colorado, which is where I recommend staying. It’s a 13-minute drive from Cortez to the park entrance but another 45-to-60-minute drive from the entrance to the main sites and cliff dwellings.
Guide to Mesa Verde National Park
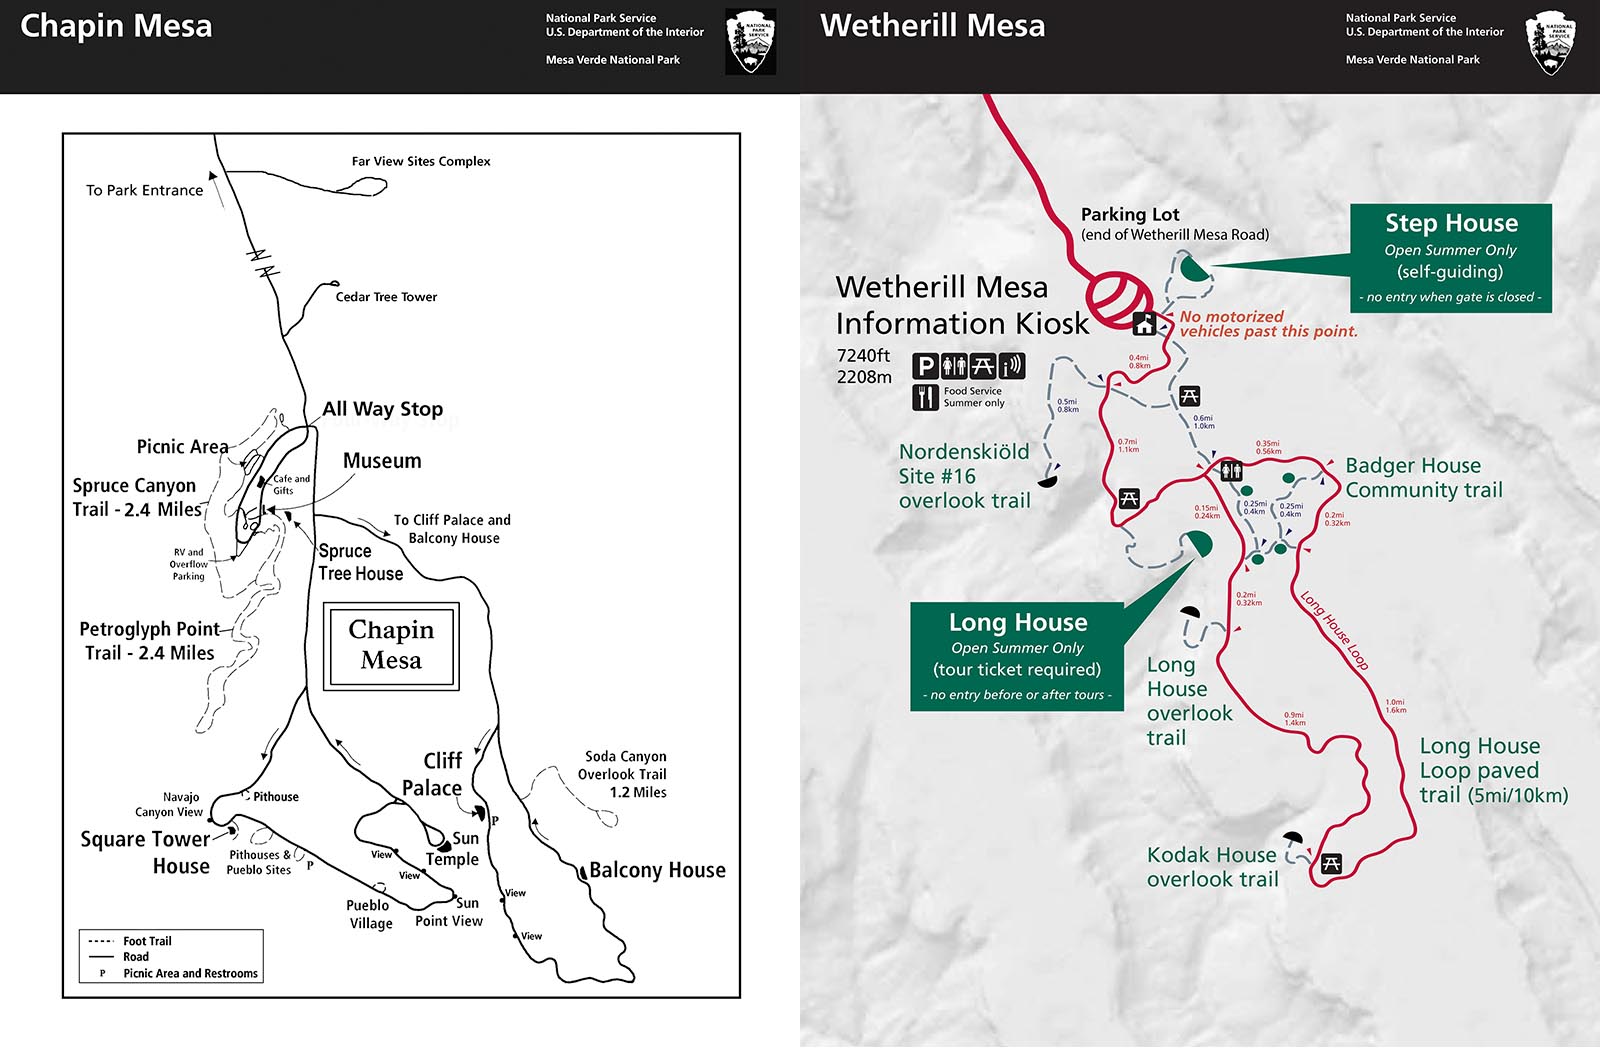 These maps from the NPS show the main areas of the park, Chapin and Wetherill Mesa, which are up to an hour drive from the park entrance.
There are two main sections of the park – Wetherill Mesa and Chapin Mesa. Chapin Mesa includes Mesa Loop, Cliff Palace Loop and Spruce Tree House. Wetherill Mesa is a good 30–60-minute drive from the other sites, which are closer together. It can take 45 to 60 minutes to drive from the park entrance to any of the locations listed. All park roads are narrow two-lane winding roads so driving between sights can take a while if there’s traffic or construction. (There was a good bit of construction when I visited, and Cliff Palace Loop was closed. It’s slated to be open summer 2025 if construction on viewing platforms is completed.) Check the park website for detailed maps and road closure notices before visiting.
Best Photo Spots in Mesa Verde National Park
I’ve organized my favorite photo spots in Mesa Verde National Park by location: Chapin Mesa versus Wetherill Mesa.
Chapin Mesa
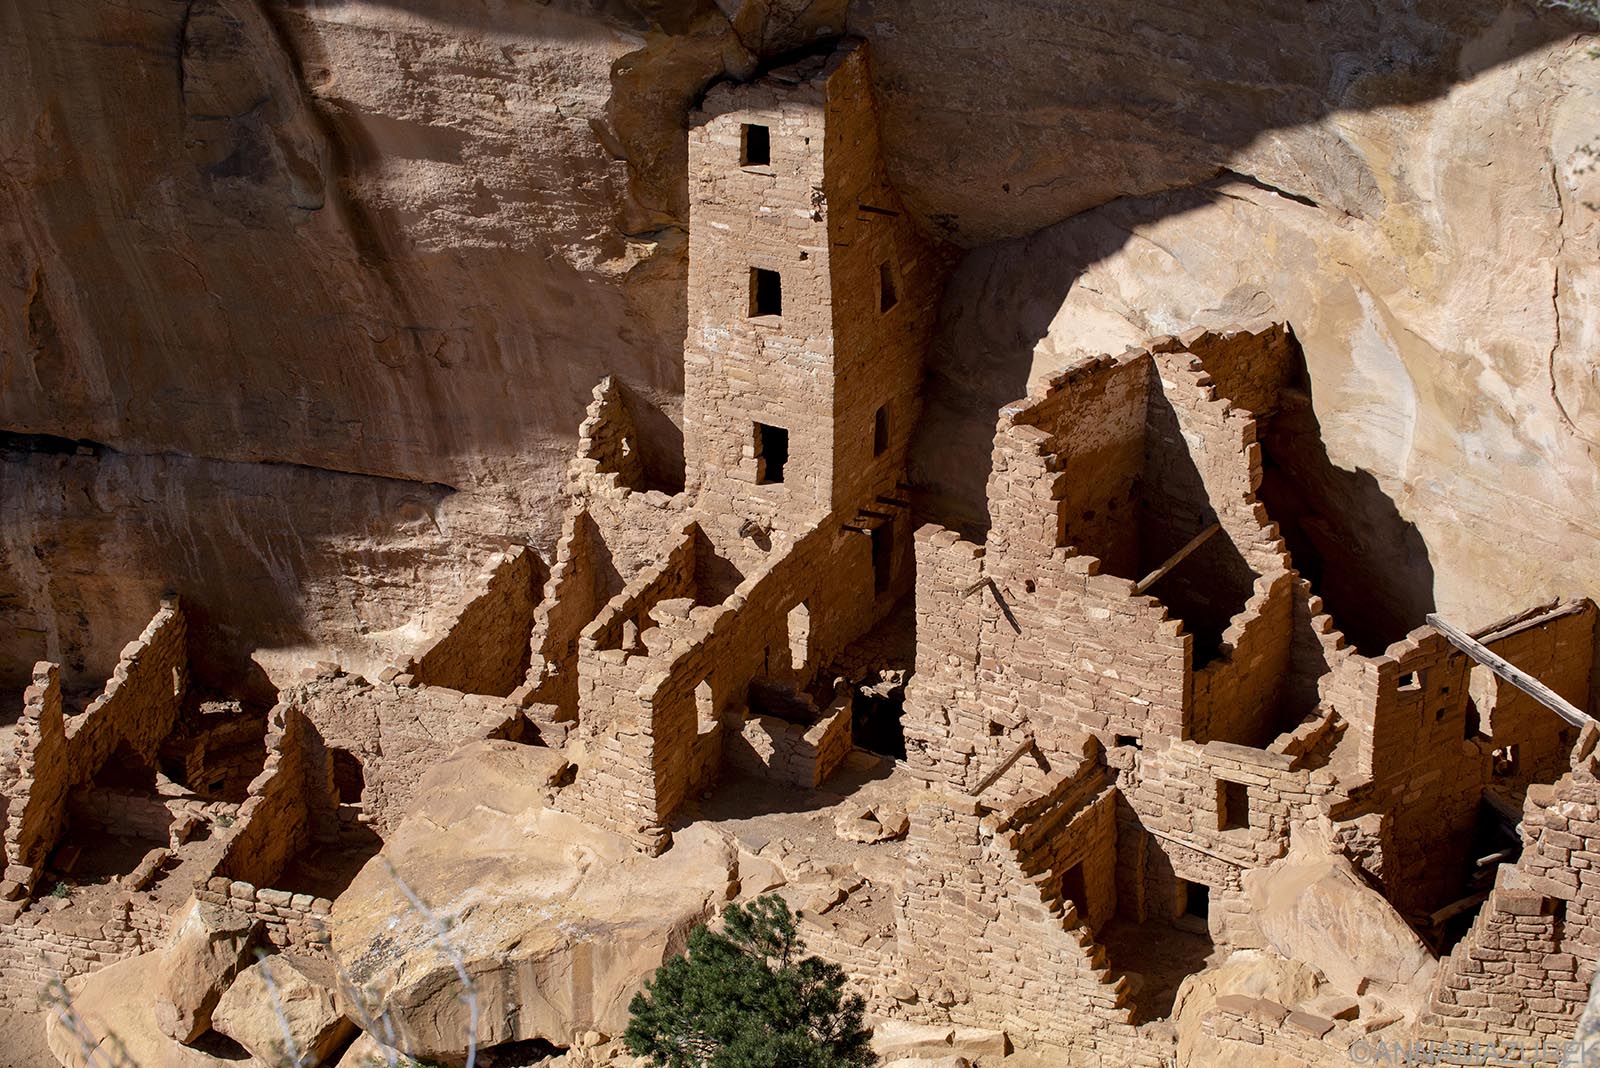 Square Tower House photographed from the viewpoint in the early afternoon. Camera Settings: f/11 @ 1/320, ISO 400, 95 mm with 70-200mm lens
Chapin Mesa is the location for Mesa Loop, Cliff Palace Loop and Spruce Tree House. It’s the most popular portion of the park and most crowded. Cliff Palace Loop is currently closed as of October 2024 per a notice on the website in early 2025.
Cliff Palace Loop
Cliff Palace cliff dwelling photographed from the Cliff Palace Viewpoint by Sun Temple on Mesa Loop. Camera Settings: f/16 @ 1/250, ISO 400, 350 mm (70-200mm lens with 2X teleconverter.)
Cliff Palace Loop is located on Chapin Mesa and was closed due to construction when I visited. (It’s slated to be open summer 2025.) When the loop is open, Cliff Palace Dwelling is only accessible by guided tours for $8/person. The loop also contains Balcony House and the Soda Canyon Trail.
Mesa Loop
 New Fire Temple and New Fire House Overlook on Mesa Loop. Camera Settings: f/8 @ 1/1600, ISO 800, 240 mm with a 70-200mm lens with 2X teleconverter. The wind was insane here, which is why my shutter speed and ISO were high.
The six-mile Mesa Loop, located on Chapin Mesa, will take a while to drive because there’s so much to see. Sunrise shots aren’t an option here because the road doesn’t open until the staff arrive (varies based on staffing so check website for details), but sunset is possible. Law enforcement will sweep the road before they close the gates at sunset so you can shoot until they come along. While it was cool to see the pit houses, they aren’t the best with photography because they are in buildings with guard rails. The viewpoints of the dwellings were the best photo spots. I recommend downloading the free Mesa Loop driving tour podcast before visiting.
Square Tower House
 There is a crow’s nest set of buildings in in the corner of the canyon at Square Tower House that can only be seen on the tour. Camera Settings: f/9 @ 1/320, ISO 1250, 38mm with a 24-70mm lens.
The house itself is in the shade in the morning and full sun later in the afternoon. I recommend shooting in the afternoon to get the light on the house and the cliff. For tours, it’s best to go in the morning when the house is in the shade to avoid harsh shadows in the afternoon. The trail is only a mile but includes two ladders. It was my favorite of the two ranger-guided tours I did. There’s a cool Crow’s Nest building that can’t be seen from the viewpoint that we kept joking was a kid’s treehouse!
Cliff Palace Viewpoint by Sun Temple
 Cliff Palace cliff dwelling photographed from the Cliff Palace Viewpoint by Sun Temple on Mesa Loop. Camera Settings: f/11 @ 1/400, ISO 500, 98mm with 70-200mm lens. This was shot at roughly 4:30 p.m. in May. I’d suggest going earlier in day to avoid the dark shadow on left.
Spruce Tree House
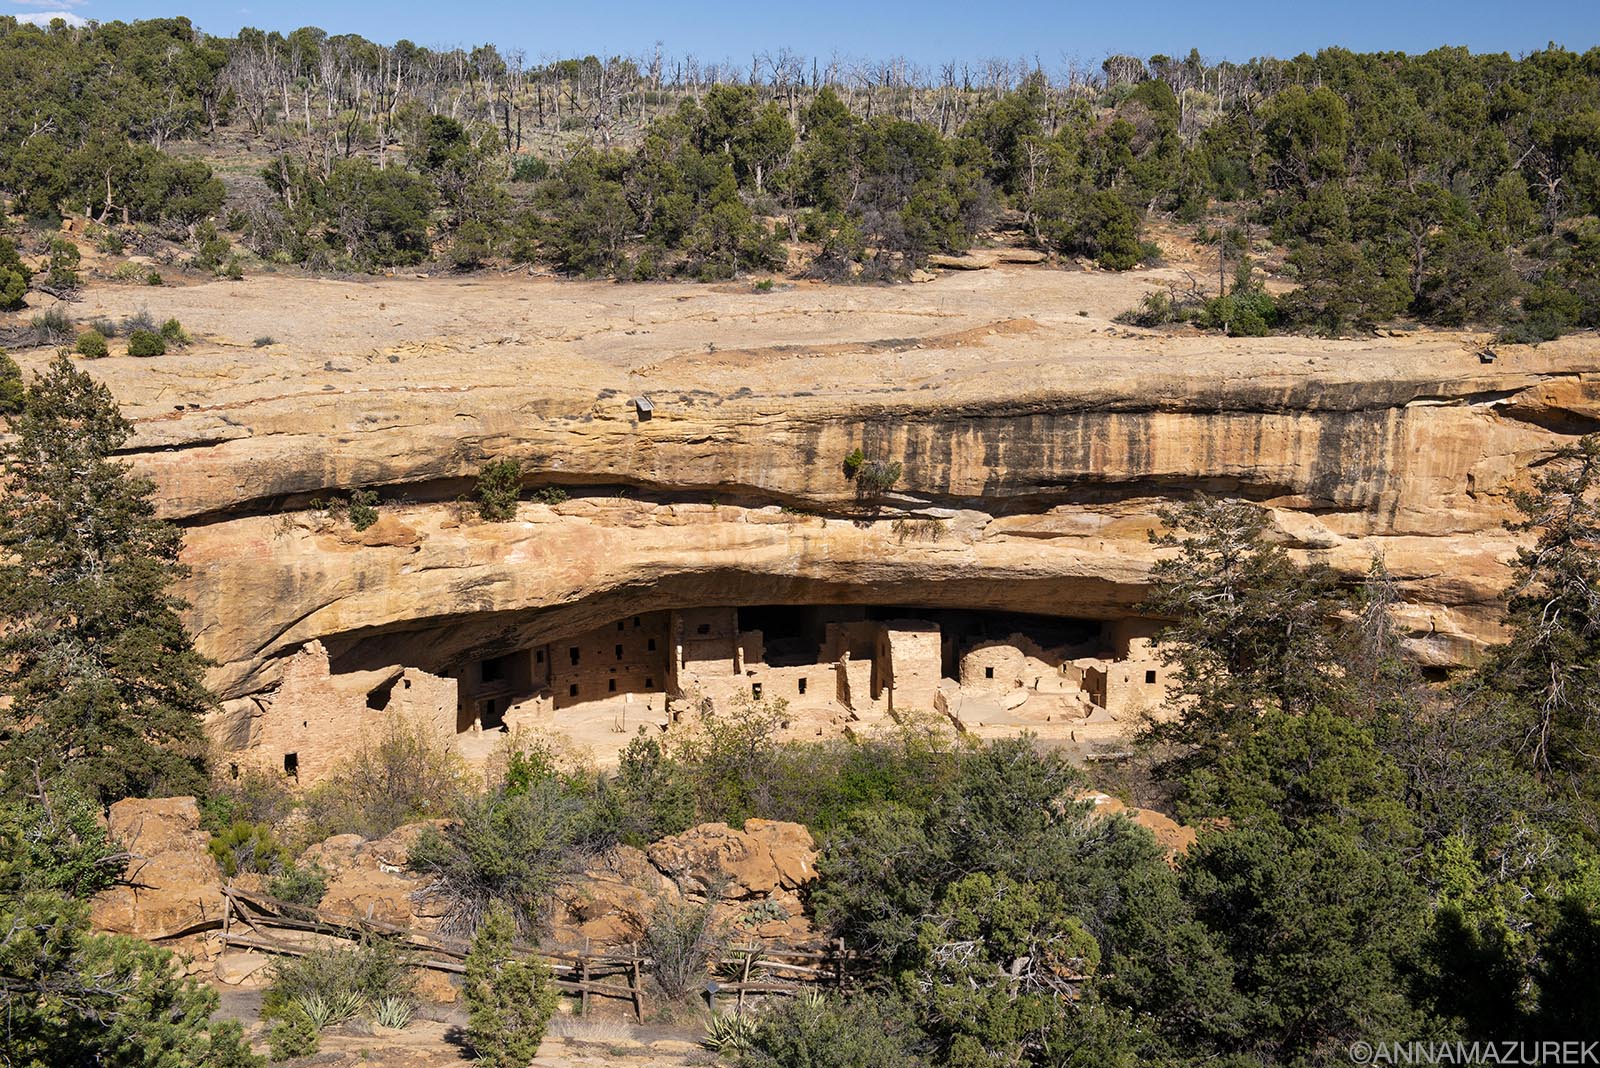 The view of Spruce Tree House from the back porch of the ranger’s office is one the best viewports in my opinion. Camera Settings: f/11 @ 1/320, ISO 400, 48mm with a 24-70mm lens.
Due to rock falls, Spruce Tree House is closed for the foreseeable future. (Previously, it was open to a self-guided tour.) There’s a lovely view of it from the back porch of the ranger’s office, which is better than the viewpoint below on the trail because it puts you above some of the trees. Unlike the other loops Spruce Tree House area is open 24/7 so you can shoot at sunrise or sunset easily, which I’d recommend. Otherwise, you’ll have to time your shoot between 3-5 p.m. to get light on the house while avoiding shadows from the cliff above or the trees in front. Around 6 p.m. the shadows from the trees in front really photobomb the image.
I’d only recommend sunrise/sunset shoots if you feel comfortable driving the two-lane winding park roads in the dark. The roads are well maintained but pretty scary driving out of the park at night, which is why I never stayed for sunset. There are some pretty steep drop-offs with no guardrails on the road! Plus, wildlife is another concern at night – there are still wild horses roaming the park. Due to this, I wasn’t happy with any of my images of Spruce Tree House.
The bathrooms at Spruce Tree House are the best ones. Mesa Loop only had portable toilets when I was there.
Wetherill Mesa
(Wetherill Mesa was closed for all of 2024 but the park office said it should hopefully be open in summer 2025 depending on staffing.)
 The majority of the trails at Wetherill Mesa are flat unless you are touring one of the cliff dwellings.
Once you arrive at Wetherill Mesa, you have to walk to the sites. No cars are allowed beyond the parking lot. All the trails to viewpoints are flat and easily bikeable. (This is the ONLY area in the park where bikes are allowed!) There’s no shade so go early or be prepared for the sun and wind! The area is open from May to October and is usually the quieter part of the park. Allow a least half a day to see all the sites excluding dwelling tours. There’s a ranger posted at a desk at the entrance. I’ve listed the sites you can physically visit below, but there are more sites you can see from viewpoints. It takes about 45 minutes to drive to Wetherill Mesa from Chapin Mesa and about 45-60 minutes from the park entrance!
Step House
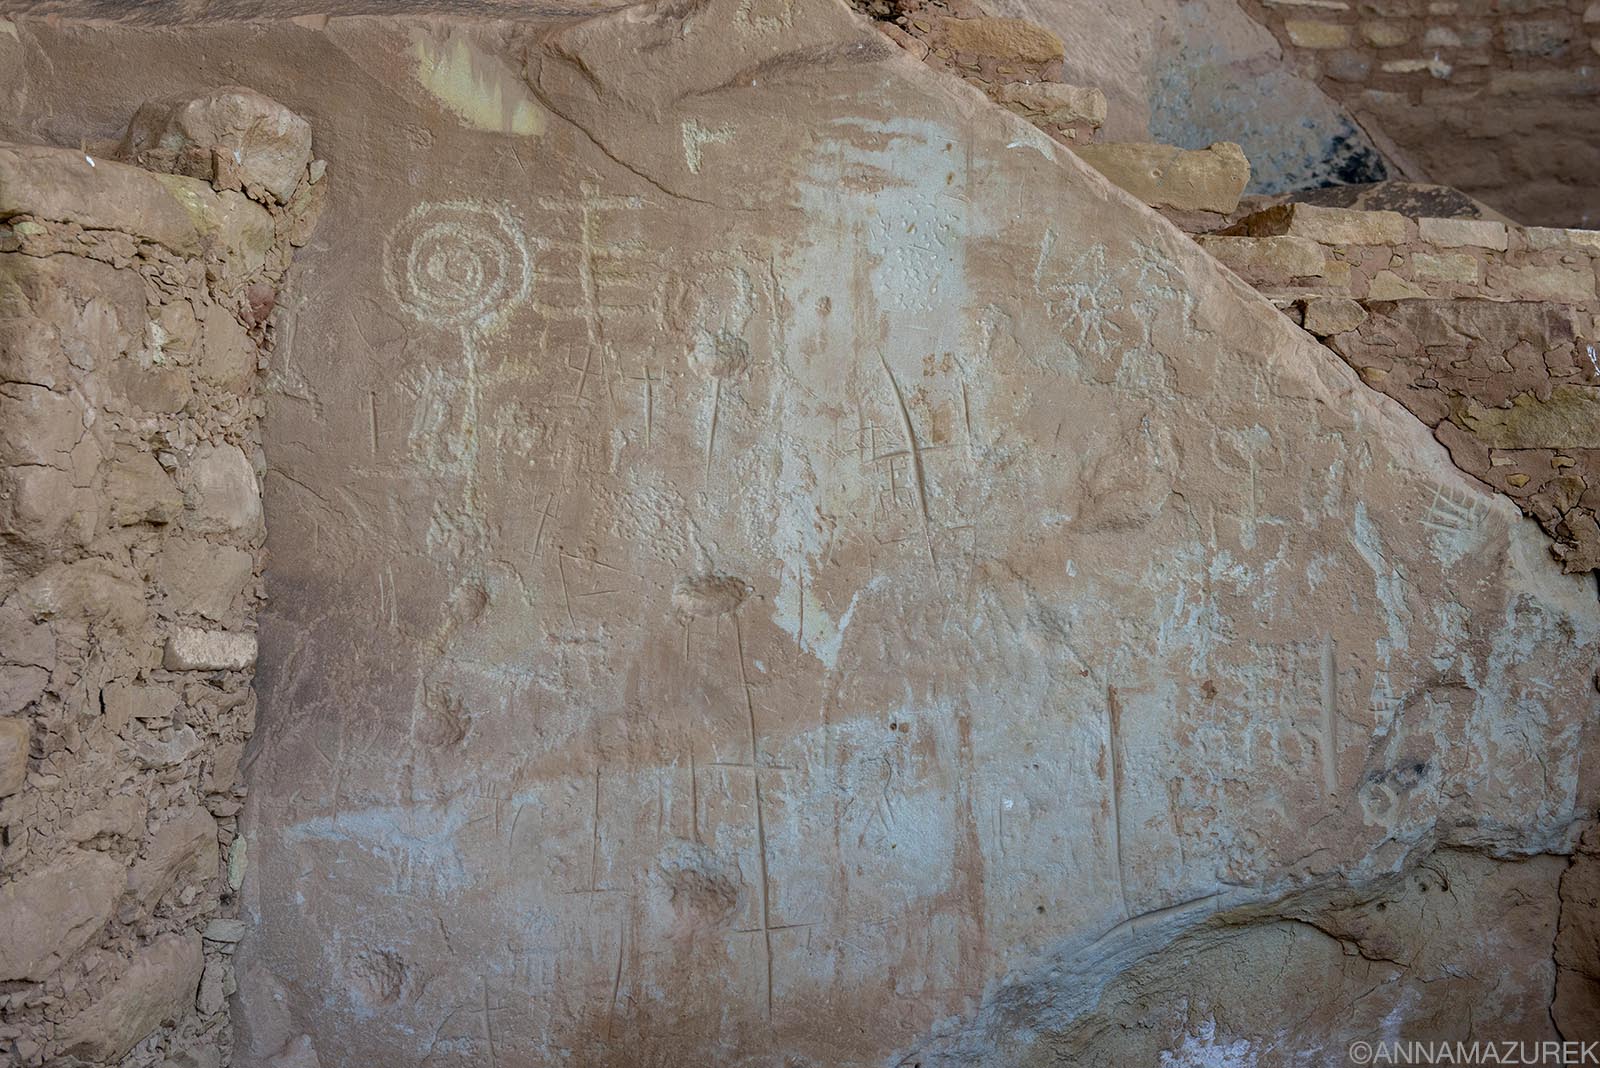 Petroglyphs inside Step House at Wetherill Mesa. This dwelling isn’t as amazing as the others but is very accessible.
A one-mile roundtrip trail starts at the kiosk and leads through the cliff dwelling that was once home to 30-40 people. It’s a unique site with a reconstructed pit house constructed around 620 and a multi-story pueblo built in 1226. It’s not as impressive as the other dwellings on the guided tours but this is the most accessible by foot, which is why they allow self-guided tours. A ranger is always on duty to answer questions at the site.
Mug House
 Mug House isn’t visible from any viewpoints and can only be visited on a tour. Camera Settings: f/10 @ 1/160, ISO 640, 52mm with a 24-70mm lens.
Mug House isn’t listed on any map and is only accessible by guided tour with a ranger. It’s a three-mile roundtrip hike from the kiosk and not visible from any viewpoint. While it’s labeled as a strenuous hike, I didn’t think it was bad. I did the noon tour, and the site was still in the shade since it faces west. The dwelling was named for three mugs found tied together on the site. Tours are $25/person with a maximum of 10 people.
Long House
Long House is the second-largest cliff dwelling in the park with 150 rooms and accessible only by a ranger-guided tour. ($8/person) It’s the most in-depth tour offered at the park but wasn’t available on the dates I visited.
Trails at Wetherill Mesa
 Nordenskiöld Site #16 photographed from the viewpoint. Camera Settings: f/8 @ 1/640, ISO 400, 60mm with a 24-70mm.
The main trail is the paved five-mile Long House Loop that’s great for hiking or biking. The Kodak House overlook (2.5 miles) and Long House overlook (1.5 miles) are located on the trail. Bikes have to be parked at the trailhead while you walk the .15-mile trail to the overlooks. The Badger House Community Trail (2.25 miles RT) weaves through four mesa-top sites and crosses the Long House Loop trail. The Nordenskiöld Site #16 Trail leads to an overlook of the cliff dwelling and is two miles roundtrip. All trails are relatively flat but exposed to sun/wind. (Due to the heat and exhaustion of doing two dwelling tours and Step House back-to-back, I only did the Nordenskiöld Site #16 Trail.)
Far View Sites
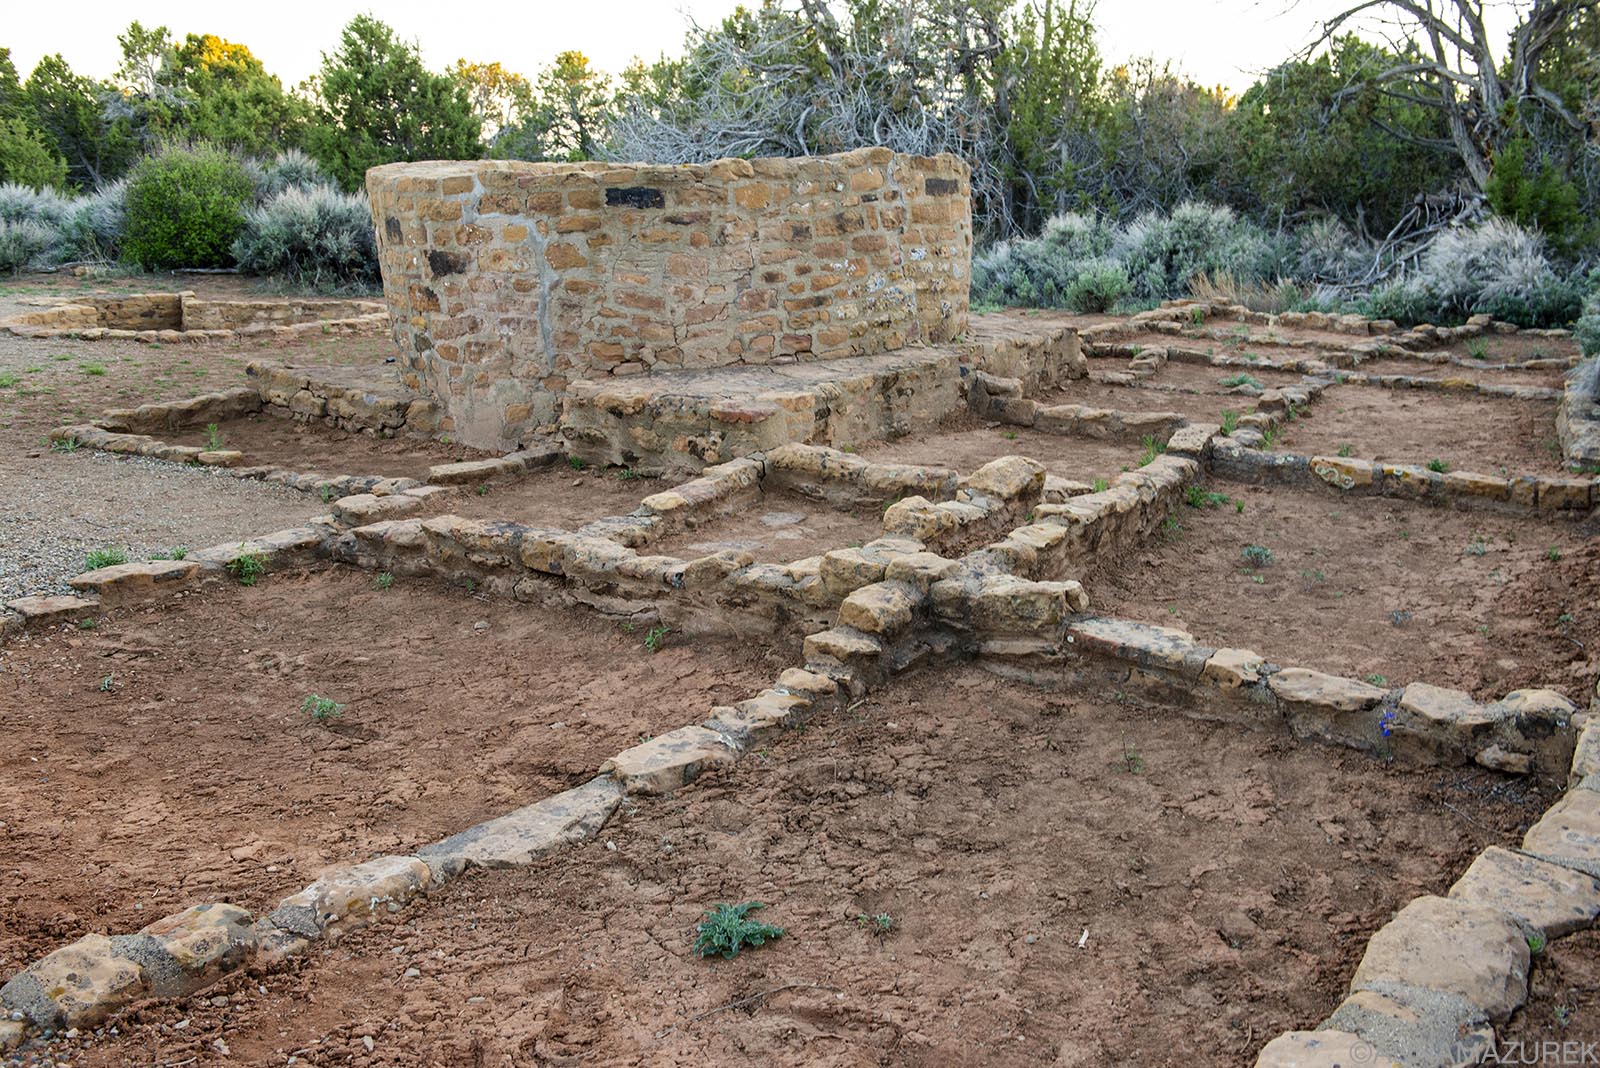 I had the Far View Sites to myself at sunset, which I recommend to avoid people in your photos. Camera Settings: f/6.8 @ 1/80, ISO 1000, 32mm with a 24-70mm.
The Far View area was a mesa-top community and one of the most densely populated regions. A .75-mile trail leads through ruins of several houses and a reservoir. I went right before sunset and really enjoyed this small walk. It’s definitely underrated and worth a visit! The site is open from 8 a.m. to sunset. It’s located on the main park road.
Hiking Trails at Mesa Verde National Park
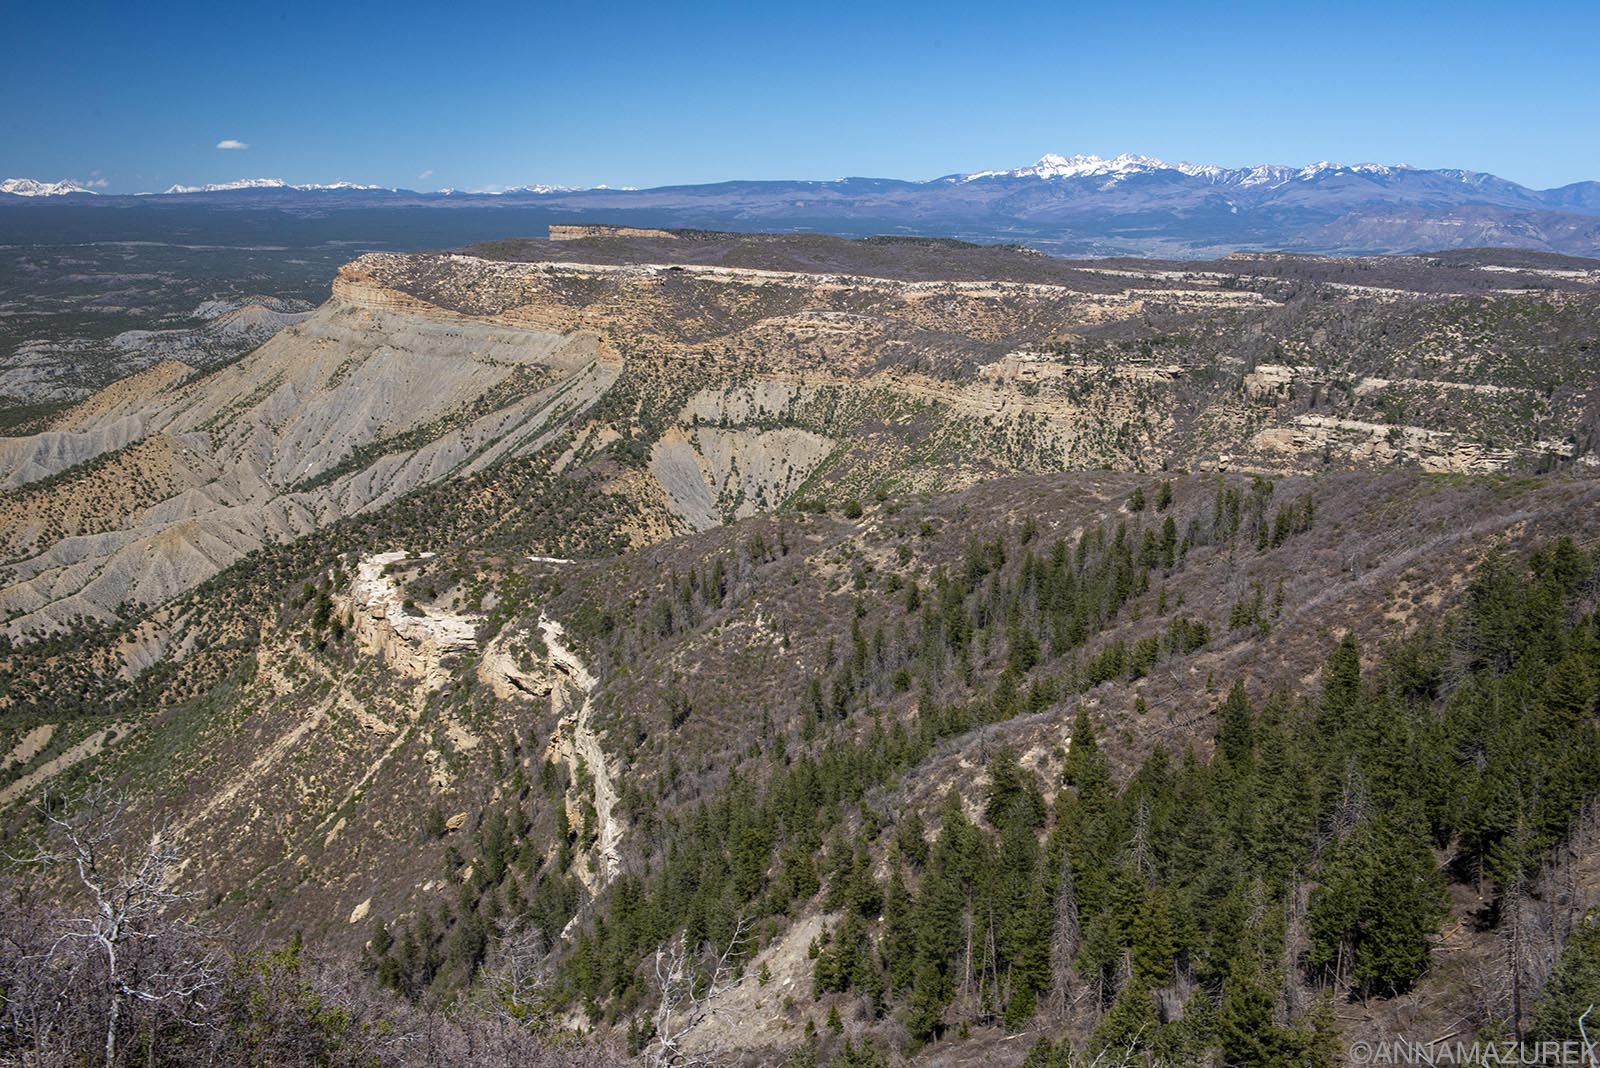 The main park road has several scenic viewpoints including this one — Park Point Viewpoint, the highest point in Mesa Verde.
There are several hiking trails throughout the park. Many of the ones I was interested in were closed partially due to Cliff Palace Loop construction, which should be open in 2025. Elevation in the park ranges from 7,000 to 8,500 feet so carrying camera gear gets even harder if you’re not used to the elevation. The sun is relentless, and there’s very little shade so start hikes early. Since I was so focused on photography and booked the dwelling tours, I didn’t get to do any other hikes due to the heat. I wanted to do Petroglyph Point but skipped it since I was going to Petroglyph National Monument in Albuquerque a few days later.
The Mesa Verde Museum Association offers free downloadable site guides for Cliff Palace, Spruce Tree House, Wetherill Mesa (Step & Long House) and Balcony House.
Photo Tips for Mesa Verde National Park
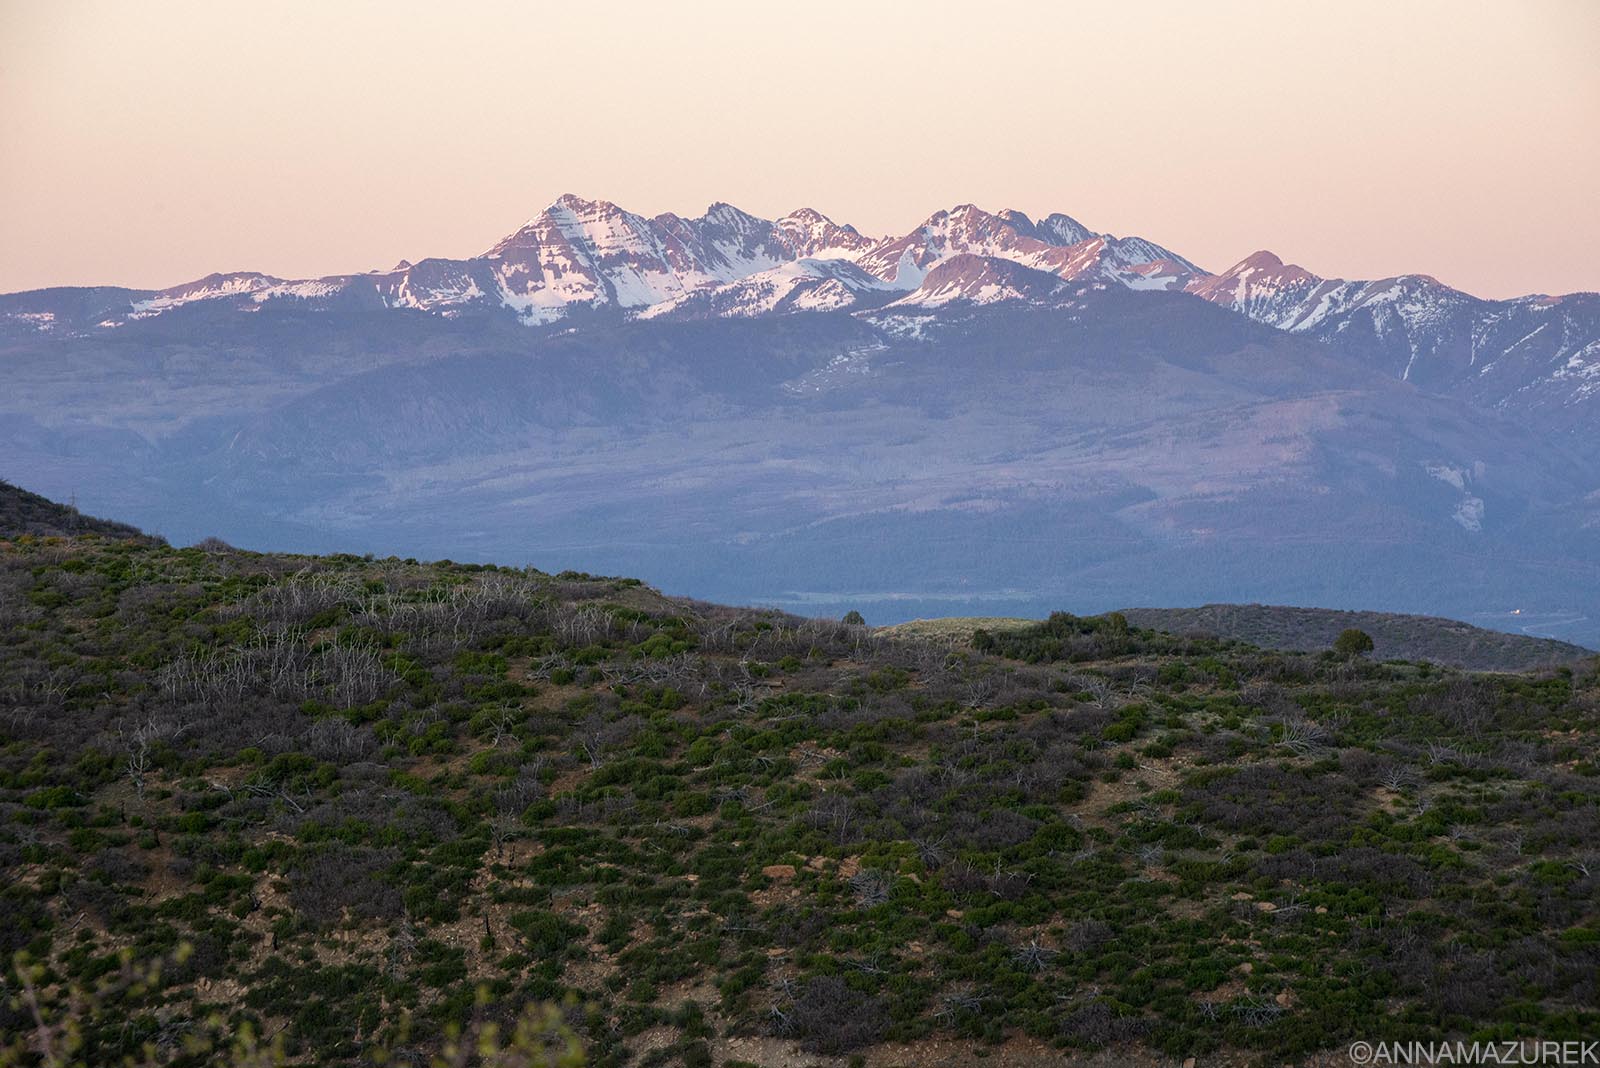 I stopped at an unmarked viewpoint to take this photo while I was leaving the park at sunset.
-
Lenses: You’ll need at least a 70-200mm zoom lens from the viewpoints for most of the cliff dwellings. I’d recommend a 400mm or a teleconverter as well. (I rented a Nikon 2X teleconverter from LensRentals.com for my trip to test it out, but I’d recommend a 1.4x teleconverter instead because that’s much sharper.)
-
Filters: A circular polarizer is a big help with the blue skies and helps reduce glare on the rocks, especially when shooting petroglyphs in the sun. A graduated neutral density filter would also be helpful with contrast but can be time consuming.
-
Take a Tripod: The wind is fierce so change lenses in your car or take two camera bodies. I’d recommend a tripod in low light or even with the teleconverter since the wind will knock you around. I used my Peak Design Travel Tripod, and it was perfect with my 70-200mm with the 2X teleconverter.
-
Photo Guide: At the entrance kiosk, they have an amateur photography guide with a chart of the most photographed areas in the park and the best times to shoot during the summer. I’ve included the chart below.
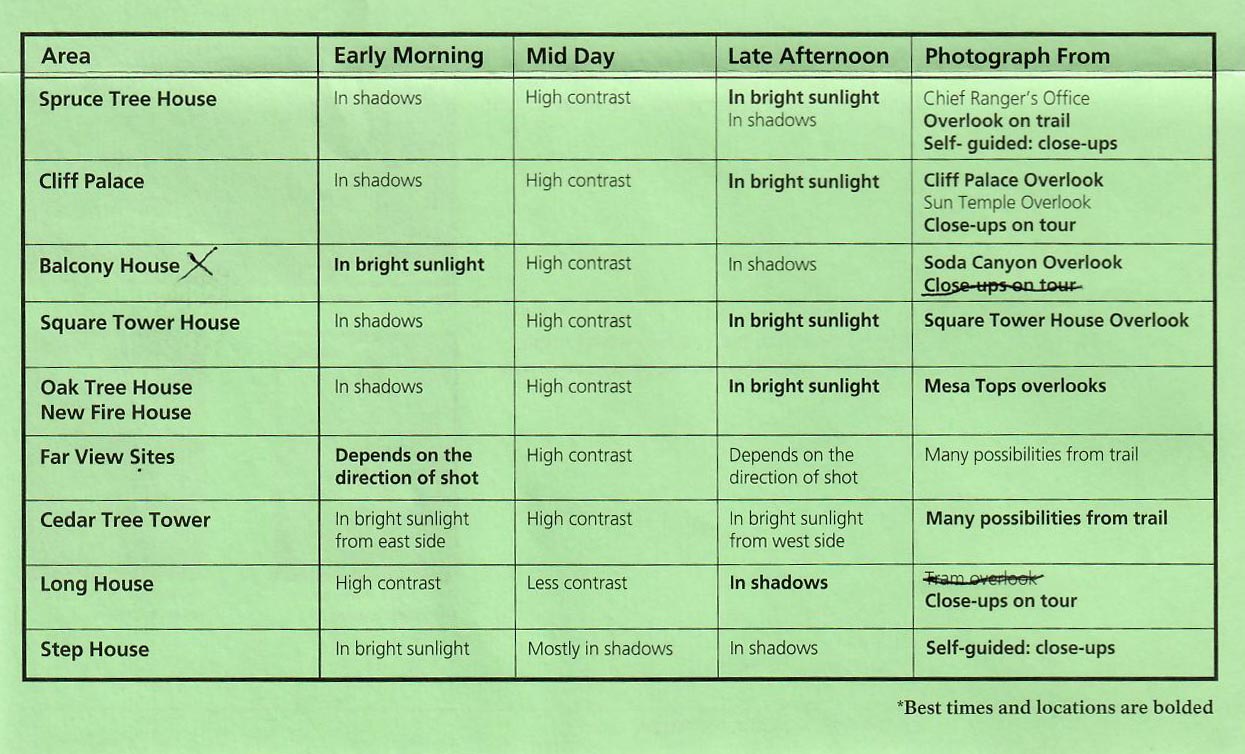 This is a scan of the National Park Service’s amateur photography guide for Mesa Verde National Park that is available at visitors center and entrance kiosks. The best times and locations for summer are bolded.
Mesa Verde National Park FAQ
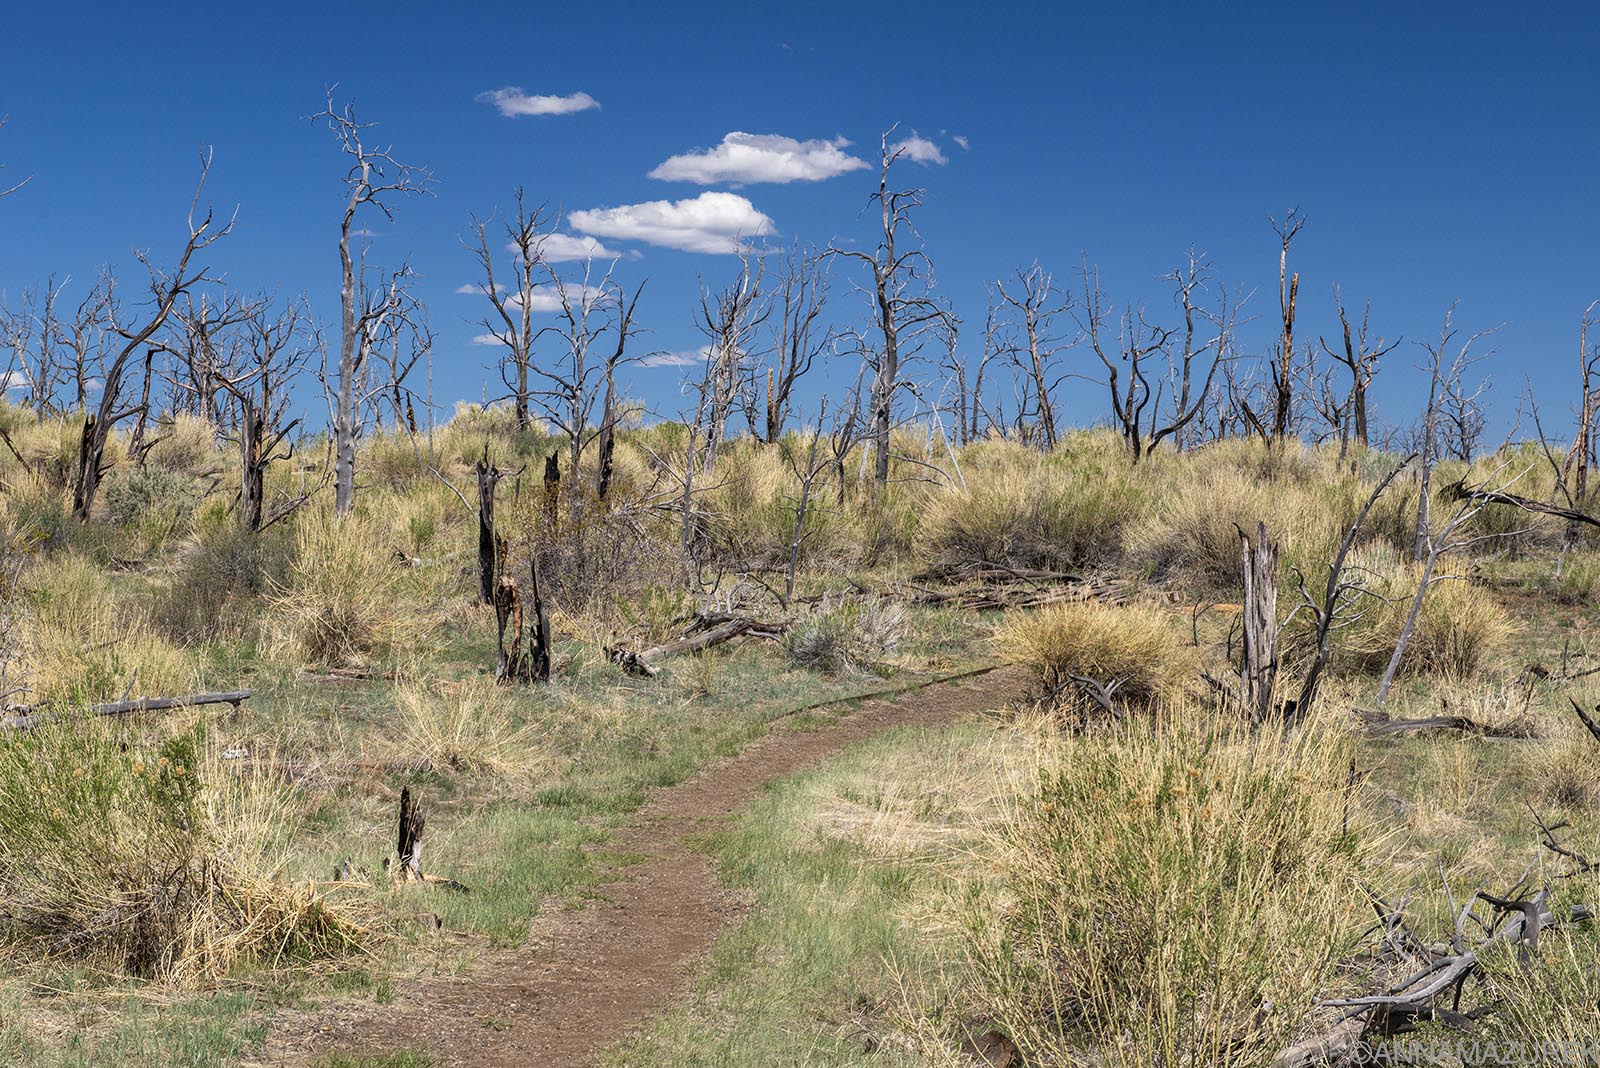
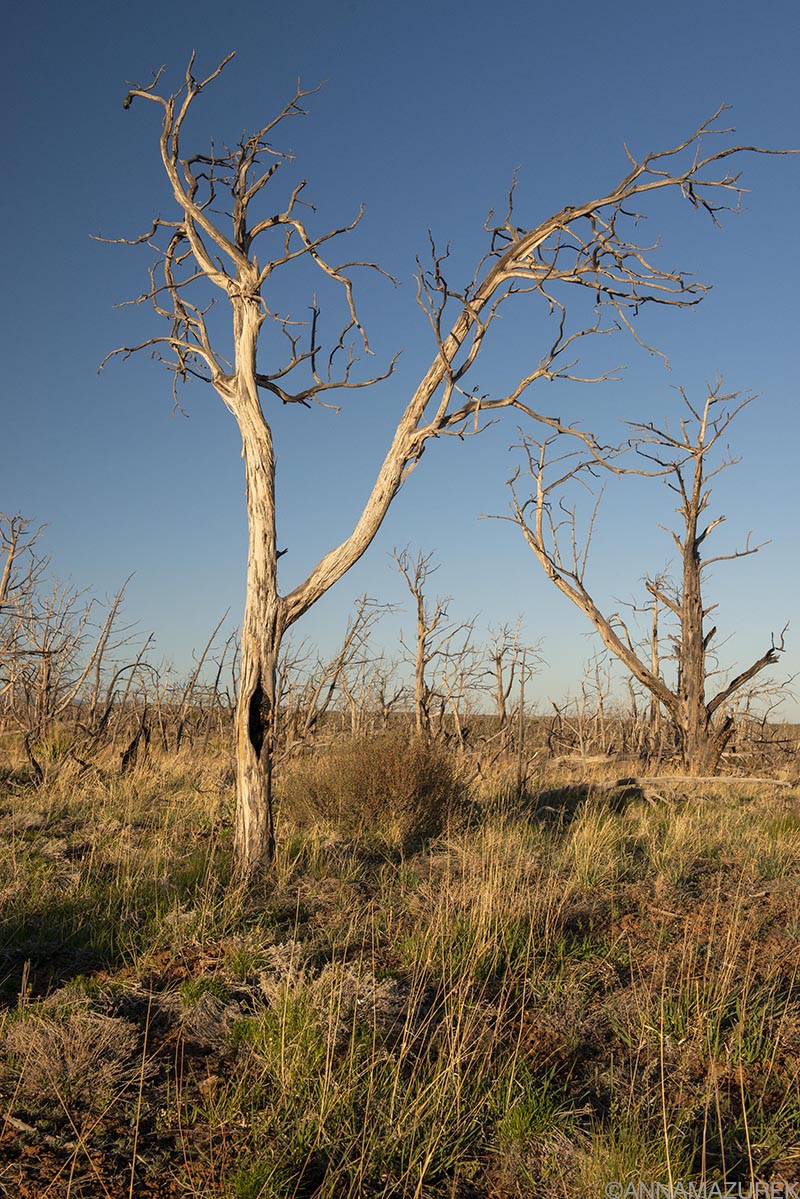 Every year there’s a series of “dry” lightning fires on the mesa tops, which are usually labeled by signs with the date of the fire. Since the park was established in 1906, 70 percent of the park has been burned by wildfires.
How much time do you need to visit Mesa Verde National Park?
Not all the sites are Mesa Verde are open at the same time each year so it honestly will probably take multiple trips to see it all. Otherwise, I’d suggest at least three to four full days and possibly more for photography. You could spend an afternoon going to the main sights on Mesa Loop but what makes this place special is going into the dwellings on a tour! It can take 45 to 60 minutes to drive from the park entrance to any of the locations listed above. All park roads are narrow two-lane winding roads so driving between sights can take a while if there’s traffic or construction. I was only here for two days (too short) because I added this on to a New Mexico road trip but plan to come back in the next year or two.
How much does it cost to visit Mesa Verde National Park?
For private vehicles, the entry fee is $30 from May 10-Oct. 22 and $20 from Oct. 23- April 30. Motorcycles are $25 from May 10-Oct. 22 and $15 from Oct. 23- April 30. The park also sells annual $55 passes. If you’re going to visit more than one national park, I’d recommend an annual pass for $80 that covers one vehicle or up to four people. If there are cancelations, they will show up on Recration.gov. I recommend setting reminders and be logged in ready to book at 8 a.m. MDT. I got every tour I wanted using this strategy. Since cell service is limited in the park, save digital tickets to your phone or take a screenshot.
Can you tour the cliff dwellings at Mesa Verde National Park?
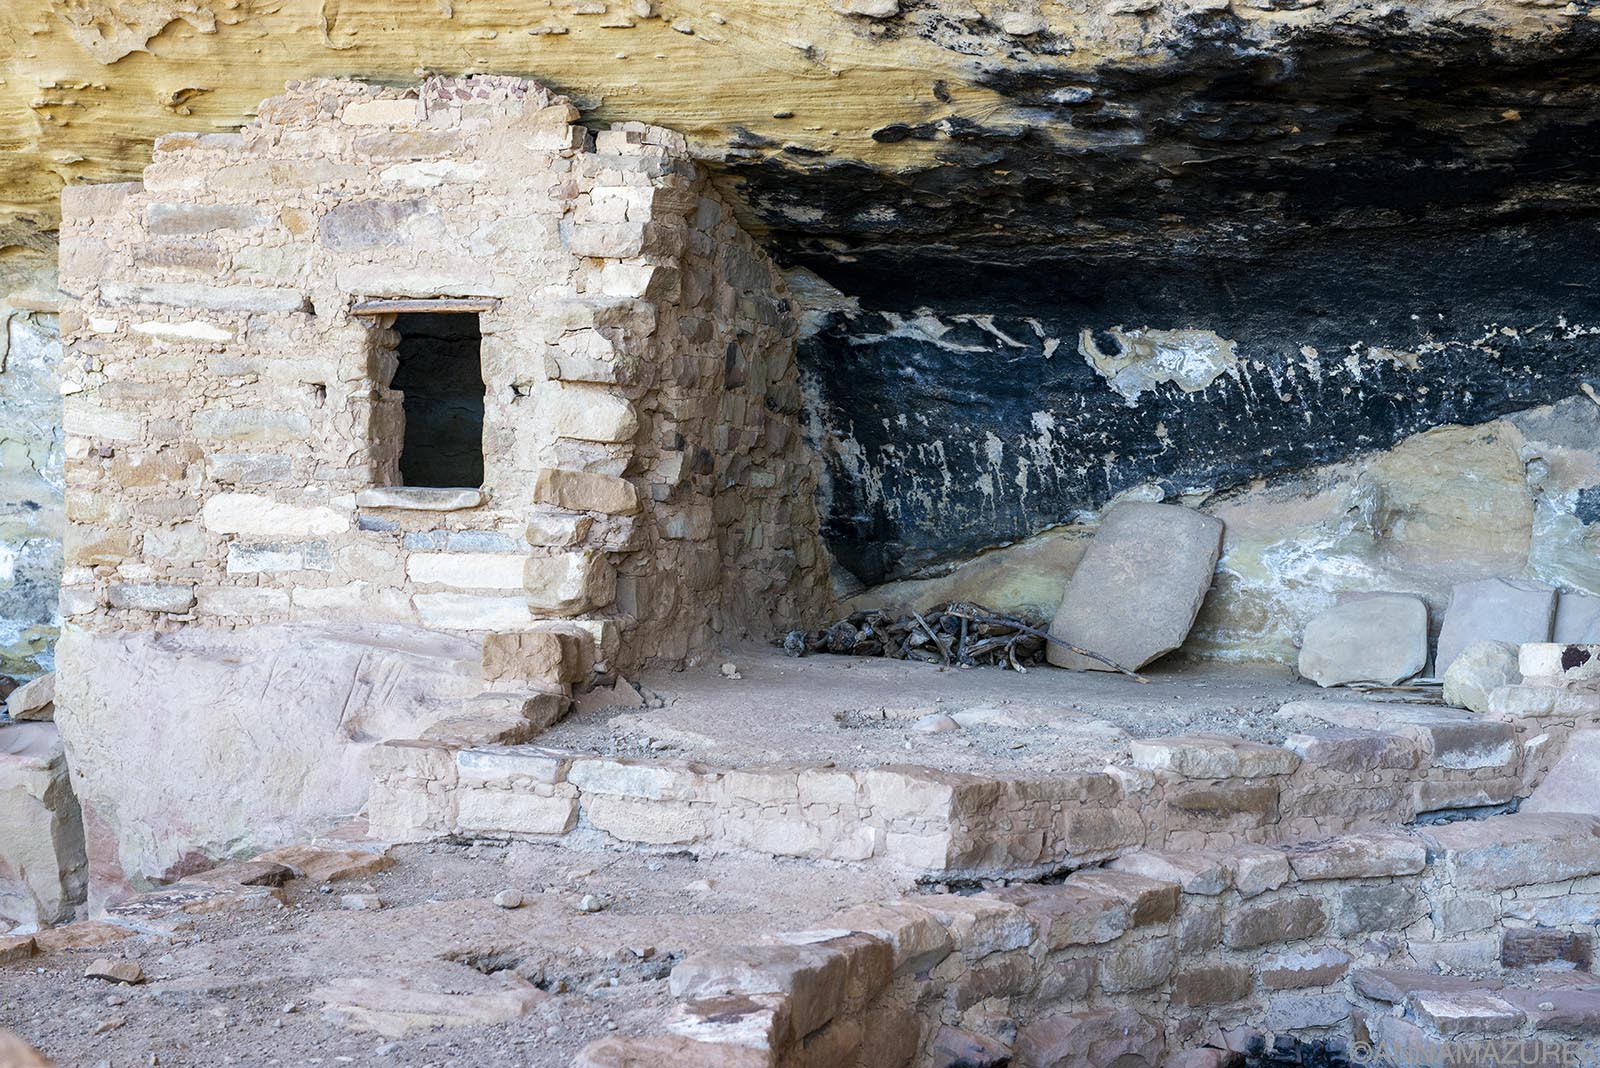 Mug House on Wetherill Mesa // The cliff dwellings are all made with rocks and mud mortar. The roofs were made of wood and covered in a layer of dirt. The black areas in the caves were the result of fires from the kitchen areas. Camera Settings: f/7.1 @ 1/250, ISO 650, 60mm with a 24-70mm lens.
Step House is the only cliff dwelling that’s publicly accessible for a free self-guided tour. A handful of other dwellings are open for either ranger-assisted or ranger-guided tours for $8-45/person, which trust me is worth it, especially for photography. The only way to get detailed shots of the dwellings is to do a tour, which books up fast and reservations open at 8 a.m. MST 14 days before the date. (I was literally on my computer when the clock it 8 a.m. to book my tours! Each tour only had 10 spots!)
The dwellings that are open for tours varies each year, so check the park website for updates. I toured Square Tower House in the morning and Mug House in the afternoon. (Both were $25 each.) I highly recommend both but loved Square Tower House the most. Read the details for the tour carefully as some require climbing ladders on the trail.
More tours are offered during the summer, which is also the busiest season so expect crowds. Other sites available for tours are Long House and Spring House, which is an eight-mile full-day tour only offered four times this summer. There are other sites available for limited dates, which vary each year. For more information on guided tours, visit the NPS website.
Is there cell service in Mesa Verde National Park?
Cell service is non-existent in most parts of the park. Download offline maps before visiting the park. Keep in mind that it’s a 45–60-minute drive from the entrance to the main sites.
What’s the best time to visit Mesa Verde National Park?
Spring (May) and fall (September and October) are the best time to visit for weather and to avoid the crowds. Most cliff-dwelling tours are open during these dates. Summer means more daylight but more crowds and often intense heat. (There’s not a lot of shade in the park.) The park is open in winter but facilities are limited and snow can make things hard to access. (I visited in mid-May and highly recommend that time of year.)
Where to stay at Mesa Verde National Park?
The most budget-friendly option is the Morefield Campgrounds (all services open May to September in addition to limited October options) in the park, which has direct access to some of the best hiking trails that are focused more on scenery than cliff dwellings. The Far View Lodge (starting at $146/night) is an excellent location in the park for photography because it’s close to attractions and located past the scariest portions of the road.
There’s a plethora of other camp and RV sites including a KOA and most hotel brands available on the way to the park or in the city Cortez, which is just a 10–15-minute drive from the park entrance. I stayed at the Hampton Inn in Cortez, which was cheaper and rated higher than the Far View Lodge. (Prices vary by season.) I brought my own food to cut costs, so I didn’t eat out at all.
This post originally appeared online in 2021; it was recently updated in February 2025 to include current information.